
Imagine you’re a chef, crafting the perfect digital dish—your website. Now picture Google’s search bots as your panel of expert food critics, ready to give you feedback on what’s working and what needs improvement. That’s exactly what Google Search Console (GSC) does for your website.
It helps you understand how your site performs in search results, identifies issues that might be holding you back, and gives you the tools to make improvements.
In this guide, we’ll explore Google Search Console from top to bottom—without jargon, without unnecessary fluff. Just clear explanations, step-by-step instructions, and practical insights you can apply immediately. Let’s get started.

Quick Links
Why Google Search Console Matters (and Why You Should Care)
Let’s be honest—SEO is tough. It’s a competitive arena where only the most optimized websites rise to the top. If you’re not using Google Search Console (GSC), you’re navigating the digital landscape without a map—hoping your site somehow climbs the search rankings. But hope won’t cut it.
Here’s why GSC is absolutely essential for your SEO efforts:
- It shows you how Google views your website—every strength and every flaw.
- It reveals which keywords drive traffic to your site (and which aren’t performing).
- It alerts you to technical issues before they impact your rankings.
- It helps you optimize for mobile—crucial, as Google prioritizes mobile-friendly sites.
- And it’s completely free—there’s no reason not to use it.
In short, Google Search Console is the essential tool that guides your SEO strategy. It’s not a “nice to have”—it’s a non-negotiable.
Setting Up Google Search Console: Your Step-by-Step Playbook
Let’s tackle the setup process quickly and efficiently, so we can move on to the important parts.
Step 1: Sign Up and Add Your Property
Open Google Search Console and sign in with your Google account (preferably the same one you use for Google Analytics). Once logged in, you’ll find two options to add your website:

-
Domain property (recommended): Covers everything—all subdomains, all protocols (http/https).
-
URL prefix: Tracks only the exact URL and path you enter.
If you’re serious about SEO, go with the Domain option. It’s more robust.
-
Select the “Domain” option (not the URL prefix).

-
Enter your full domain name (e.g.,
example.com) withouthttporhttps. -
Click Continue to proceed.

Step 2: Verify Your Ownership
Google wants proof that you actually own the site you’re adding. Verification options:
-
DNS TXT Record (for Domain): Add a TXT record in your domain registrar (like GoDaddy or Namecheap).

-
HTML File Upload: Upload a special file to your server.
-
HTML Meta Tag: Add a snippet to your website’s <head> section.
-
Google Analytics/Tag Manager: If you’ve already set these up, you can verify through them.
Tip: DNS verification is the cleanest, especially if you’re managing multiple subdomains.
Step 3: Explore Your Dashboard
Once verified, GSC will start collecting data. It won’t show you past data, so give it a few days to populate.
The Google Search Console Dashboard: Your Command Center Explained
Let’s break down the dashboard in a clear and structured way.
Overview Tab
This tab provides a quick snapshot of your website’s overall SEO health. It displays data related to performance, coverage, and enhancements—like a comprehensive report card that helps you assess your site’s current status.
Performance Report
The Performance Report in Google Search Console provides crucial insights into how your website performs in search results. It includes the following metrics:
-
Total Clicks: The total number of times users clicked on your website from search results.
-
Total Impressions: How often your website appeared in search results.
-
Click-Through Rate (CTR): The ratio of clicks to impressions, indicating how often users clicked on your site after seeing it.
-
Average Position: The average ranking position of your website in search results across all queries.
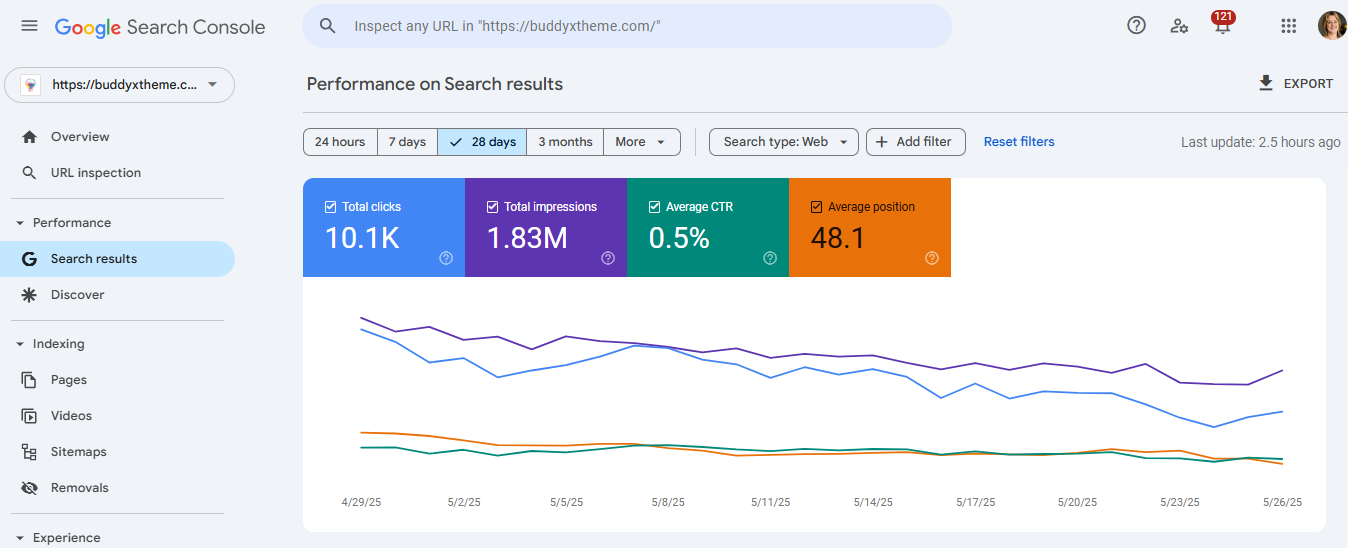
To review these metrics for your website, navigate to the Search Results section in the left-hand menu of Google Search Console.
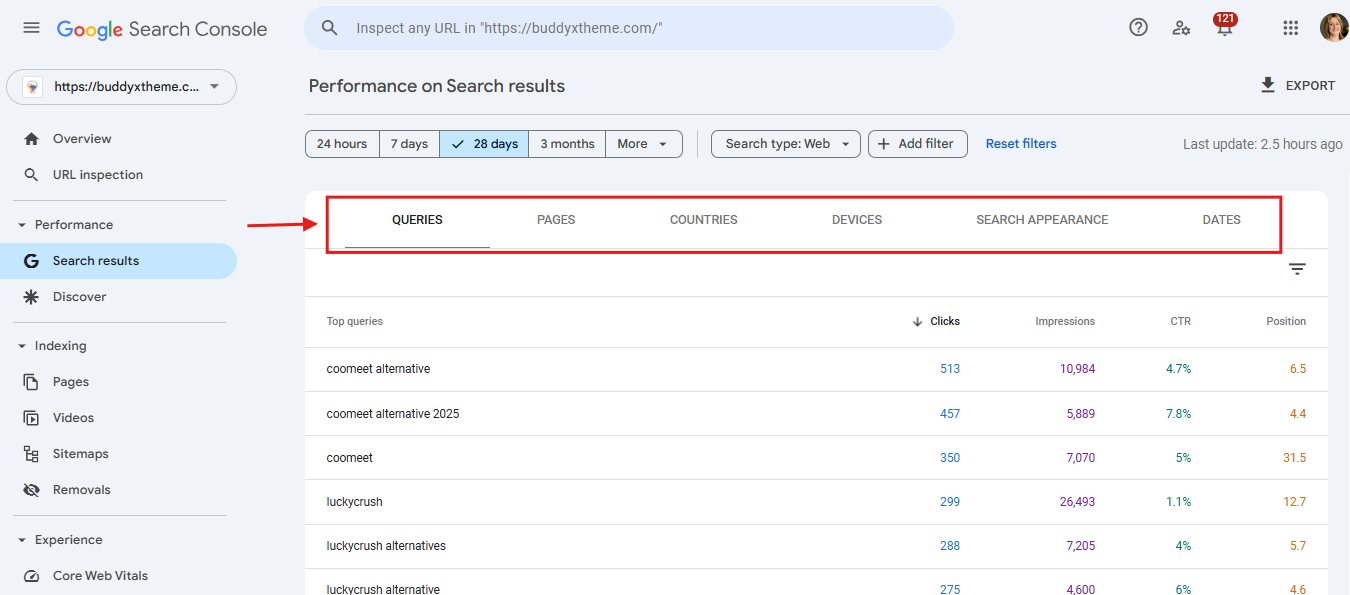
You can filter this data by page, country, device, and search query, helping you analyze performance from different angles and uncover optimization opportunities.
Here are two important aspects to focus on when analyzing your Google Search performance data:
-
Low Click-Through Rate (CTR): If your pages are ranking well but not receiving many clicks, it may indicate that your title tags and meta descriptions are not compelling enough. Consider revising them to make your listings more attractive and relevant to users, which can encourage more clicks.
-
Missing Keywords: If you are not ranking for key search terms, it could mean that your website lacks relevant content covering those topics. This highlights a gap in your content strategy. To address this, focus on creating high-quality, informative content that targets important keywords relevant to your audience and business goals.
URL Inspection Tool
Want to know how Google sees a specific page? This is your crystal ball. Enter a URL, and GSC will tell you if it’s indexed, when it was last crawled, and whether there are issues.

Bonus tip: Request indexing for new or updated pages here.
To check the index status of a specific page, enter the full URL in the URL Inspection Tool search bar within Google Search Console and press Enter.

By reviewing this information, you can ensure your important pages are indexed, discover any potential problems, and make informed decisions to improve your website’s visibility in search.
Page Indexing Report
The Page Indexing report, found under the Indexing section in Google Search Console, provides a detailed overview of the pages Google has successfully indexed, as well as those that have not been indexed. It also highlights any issues that may be preventing proper indexing.
The report breaks pages down into:
- Valid: All good!
- Errors: Big problems. Fix them now.
- Valid with Warnings: Needs attention.
- Excluded: Pages Google didn’t index—on purpose or by accident.
Indexing is critical because only indexed pages can appear in Google’s search results. Therefore, identifying and resolving any indexing problems is essential to ensure your site is visible to users.
To access the report, go to Indexing > Pages in the left-hand menu.

Here, you’ll find two tabs that show:
-
The total number of pages that are indexed.
-
The total number of pages that are not indexed.
This data helps you monitor your website’s indexing status and take action when necessary.
If you observe a sudden decrease in the number of indexed pages, it may indicate an issue that requires your immediate attention.

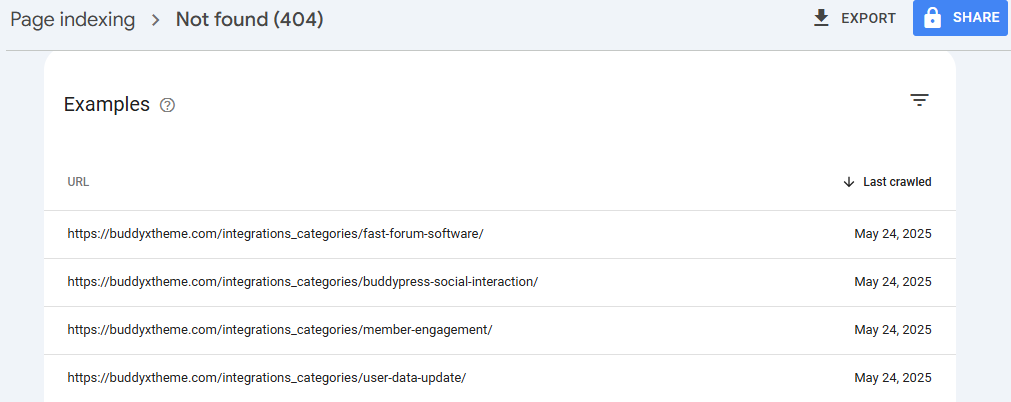
Scroll down to view detailed reasons why certain pages were not indexed.
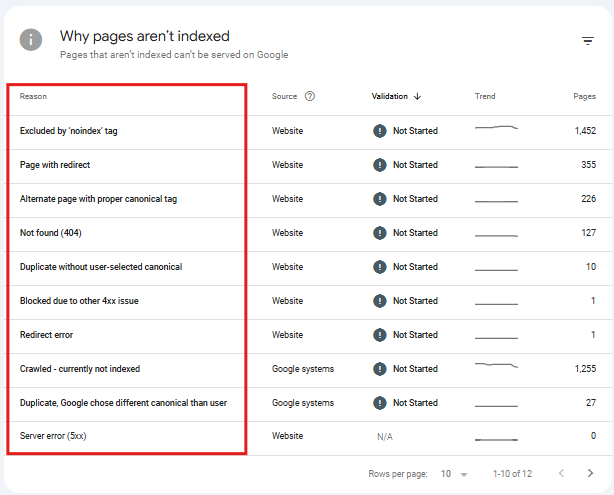
There are several reasons why some of your pages might not be indexed.
For instance, a page might be returning a “Not found (404)” error, or it could be excluded because of an accidentally added “noindex” tag.
This report helps you identify and understand these issues.
To investigate a specific reason, simply click on an entry in the Reason column.
You will see a list of the pages affected by that particular issue.
At the top, you’ll also find a link to detailed guidance on how to resolve the issue.
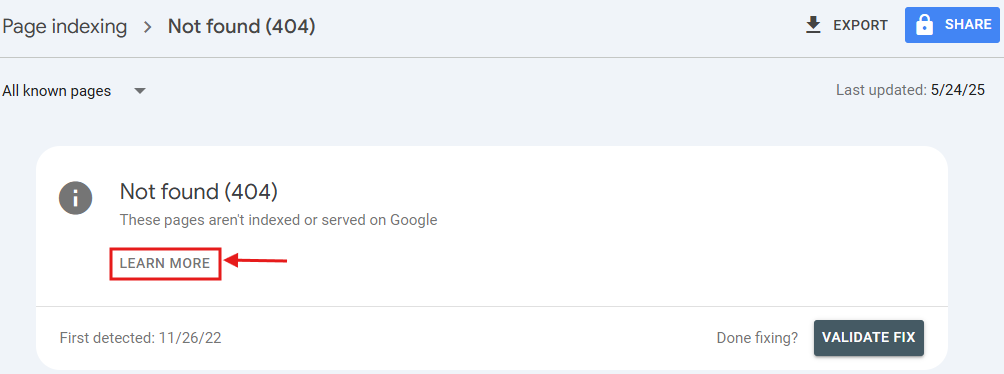
Once you’ve applied the necessary fixes, click the Validate Fix button to notify Google of the changes. This can prompt Google to reprocess the pages and, ideally, index them successfully.
Sitemaps Report
The Sitemaps report shows a history of your submitted sitemaps and highlights any errors or issues that may prevent proper indexing.
To access this report, click on Sitemaps in the left-hand menu.

Upload your sitemap here to guide Google’s crawling efforts. A sitemap is like a table of contents for your website.
The Sitemaps report provides key details about your sitemap submissions, including:
-
URL: The address of the sitemap you submitted.
-
Type: The sitemap format (such as XML, RSS, or Atom).
-
Submitted: The date the sitemap was first submitted to Google.
-
Last Read: The most recent date when Google accessed the sitemap.
-
Status: The current crawl status (for example, “Success,” “Has errors,” or “Couldn’t fetch”).
-
Discovered Pages: The total number of pages Google has found through the sitemap.
Reviewing this information regularly ensures that your sitemap is being processed correctly and helps you spot any potential issues early on.

Ensure that the Status column shows “Success.” This indicates that your sitemap has been processed correctly and without any errors.
If the status is anything other than “Success,” here’s what it could mean and how you should proceed:
-
Has Errors: There are issues with your sitemap. Review the error messages provided, and refer to Google’s documentation for guidance on resolving them.
-
Couldn’t Fetch: Google Search Console was unable to retrieve your sitemap. To troubleshoot, use the URL Inspection tool and perform a live test of the sitemap URL to identify the issue.
Clicking on your sitemap entry will open a detailed report specific to that sitemap submission. This allows you to review any warnings or errors in detail and take appropriate action to resolve them.

Clicking the See Page Indexing button (highlighted above) will take you directly to the Page Indexing report for that particular sitemap.
Removals
The Removals section in Google Search Console allows you to request the temporary removal of specific URLs from Google’s search results. It’s a powerful tool for site owners who need to manage sensitive or outdated content that shouldn’t appear in search results anymore.
This feature can be especially useful in the following situations:
-
If you’ve removed a page from your site but it’s still appearing in search results.
-
If a page contains sensitive information that needs to be hidden immediately.
-
If you’ve updated or replaced content and want to prevent users from accessing the outdated version.
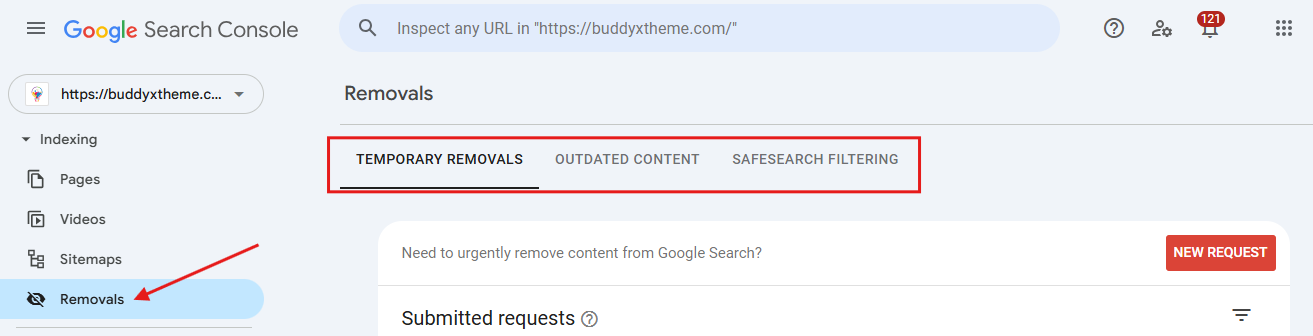
To access this feature, navigate to Removals from the left-hand menu in Google Search Console. You’ll find three key tools within this section:
Temporary Removals
This allows you to temporarily block a page from appearing in Google’s search results. Keep in mind that the removal is not permanent; it typically lasts around six months, giving you time to make any necessary changes to your site.
Outdated Content
This tool lets you request the removal of search results that contain outdated information. It’s particularly helpful when you’ve already updated the content, but the old version still appears in search results or in cached pages.
SafeSearch Filtering
This option allows you to request the removal of content from search results if it’s considered explicit or adult in nature.
Important Notes:
-
Submitting a removal request does not delete the page from your website or Google’s index entirely. It only hides the page temporarily from search results.
-
For permanent removal, you must also delete the page from your site, use a noindex tag, or block it in your robots.txt file.
-
Always review your site’s structure and internal links after submitting a removal request to ensure users and search engines aren’t being led to the removed content.
By understanding how to use the Removals section effectively, you can better control what appears in Google’s search results and ensure that your site’s visibility reflects the most accurate and relevant content.
Page Experience Report
The Page Experience report offers valuable insights into how users interact with your website, focusing on the overall quality of their experience.
This report evaluates your site using three key factors:
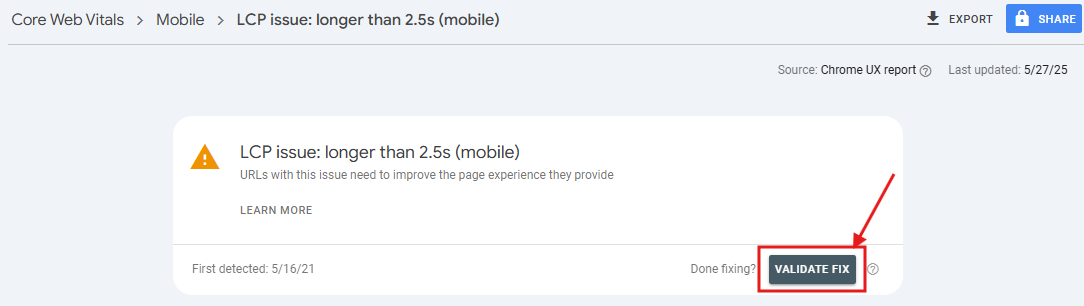
Core Web Vitals: These are Google’s metrics for assessing a webpage’s loading performance, interactivity, and visual stability.

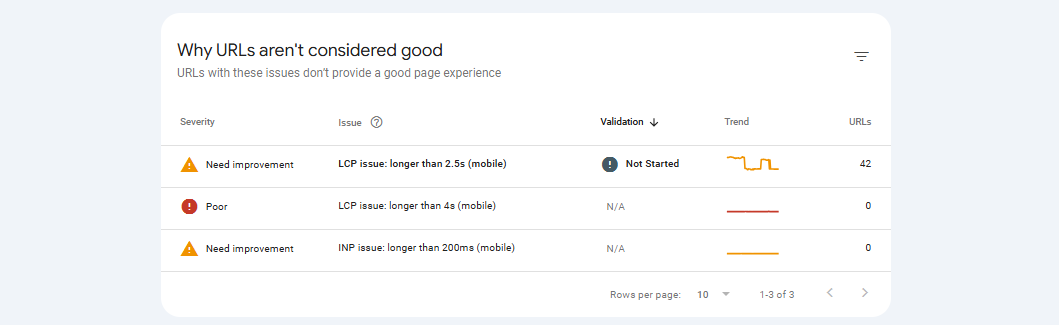
Here, we can see that 42 URLs have failed the Core Web Vitals assessment due to high Largest Contentful Paint (LCP) load times.

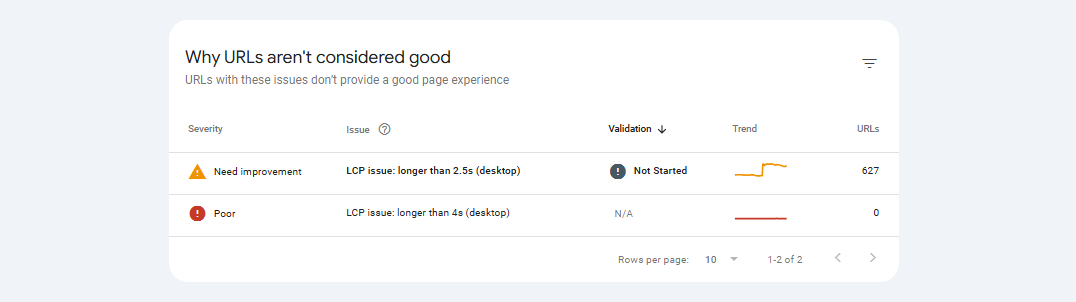
Here, we can see that 627 URLs have failed the Core Web Vitals assessment due to high Largest Contentful Paint (LCP) load times.
-
Click to see which pages are affected by the LCP issue.
-
Fixing Core Web Vitals issues usually requires the help of a developer, unless you’re highly skilled in technical SEO.
-
After resolving the problem, notify Google by clicking the “VALIDATE FIX” button at the top of the error report. This signals Google to review the changes you’ve made.
Enhancements Report
The Enhancements report displays details about any structured data Google has detected on your website—and highlights any issues that may exist.
Structured data helps Google better understand your pages by providing additional context. It also allows Google to display rich results in search listings, which can potentially boost your click-through rates (CTR).
You’ll find the types of structured data detected by Google listed under the “Enhancements” section in the sidebar.

Click on a specific structured data type—like “Breadcrumbs”—to view a detailed report.
The report shows whether there are any problems by listing the number of “Invalid” items. Ideally, the count of invalid items should be zero.
If there are any issues, the affected pages won’t be eligible to appear as rich results in search results, which could impact visibility.
Security Issues and Manual Actions
If your site gets hacked or penalized by Google, this is where you’ll find out. Fingers crossed you never see anything here! Google issues a manual action when a website violates its spam policies.
If your website has a manual action, it may drop significantly in rankings or stop appearing in Google search results entirely. This can result in a major loss of traffic and visibility.
To check if your website has been affected, go to the “Manual Actions” report in Google Search Console. This report will tell you if your site has any manual actions applied.
If you see no issues listed, you’re in the clear. If you do see a manual action, it’s important to follow Google’s recommendations to resolve the problem.
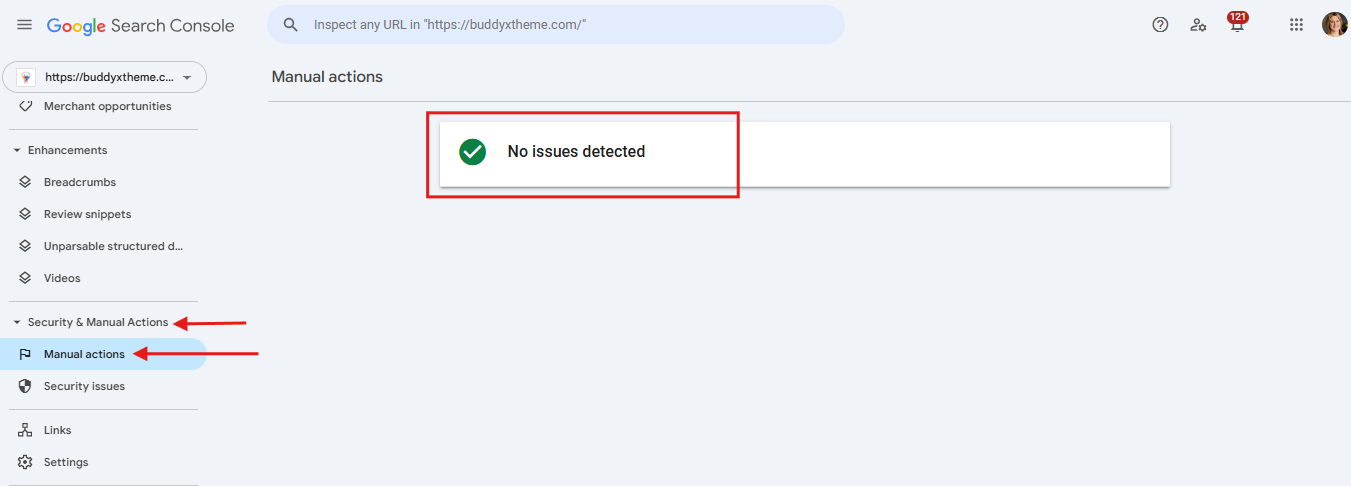
If the report displays “No issues detected,” there’s no action required from your side.
However, if you encounter “Issues detected,” it indicates a critical problem that needs your immediate attention. You must resolve each issue without delay to avoid further impact on your site’s visibility.
For detailed guidance on how to handle specific penalties, refer to Google’s official guide on the Manual Actions Report.
Links Report
The Links report provides an overview of the backlinks pointing to your website—these are external links from other domains that direct traffic to your site.
Backlinks are a key factor in Google’s ranking algorithm, as they indicate authority and relevance.
To access the Links report, navigate to the Links section from the sidebar in Google Search Console.

At the top of the report, you’ll see the total number of backlinks pointing to your site.

Below that, you’ll see a list of your top linked pages—those receiving the highest number of backlinks. You’ll also find a list of the websites that link to you the most.

You’ll also see which websites are linking to you the most.


The “Links” report also provides details on your internal links—the links from one page on your site to another.
Internal links are essential for SEO because they:
- Help both users and search engines navigate your site more easily
- Pass authority to other pages on your site, which can boost their rankings
You’ll find the internal link data on the right side of the report.
It includes the total number of internal links and a list of the top linked pages.

Pro Tips to Supercharge Your GSC Game
Looking to step up your game? Here are some advanced tips:
- Compare Time-periods: Use the date filter to see trends. Are clicks up or down compared to last month?
- Filter by Device: See how mobile vs. desktop users behave.
- Geo-Targeting: Use the country filter to tailor content for specific regions.
- Track Core Web Vitals: Google cares about page speed. Check the Enhancements tab and improve metrics like LCP (Largest Contentful Paint) and CLS (Cumulative Layout Shift).
- Request Indexing: Updated a page? Use the URL Inspection tool to get it indexed faster.
- Integrate with Google Analytics: Combine GSC and GA4 data to view traffic, behavior, and conversions.

Taking Action with Google Search Console
Google Search Console is an indispensable tool for anyone looking to enhance their website’s search results performance. By understanding and regularly monitoring key metrics such as clicks, impressions, CTR, and average position, you can make informed decisions to optimize your content and SEO strategies.
Remember to:
- Regularly review the Performance report to track your site’s visibility and engagement.
- Use the Index Coverage and URL Inspection tools to ensure your content is accessible to search engines.
- Monitor Mobile Usability and Core Web Vitals to provide a seamless user experience.
- Leverage Enhancements reports to implement structured data and enhance your search presence.
By proactively utilizing the insights provided by Google Search Console, you can drive more organic traffic to your site and achieve your digital marketing goals.
Interesting Reads:
How to Do YouTube SEO the Right Way
Top 10 TextNow Alternatives and Competitors for Free Calling and Texting

