
Shipping is one of the most critical aspects of running an online store. Customers expect fast delivery, real-time tracking, and affordable shipping options—and they want all of this without hidden costs or complicated checkout processes. As a WooCommerce store owner, you probably know that managing shipping manually can quickly become overwhelming, leading to delays, errors, and unhappy customers. That’s where learning how to integrate Shippo with WooCommerce steps in as a game-changer.
By integrating Shippo with WooCommerce, you can unlock discounted shipping rates, print labels with a single click, and send automatic tracking updates—all without leaving your dashboard. The result? A smooth and stress-free shipping process that delights your customers and gives you more time to focus on growing your business.

Quick Links
Why Integrate Shippo with WooCommerce?
Think of Shippo as your all-in-one shipping assistant. It’s a trusted platform used by thousands of eCommerce businesses worldwide. With Shippo, WooCommerce store owners can:
- Access exclusive discounted rates from carriers like USPS, FedEx, UPS, and DHL.
- Display accurate shipping costs at checkout so there are no surprises.
- Validate shipping addresses before payment to reduce costly delivery errors.
- Print professional shipping labels directly in WooCommerce.
- Automatically send tracking information to customers so they’re never left wondering.
Instead of juggling multiple carrier logins or struggling with complicated shipping rules, integrating Shippo with WooCommerce keeps everything under one roof. That means more time saved, fewer headaches, and happier customers.
Getting Started with Shippo Setup
Before diving in, make sure your WooCommerce store is active and running smoothly. You’ll also need to download the Shippo plugin ZIP file so the installation process is quick and hassle-free.
Step 1: Install and Activate the Shippo Plugin

Getting the plugin up and running is simple:
- Log in to your WordPress dashboard.
- Head to Plugins → Add New.
- Click the Upload Plugin button.
- Choose the plugin ZIP file you downloaded earlier.
- Hit Install Now.
- Once the installation finishes, click Activate.
Just like that, the plugin is active and ready for setup.
Step 2: Connect Shippo to Your WooCommerce Store
Now let’s link your WooCommerce store to your Shippo account:
- Navigate to WooCommerce → Settings → Shipping → Shippo.
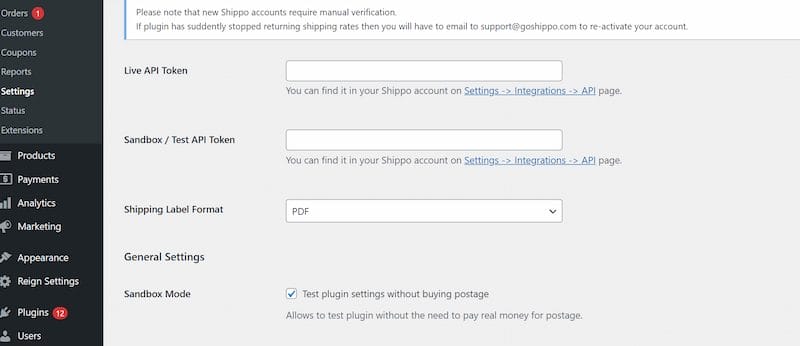
- Enter your Shippo API credentials (you’ll find these in your Shippo dashboard).
- Save your settings.
This secure connection ensures your store communicates with Shippo, giving you access to live rates and label printing.
Step 3: Configure Shipping Zones and Rates

WooCommerce uses shipping zones to decide where you ship and which options apply. With Shippo, these zones can display live carrier rates instantly.
Here’s how to set them up:
- Go to WooCommerce → Settings → Shipping.
- Add or edit a shipping zone (e.g., Domestic, International, Regional).
- Enable Shippo as the shipping method.
- Decide whether you want to show all carrier options or just the cheapest one for simplicity.
This keeps checkout clear and transparent for your customers.
Step 4: Enable Shipping Label Printing
Shippo makes order fulfillment faster by letting you print labels right inside WooCommerce:
- Open the WooCommerce Orders page.
- Select an order and click Print Label with Shippo.
- Set your default label size, format (PDF or ZPL), and printer preferences.
No more copy-pasting details into multiple carrier websites—it’s all handled in one place.
Step 5: Automate Tracking Notifications
Customers appreciate knowing exactly where their package is. Shippo takes care of this automatically:
- In the plugin settings, enable tracking notifications.
- When a label is generated, Shippo sends an email with the tracking number.
This proactive approach builds customer trust and cuts down on those “Where’s my order?” emails.
Step 6: Test Your Setup
Before going live, it’s smart to run a quick test:
- Place a test order on your store.
- Make sure the correct rates appear at checkout.
- Confirm that labels generate without issues.
- Check that tracking emails are sent automatically.
A few minutes of testing now can save you hours of troubleshooting later.
Key Features of the Shippo WooCommerce Plugin
With Shippo, you get access to powerful features like:
- Support for over 50 carriers worldwide.
- Real-time rates are shown directly at checkout.
- Address validation to avoid failed deliveries.
- Flexible adjustments for handling fees or currency conversions.
- Insurance and signature confirmation options.
- Debug mode for easy troubleshooting.
- Label printing from the WooCommerce dashboard.
- Automatic tracking notifications for customers.
Best Practices for Using Shippo with WooCommerce
To get the most from your Shippo integration, try these tips:
- Define clear shipping zones to prevent confusion and unexpected charges.
- Offer different delivery choices so customers can pick speed or savings.
- Turn on address validation to avoid costly mistakes.
- Use caching for rates to speed up the checkout process.
- Track shipping performance using WooCommerce reports to refine your strategy.
Advanced Tips for Optimizing Shippo
If you want to go beyond the basics, there are several advanced ways to optimize your shipping workflow. For example, you can set custom package sizes to cut down costs, add insurance to high-value products, and experiment with free shipping thresholds to encourage larger purchases.
You might also create custom rules for specific product categories, offer eco-friendly packaging as a way to stand out, or even schedule carrier pickups to save time on fulfillment. These practical adjustments may seem small, but together they can greatly improve customer satisfaction, streamline your processes, and make your overall shipping strategy far more efficient.
Also Read: How to Configure Sequential Order Numbers for WooCommerce
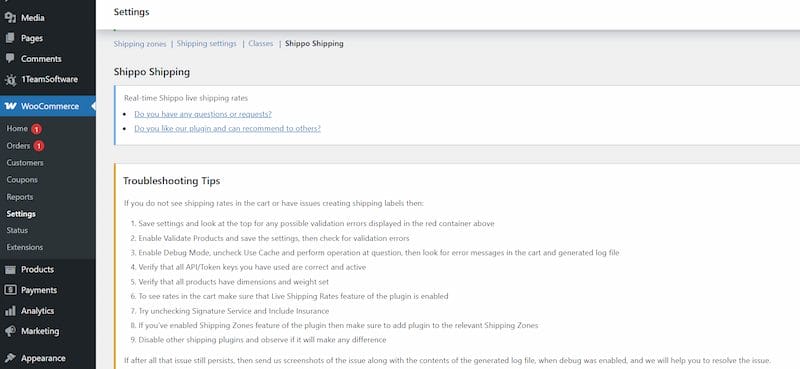
Troubleshooting Common Issues
Even with a solid setup, hiccups can happen. If you run into issues like incorrect rates, missing labels, or failed API connections, there are several things you can try. Start by turning on the plugin’s debug mode to identify errors and double-check your Shippo API keys for accuracy. Reviewing your shipping zone settings is another good step, along with clearing cached rates to refresh checkout pricing.
If you suspect plugin conflicts, temporarily disable other shipping extensions, and always make sure WooCommerce is updated to the latest version. If problems continue, consult the plugin’s documentation or contact Shippo’s support team—they’re quick, responsive, and very helpful.
Security and Data Protection with Shippo
When dealing with shipping and customer information, data security should be a top priority. Shippo uses secure API connections to ensure your customers’ details are protected during transactions. It also complies with international data handling standards, giving you peace of mind when managing sensitive information.
The plugin is regularly updated to address new security concerns, meaning your store is always equipped with the latest protections. By integrating Shippo with WooCommerce, you not only streamline operations but also build trust, safeguard sensitive customer data, and protect your business reputation.
Customer Experience Benefits
A seamless shipping process isn’t just about saving your team time—it’s about creating a smooth, reliable experience for your customers. With real-time rates, automated notifications, and faster label printing, customers feel informed and confident about their purchases. When buyers know exactly what to expect, they’re more likely to trust your brand and recommend it to others. A positive shipping experience often leads to repeat orders, stronger loyalty, and even word-of-mouth referrals that help grow your business naturally.

Why Integrating Shippo with WooCommerce is a Game-Changer
Learning how to integrate Shippo with WooCommerce can completely transform the way you manage shipping. From saving on carrier rates to automating tracking emails, the plugin removes stress from fulfillment and creates a polished customer experience. It also improves accuracy, reduces the risk of failed deliveries, and helps you scale confidently as your store grows.
👉 Ready to take your WooCommerce store to the next level? Explore our Custom WooCommerce Development Services and see how we can tailor solutions to your business.
Interesting Reads
15 Best Cloud Managed Data Center Services in 2025

