
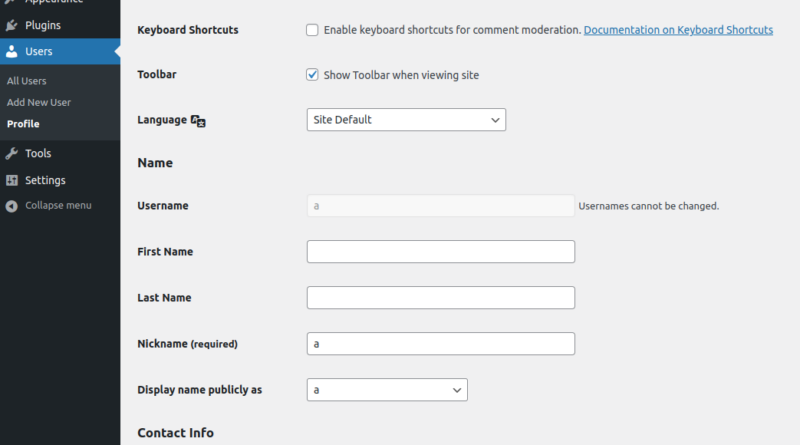
WordPress will happily let you change almost anything about your account, your display name, your email, your password, your bio, right up until you try to change the one thing most people actually mean when they say “change my username”: the login name itself. That field is locked in the standard profile screen, permanently grayed out, and it trips up more site owners than almost any other WordPress quirk. This isn’t a bug. It’s a deliberate design decision, and understanding why makes the workarounds below much less confusing.
Why WordPress won’t let you edit this one field
The username, technically stored as user_login in the database, is used internally as a foreign key across dozens of tables. Every post you’ve ever authored, every comment you’ve approved, every piece of content tied to your account references your numeric user ID, not your username directly, so on the surface a rename should be harmless. The real risk is elsewhere: plugins, custom code, and some themes occasionally store the literal username string rather than the ID when doing lookups, caching, or displaying author information. Renaming the field directly, with no safety checks, could silently break those references on a site running unpredictable third-party code. WordPress core’s answer was simpler than trying to audit every possible edge case: don’t allow the edit at all, and let site owners choose a deliberate workaround instead.
That’s worth sitting with for a second, because it reframes the whole task. You’re not looking for a hidden setting. You’re choosing between three genuinely different workaround strategies, each with its own tradeoffs, and picking the wrong one for your situation is more likely to cause a headache than the change itself.
First, know what you’re actually changing
WordPress profiles carry three separate identity fields that get conflated constantly, and confusing them is the single most common source of wasted effort here:
Username (login name). What you type on the login screen. This is the field that’s locked, and the only one that requires one of the three methods below.
Nickname. An internal label you can already edit freely on the Profile screen, no workaround needed.
Display name. What visitors actually see on published posts as the byline. Also freely editable right now, and it can be set to your nickname, your full name, your first name, or a handful of other combinations from a dropdown.
Here’s the part that saves a lot of people real time: if your actual goal is “I don’t want strangers seeing my real username publicly, and I want a more professional byline on my posts,” you don’t need any of the three methods in this article at all. Just update your display name under Users, then Profile, then “Display name publicly as.” That alone hides your login name from public view without touching the database or creating a new account. The workarounds below are only necessary if you specifically need the login credential itself, the string you type to authenticate, to change.
Method 1: Create a new admin account and migrate
This is the safest method for most site owners because it uses only WordPress’s native dashboard, no database access and no third-party plugin required.
- Back up first. Before touching user accounts on a live site, this is the moment to actually confirm your backup is current, not just assume it exists. If you’re not confident in your current setup, a look at WordPress backup plugin options is worth five minutes before proceeding.
- Go to Users, then Add New. Create a fresh account with your desired new username, a real email address different from your current admin account’s email (WordPress requires unique emails per user), and set the role to Administrator.
- Log out and log back in as the new user. Confirm the new account works correctly and has full admin access before doing anything else, this is not a step to skip or rush.
- Return to Users and select the old account for deletion. WordPress will prompt you with two options: delete all content associated with that account, or attribute all of its content to another existing user. Choose “Attribute all content to” and select your new account from the dropdown. This single step is the one people miss when doing this manually without the built-in delete flow, it’s what prevents every post and comment tied to your old username from either disappearing or becoming orphaned.
- Confirm the deletion. Your posts, pages, and any custom content types now show your new account as the author, and the old username no longer exists.
The entire process typically takes under ten minutes on a small to medium site. The one real limitation: any content genuinely authored under the old ID becomes attributed to a “different” author from a data standpoint, even though the actual writing didn’t change, which matters if you’re relying on author-level analytics or bylines tied to publish history rather than just display name.
Method 2: A dedicated username-change plugin
Several small, single-purpose plugins exist specifically to unlock the username field directly in the profile screen, avoiding both the account-recreation dance above and the database editing below. The workflow is close to identical across them: install, activate, the username field becomes editable on your profile page, type the new value, save, then deactivate and delete the plugin once you’re done, there’s no reason to leave a username-editing tool active on a live site longer than the few minutes it takes to make the change.
This is the middle-ground option, faster than the account recreation method since there’s no need to reassign content, and safer than editing the database directly since the plugin handles the update through WordPress’s own functions rather than a raw SQL edit. The tradeoff is installing and trusting a small third-party plugin, even briefly, so stick to options from the official WordPress.org plugin directory with recent updates and a reasonable number of active installs rather than an obscure, unmaintained alternative.
Method 3: Editing the database directly
This is the most direct method and the one to reach for only if you’re comfortable in phpMyAdmin or a similar database tool, since there’s no undo button once you save a raw database edit incorrectly.
- Back up the database specifically, not just files, before opening phpMyAdmin. Most hosting control panels let you export a full SQL dump in under a minute, and skipping this step is the single riskiest shortcut on this whole list.
- Log into phpMyAdmin through your hosting control panel and select your WordPress database from the left sidebar.
- Open the wp_users table (your table prefix may differ from the default “wp_” if it was customized during installation, check wp-config.php if you’re unsure).
- Find your account’s row and click Edit, then locate the user_login column specifically, not display_name or user_nicename, which are different fields entirely and won’t affect your login credential.
- Replace the value with your new desired username and save the change.
- Log out of WordPress entirely and log back in using the new username. Your password stays the same, only the login name changes.
A detail that trips people up here: the user_nicename column, which drives your author archive URL (yoursite.com/author/username/), does not update automatically when you change user_login. If you want your public author URL to match your new username too, you’ll need to update user_nicename in the same row, or leave it as-is if you don’t mind the slug staying tied to the old value. Neither choice breaks anything, it’s purely a cosmetic decision about whether your author page URL matches your current login name.
What doesn’t get affected by any of these methods
A few things worth confirming stay untouched regardless of which method you choose, since they occasionally cause unnecessary panic. Your password is completely independent of your username and is never altered by any of the three methods above unless you deliberately change it separately. Your existing posts, media uploads, and comment history stay attached to your account (via Method 1’s content reassignment or automatically via Methods 2 and 3, since the user ID itself never changes, only the login string tied to it). And any active login sessions, whether yours or another admin’s, will simply need to log back in with the updated credential, nothing about site functionality breaks in the interim.
A word on why “admin” specifically is worth changing
If the reason you’re here is that your username is literally “admin,” this is worth doing sooner rather than later, and not for cosmetic reasons. Automated brute-force login attempts against WordPress sites overwhelmingly guess “admin” as the first username to try, pairing it with a list of common passwords. A unique, non-obvious username doesn’t make your site invulnerable, but it does remove the free first guess that a huge share of automated attacks rely on. Pairing a username change with login attempt limiting and keeping everything updated, covered in more depth in a broader look at ongoing WordPress maintenance practices, closes off the easiest, laziest attack path rather than eliminating risk entirely, which no single change can do.
What happens on a WooCommerce or membership site
If your site runs WooCommerce, a membership plugin, or anything else that ties customer or member accounts to WordPress users, the same underlying principle applies: the numeric user ID is what actually matters to the system, not the login string. Order history in WooCommerce, for example, is stored against the user ID, so a customer or admin changing their username through Method 1 or Method 2 doesn’t disconnect them from past orders. Method 3, the direct database edit, carries slightly more relative risk here only in the sense that any raw database change on a site with commerce data deserves extra caution and a fresh, verified backup, not because the username field itself behaves differently.
One thing worth checking regardless of platform: if any custom code, a theme functions.php snippet or a bespoke plugin built specifically for your site, queries users by username string rather than by ID (get_user_by(‘login’…) instead of get_user_by(‘ID’…)), that specific piece of code would need a matching update after a rename. This is uncommon in well-built plugins and themes, which almost always use the ID internally, but it’s worth a quick check of any custom functionality your developer added if the site relies on it.
What about multisite networks?
On a WordPress multisite installation, usernames are shared and unique across the entire network, not per individual site, which adds one extra consideration. If you’re a network administrator changing a username via the database method, you’re editing a single row in the shared wp_users table (not a per-site table), so the change applies everywhere that user has access across every site in the network simultaneously. Method 1, the account recreation approach, works the same way it does on a single site, just remember that a new account needs to be added to each individual site within the network separately if the original user had access to more than one.
A short pre-flight checklist
Before starting any of the three methods, a quick mental checklist saves most of the avoidable mistakes people run into:
- Confirm you have a current backup, and that you know how to restore from it if something goes sideways, not just that a backup plugin is technically installed and running.
- Have your new desired username decided in advance, including whether it needs to be all lowercase (WordPress usernames are case-insensitive at login but stored as entered, so consistency avoids confusion later).
- If you’re the only administrator on the site, make sure you’re not locked out of any other admin tools, like your hosting control panel or FTP, in case you need to intervene manually.
- Note down your current username somewhere before you start, obvious as it sounds, it’s a genuinely common mistake to forget the old value once it’s already been changed.
Choosing the right method for your situation
Running a personal blog or small site with a handful of posts? Method 1, the native account recreation approach, is genuinely the least risky, since it uses only built-in WordPress functionality and the content reassignment step is handled for you automatically by the delete-user flow.
Managing a site where recreating the account and reassigning dozens or hundreds of posts feels like overkill? Method 2, a dedicated plugin, gets you an in-place rename without touching a single database table, at the cost of briefly trusting third-party code.
Comfortable in phpMyAdmin and want the most direct, no-plugin-required change? Method 3 works, provided you actually take the backup step seriously rather than treating it as optional, and remember to check whether user_nicename needs updating too if your author URL matters to you.
Frequently asked questions
Will changing my username break my SEO or lose my published posts?
No, as long as you use one of the three methods correctly. Method 1 explicitly reassigns content during the deletion step. Methods 2 and 3 change only the login string while your account’s underlying ID, and everything tied to it, stays the same.
Can I change my username back later if I don’t like the new one?
Yes, all three methods are fully reversible, you’re simply repeating the same process with your preferred value.
Does changing my username also change my email address?
No, these are entirely separate fields. Updating your email is done through the standard Profile screen and doesn’t require any of the methods described here.
Is there a risk to other users on a multi-author site if I change my own username?
Not if you’re only editing your own account’s row or using the account-recreation method on your own profile. Just be careful, if using the database method, that you’ve identified the correct row for your specific account and not a colleague’s.
Why doesn’t WordPress just build this into the profile screen like every other field?
Because the login name is referenced in ways that vary unpredictably across different plugins and custom code, an official one-click rename inside core could silently break things on some sites in ways the WordPress team can’t fully predict or test for. Leaving it as a deliberate, opt-in workaround keeps the responsibility, and the choice of method, with the site owner.
What if I only manage the site for a client and don’t have database access?
Method 1 or Method 2 are the practical choices in that situation, since both work entirely through the standard WordPress dashboard without needing phpMyAdmin or hosting-level access. If you’re not comfortable installing a new plugin on a client site without approval, the account-recreation method needs nothing beyond permissions you already have as an administrator.
The takeaway
Changing a WordPress username isn’t hard, but it’s also not a single button anywhere in the dashboard, and that absence is intentional rather than an oversight. Pick the method that matches your comfort level, take the backup step seriously regardless of which one you choose, and the whole process is done in a few minutes with zero lasting side effects on your content or your site’s day-to-day operation.