
WordPress is a web content management system. It is an open source software created as a tool to publish blogs and other web content, including more traditional websites, mailing lists and Internet forums, media galleries, membership sites, learning management systems and online stores.
There are two ways to download WordPress.
1. You can download and set it up yourself.
2. You can use a hosting provider.
Quick Links
Steps to download WordPress
Let’s learn in simple steps on how to download WordPress from WordPress.org.
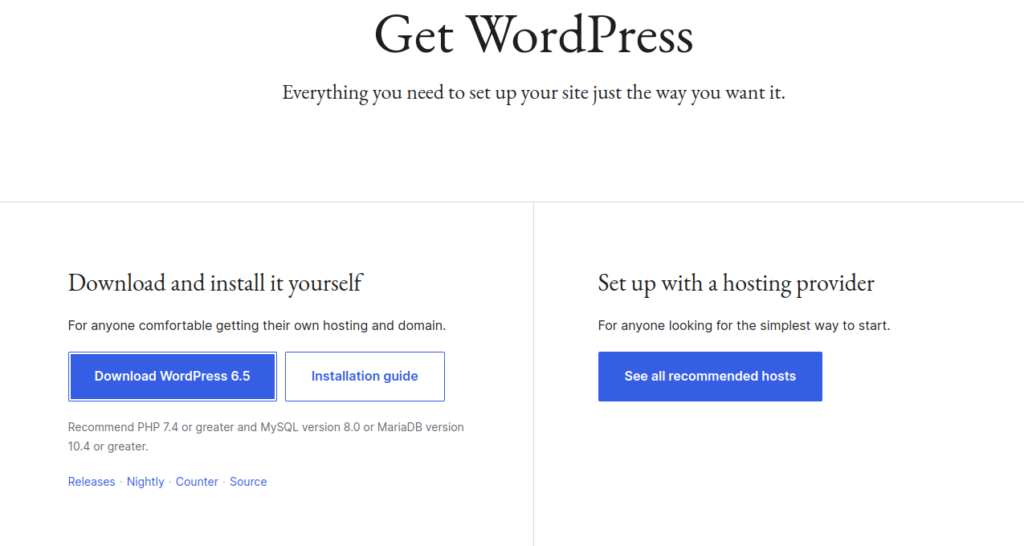
1. Visit WordPress.org website
Open your web browser and type “WordPress.org” in your search engine or you can follow this link https://WordPress.org/
2. Click on get WordPress
When your page opens press “Get WordPress” on the top right corner of the page.

3. Click on Download
Click on the download and select your desired path. The download button will also show the latest version(which is 6.5 while uploading) also.
5. Extracting WordPress zip file
Once the folder is downloaded visit the folder where the file is and unzip it and extract all the files.
6. Uploading the WordPress to a web hosting provider
When you download WordPress from WordPress.org, you receive a ZIP file containing all the necessary files for WordPress installation. To make your website accessible on the internet, you need to upload these files to your web hosting server. Here’s how you can do it:

7. Using an FTP Client
FTP (File Transfer Protocol) is a standard network protocol used for transferring files between a client and a server on a computer network. An FTP client is a software application that allows you to connect to your web hosting server and transfer files back and forth.
Here’s a step-by-step guide on using an FTP client to upload WordPress to your web hosting server:
1. Choose an FTP Client: There are many FTP clients available, both free and paid. Some popular options include FileZilla, Cyberduck, and WinSCP. You can download and install the FTP client of your choice on your computer.
2. Gather FTP Credentials: Your web hosting provider will provide you with FTP credentials, including a hostname (usually an FTP server address), a username, and a password. You may also need to specify a port number (often port 21) for the FTP connection.
3. Launch the FTP Client: Open your FTP client software on your computer.
4. Connect to Your Server: Enter the FTP server address (hostname), username, password, and port number provided by your web hosting provider into the appropriate fields in your FTP client. Then, click on the “Connect” or “Quickconnect” button to establish a connection to your server.
5. Navigate to Your Website’s Root Directory: Once connected, the FTP client will display the files and directories on your web hosting server. Navigate to the root directory of your website. This directory is often named “public_html,” “www,” or “htdocs.”
6. Upload WordPress Files: Locate the extracted WordPress files on your computer (the ones you downloaded from WordPress.org and extracted in step 5). Select all the files and directories, then drag and drop them into the root directory of your website on the FTP client.
7. Wait for the Upload to Complete: The FTP client will begin uploading the WordPress files to your web hosting server. Depending on the size of the files and your internet connection speed, this process may take some time. Once the upload is complete, you’ll see the files listed in the root directory of your website on the FTP client.
8. Verify the Upload: After the upload is finished, you can verify that the WordPress files are successfully uploaded to your server by visiting your website’s URL in a web browser. If everything is uploaded correctly, you should see the WordPress installation wizard, indicating that you can proceed with the installation process.
8. Create a MySQL Database
Before installing WordPress, you’ll need to create a MySQL database on your web hosting server. Most hosting providers offer a control panel interface (such as cPanel) where you can create a new database.
9. Run the WordPress Installation Script
Once the WordPress files are uploaded to your server and the MySQL database is created, navigate to your website’s domain name in your web browser. You should see the WordPress installation wizard. Follow the on-screen instructions to complete the installation process.
10. Set Up Your WordPress Site
During the installation process, you’ll be prompted to enter your site title, admin username, password, and email address. Once installation is complete, you can log in to your WordPress dashboard and start customising your website.
By following these above steps, you can download WordPress for free and install it on your web hosting server to start building your website.
Installing WordPress On Your Computer
Installing WordPress on your computer helps you to test your website before launch. To Download WordPress locally means you can find error and debug them before launching your website.
To download WordPress locally on your system we can use Local WP, XAMPP, MAMP,etc . These are really efficient and smooth.
But we are gonna use Local WP because it is hassle free and provide numerous advantages such as:
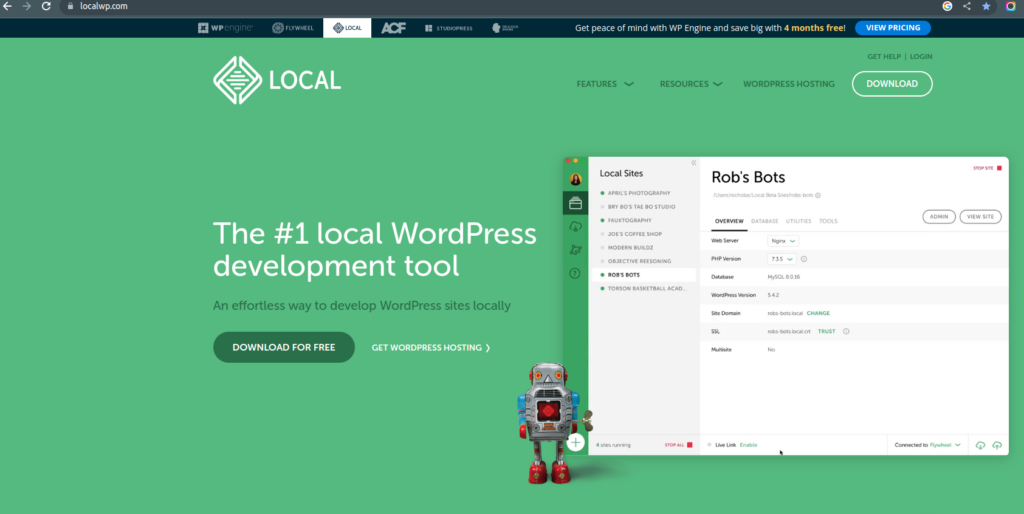
1. Easy Local Development Environment Setup: Local by Flywheel provides a user-friendly interface for setting up local WordPress development environments. It streamlines the process of configuring servers, databases, and WordPress installations, saving time and effort.
2. Easy site cloning and sharing: It offers features for cloning and sharing local WordPress sites. This is useful for collaborating with team members or sharing site snapshots for testing or troubleshooting purposes.
3. Pre-configured Environments: Local provides pre-configured environments tailored for WordPress development, including popular server configurations Nginx, various PHP versions, and MySQL databases. This ensures compatibility and consistency across development environments.
Overall, Local by Flywheel simplifies the WordPress development process, providing developers with a reliable, efficient, and secure environment for building and testing WordPress websites.
Let’s see how to install Local WP by Flywheel.
These are the steps you have to follow:
Step 1: Open your web browser and search https://localwp.com/ on your search engine or you can directly click on the given link.
Step 2: Your website is open now click on download and choose your platform.
Step 3: Now fill in the required details and click on the Get it now button. Your download will start.
Step 4: Now install the software on your system and is ready to go
Make as many websites as you want, debug them and optimize.
We hope this blog was helpful enough to install WordPress for free
Interesting Reads
Checking and Updating WordPress
Best Programming Languages To Learn