

Forms handle feedback, orders, event registrations, and contact requests, the backbone of a lot of site functionality. WPForms and Gravity Forms are the two most established options in WordPress, and the right one depends more on your budget and complexity needs than any objective “better.” Both have loyal user bases and both power a genuinely large share of the WordPress forms in production today, so the goal here isn’t declaring a universal winner, it’s mapping which specific project needs point toward which plugin.
Short Summary
WPForms wins on ease of use and price: a genuine free tier (WPForms Lite, now marketed as part of an “AI Form Builder” rebrand) plus paid plans from $49.50/year (introductory pricing; renewal runs $99-599/year across tiers). Gravity Forms has no free tier at all, licenses start at $59/year, but it goes further on integrations, add-ons, and complex multi-step form logic.
If you need a simple contact form fast and want to spend nothing, WPForms. If you’re building complex workflows with lots of third-party integrations and don’t mind paying for it, Gravity Forms.
Configuring WPForms
1. Install and Activate
- From your WordPress dashboard, go to Plugins > Add New, search for WPForms, install, and activate.
2. Create a New Form
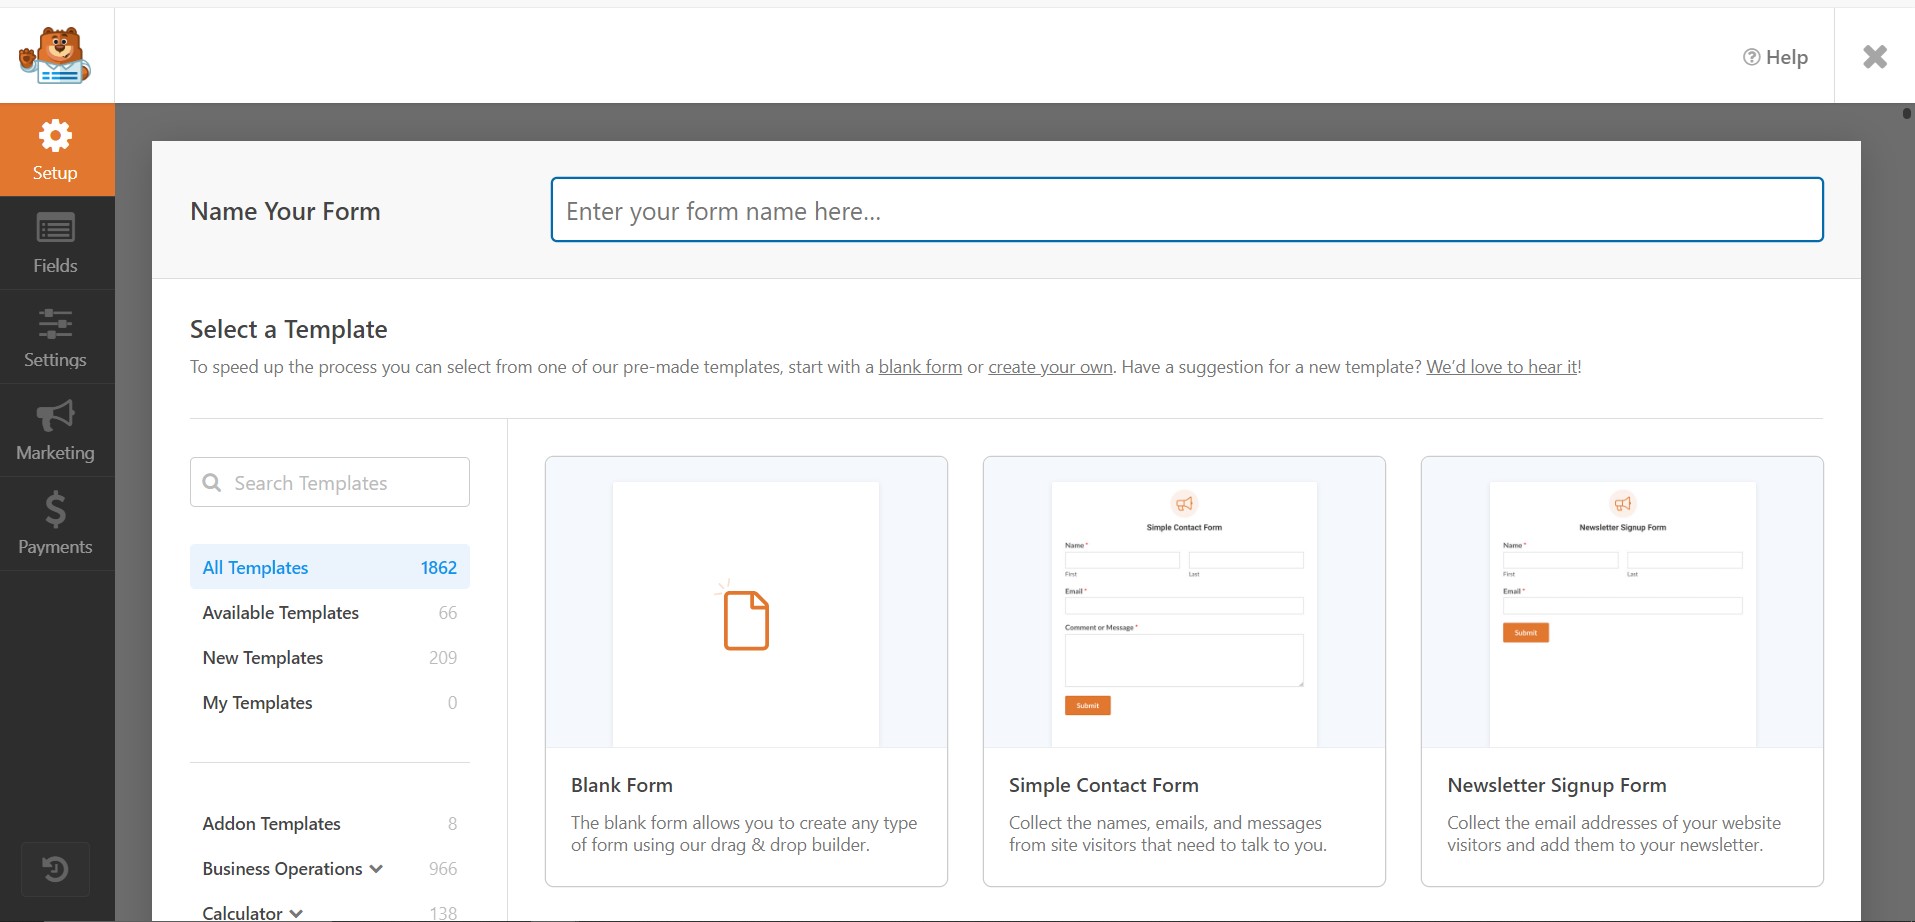
- Go to WPForms > Add New, pick a template (Contact Form, Newsletter Signup, or start blank), and name the form.
3. Customize Fields
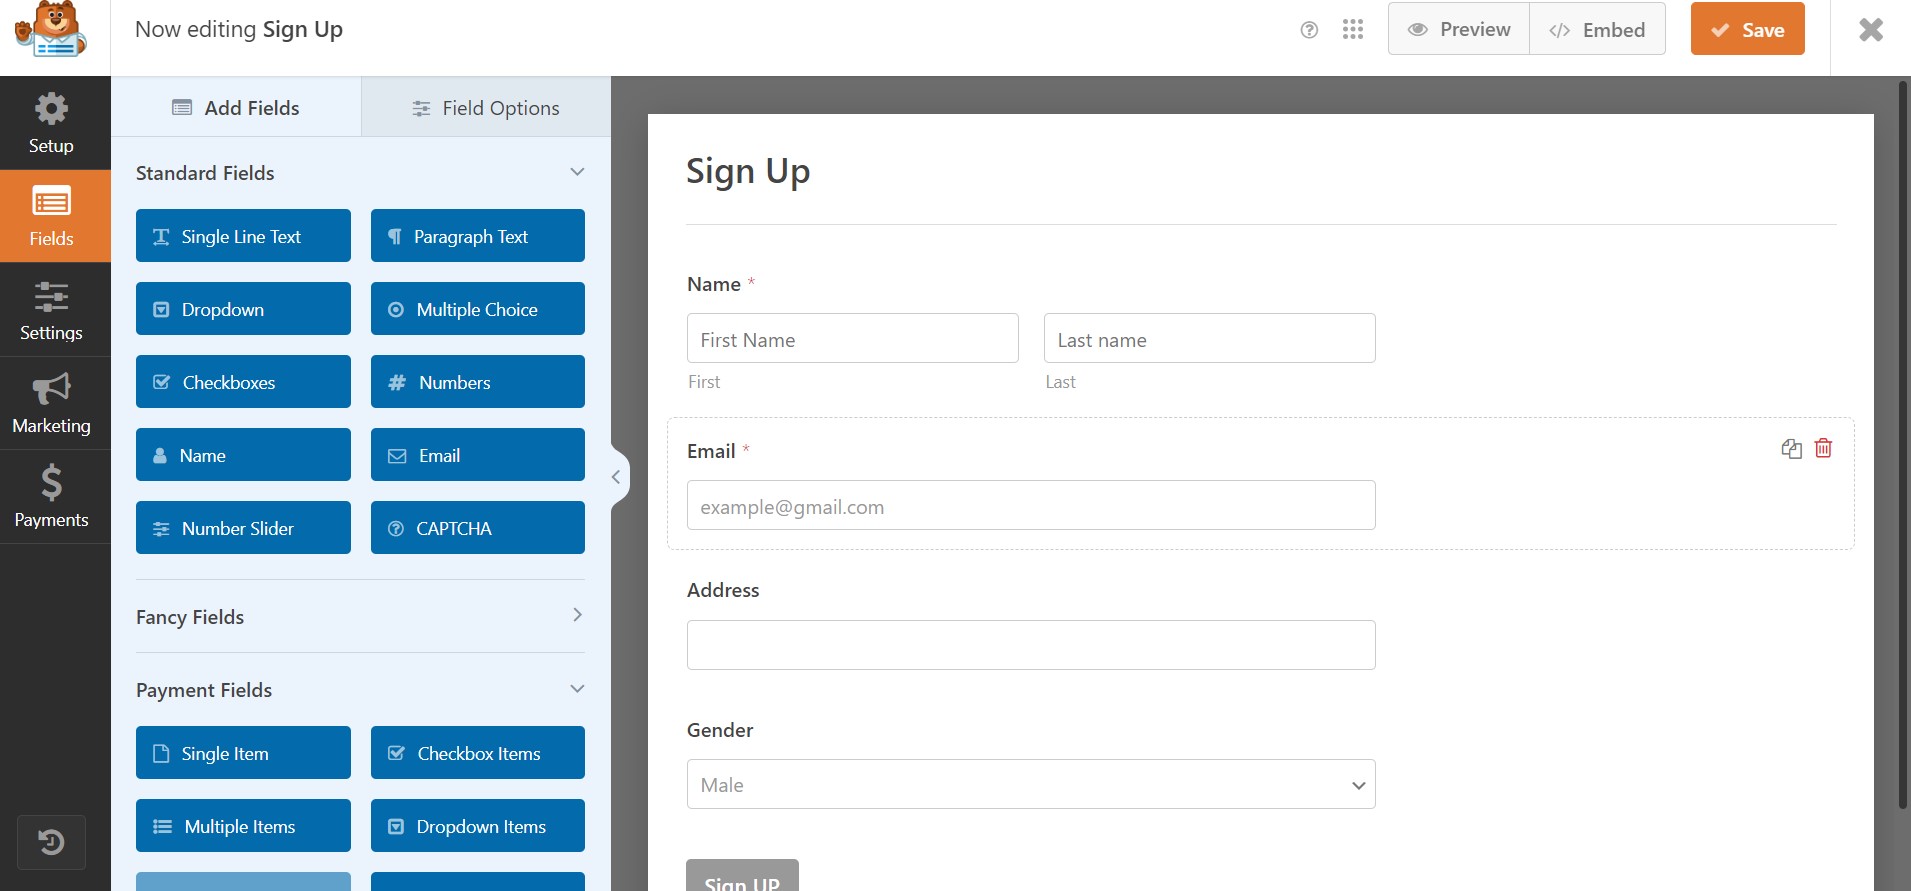
- Drag and drop fields (text, email, dropdown, checkboxes), then click each one to configure labels, descriptions, and requirements.
4. Notifications and Confirmations
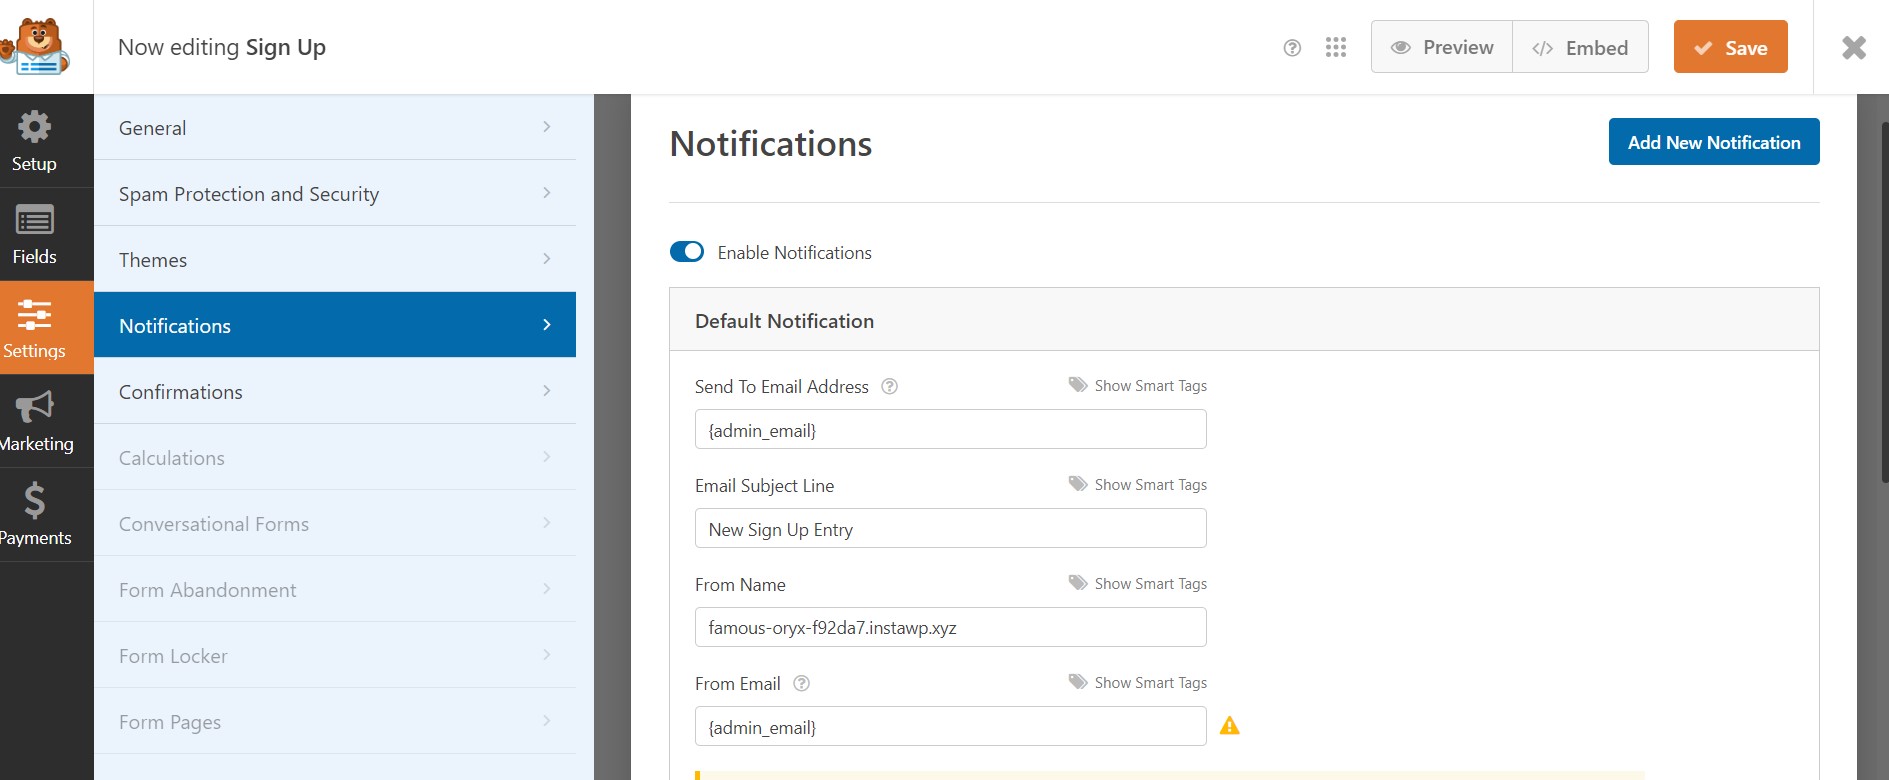
- Settings > Notifications configures admin and user emails. Settings > Confirmations sets what a user sees after submitting, a message, a redirect page, or an external URL.
5. Integrations and Embedding

- Connect email marketing, payment, and CRM services under the Integrations tab. Embed with the WPForms block in the editor, or paste the shortcode into any page, post, or widget area.
Configuring Gravity Forms
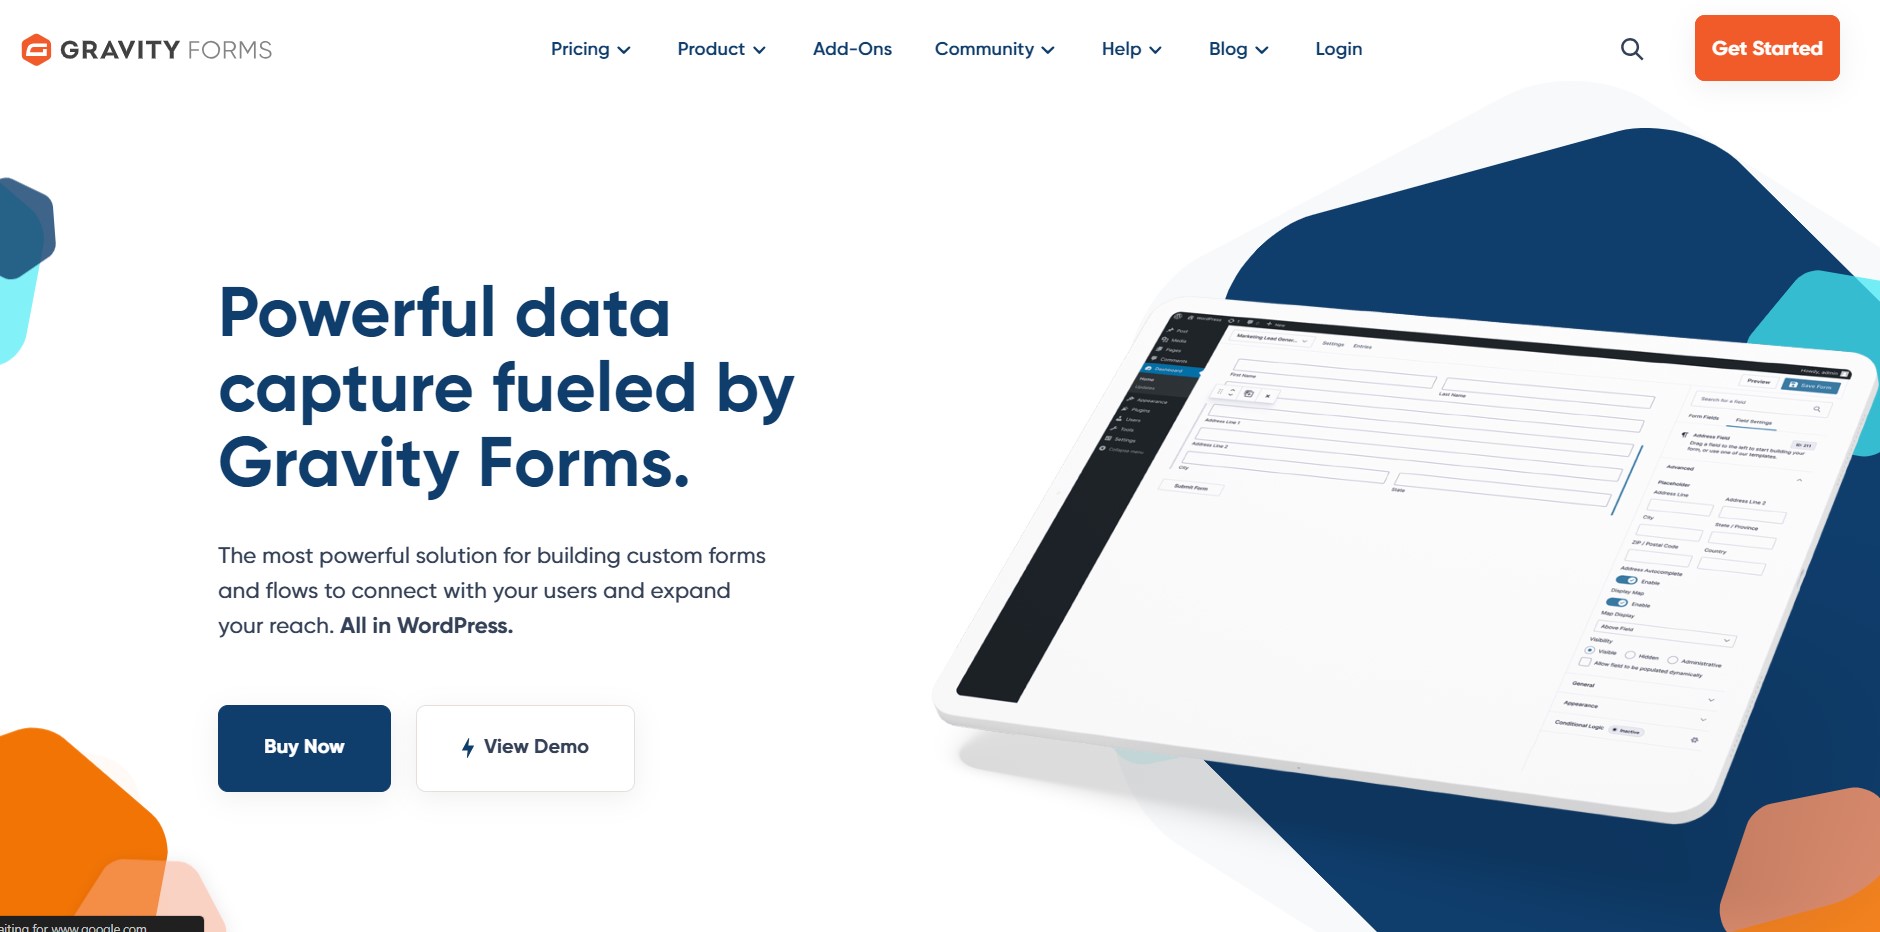
1. Purchase, Install, and Activate
- Buy a license from gravityforms.com, download the plugin file, upload it via Plugins > Add New > Upload Plugin, and activate.
2. Add a New Form
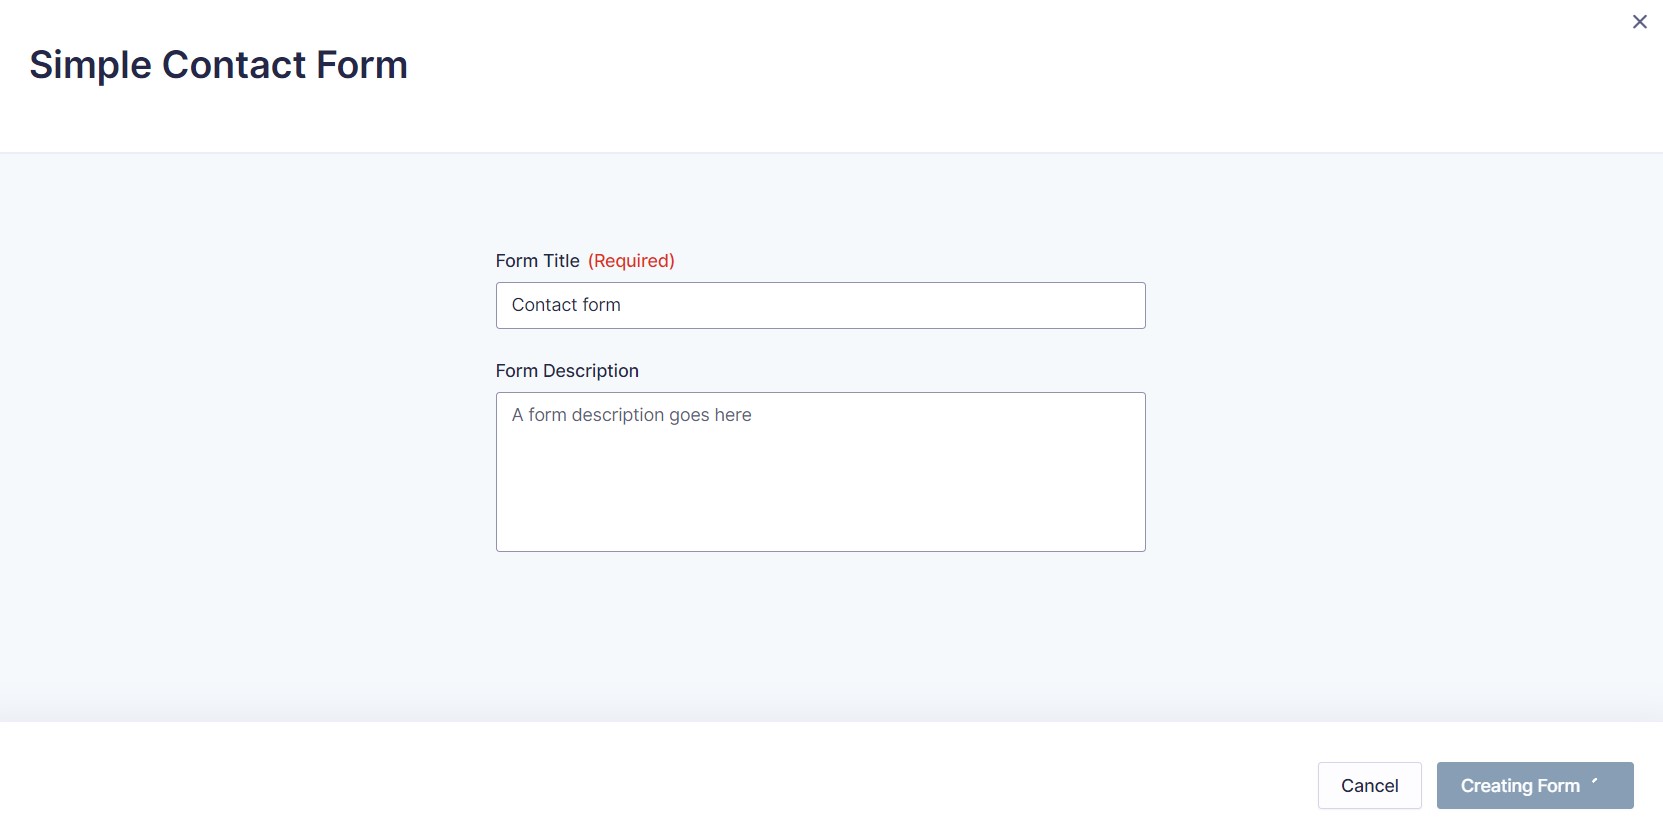
- Forms > New Form, enter a title and optional description.
3. Build the Form
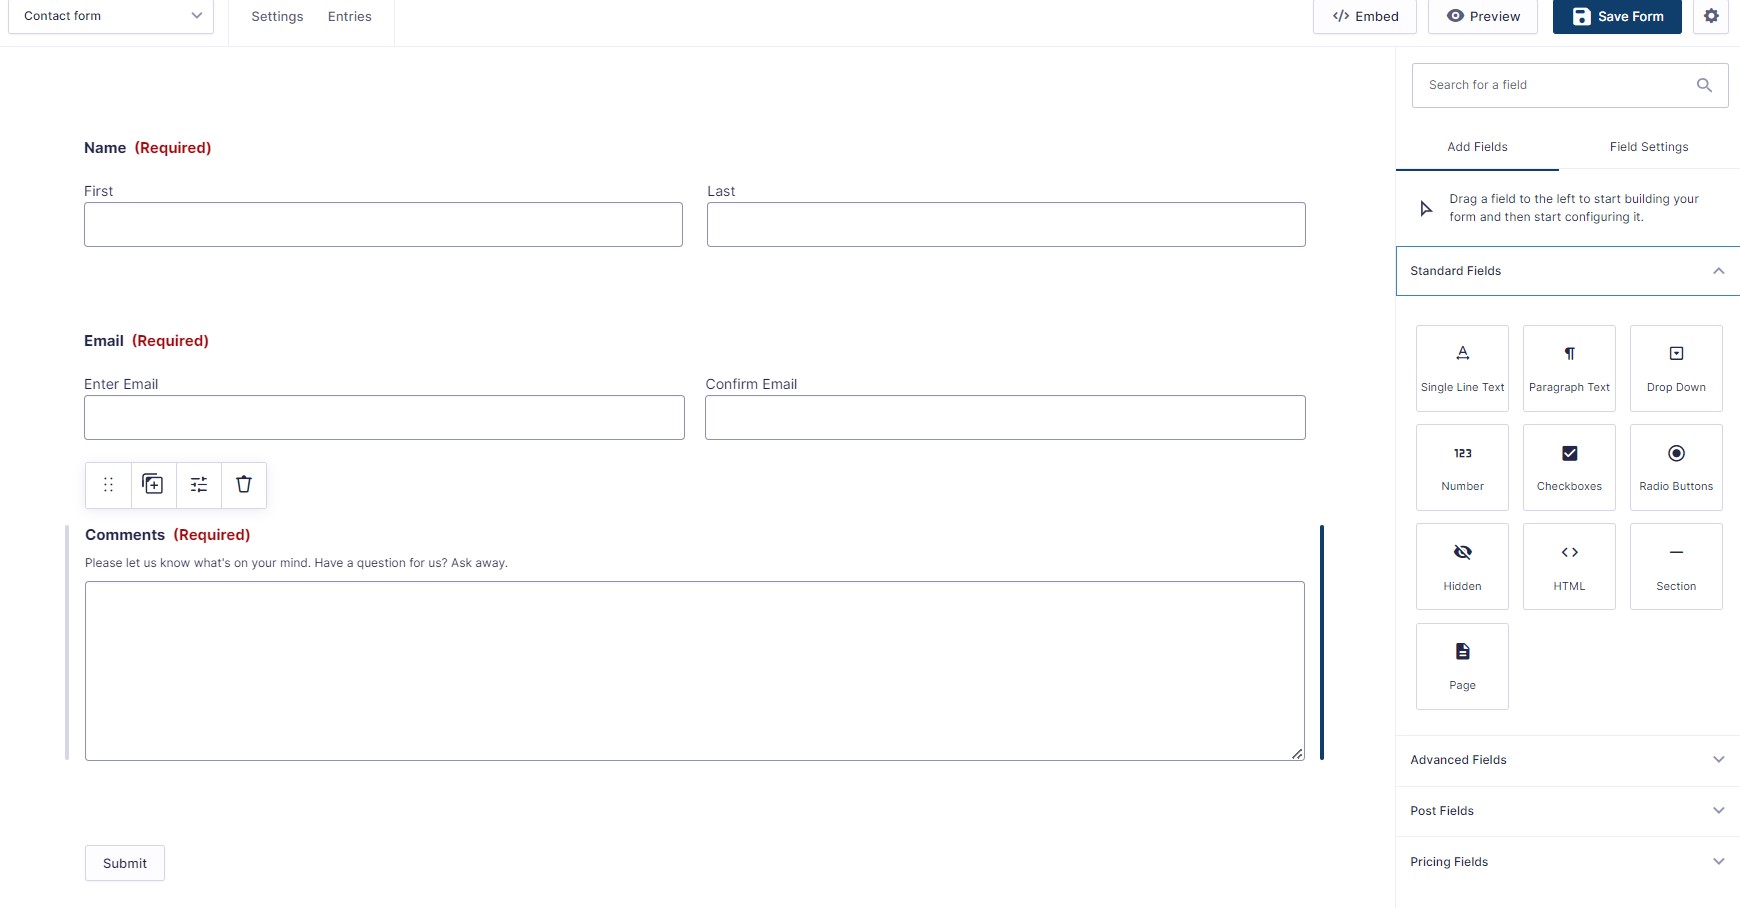
- Drag in Standard, Advanced, or Post fields, then configure labels, validation, and default values per field.
4. Advanced Features
- Conditional logic shows or hides fields based on prior answers. Multi-page forms split long forms into sections. File uploads let users attach documents to a submission.
5. Integrations and Embedding

- Add-ons connect PayPal, Stripe, Mailchimp, HubSpot, Salesforce, and more, installed from the Gravity Forms Add-Ons page. Embed with the shortcode or the Gravity Forms Gutenberg block.
Where Each One Actually Struggles
No comparison is complete without the weak points, and both plugins have real ones worth knowing before committing. WPForms’ visual form builder, genuinely its biggest strength for a beginner, becomes a limitation once a form needs truly complex conditional logic spanning many fields; the interface starts to feel cramped and hard to audit once you’re past a handful of conditional rules, and there’s no way to view all the logic for a form in one consolidated place the way some competitors offer. Gravity Forms’ weak point is the opposite kind of problem: its interface, while powerful, shows its age in places, some admin screens still feel closer to 2015-era WordPress admin design than to the cleaner, more modern interfaces WPForms and newer competitors have adopted. Neither weakness is disqualifying, but both are worth experiencing firsthand (both offer trials or low-cost entry tiers) before committing a production site to either one.
Add-On Marketplace Depth
This is the area where the gap between the two is largest and most likely to matter as a site’s needs grow. WPForms’ addon catalog covers the essentials well, Mailchimp, Constant Contact, Stripe, PayPal, Zapier, Google Sheets, but stays relatively curated and official-only; there’s no meaningful third-party addon ecosystem built around WPForms the way there is around Gravity. Gravity Forms benefits from being older and more developer-adopted: beyond its own official add-ons, an entire cottage industry of third-party shops (GravityView for frontend display, GravityWiz for dozens of small utility add-ons, GravityKit) has grown up around it over more than a decade. If a project is likely to need a genuinely niche integration, something specific enough that neither vendor built an official add-on for it, Gravity’s larger surrounding ecosystem gives meaningfully better odds someone else has already solved that exact problem and sells a add-on for it.
Customer Support, Compared Directly
Both offer email/ticket-based support tied to an active license, response quality is generally solid on both sides based on how each product is positioned. WPForms leans harder into self-serve documentation and video tutorials aimed at non-developers, consistent with its beginner-friendly positioning, if you’re not a developer and want to solve a problem yourself before opening a ticket, WPForms’ knowledge base is built with that in mind. Gravity Forms’ documentation assumes slightly more technical comfort but goes deeper on developer-facing detail, hook references, code snippets, and API documentation that WPForms’ docs don’t cover to the same depth, reflecting that a larger share of Gravity’s user base includes developers building custom solutions rather than site owners configuring forms entirely through the UI.
Accessibility Considerations
Both plugins generate reasonably accessible markup by default, proper label association, ARIA attributes on interactive elements, keyboard navigability, but neither guarantees WCAG compliance automatically regardless of what marketing copy might imply. Custom CSS styling applied on top of either plugin’s default output is the most common way accessibility regresses, low-contrast custom colors, removed focus outlines, or custom field styling that breaks keyboard tab order are all things a site builder can introduce without either plugin doing anything wrong itself. If accessibility compliance is a hard requirement (a government, education, or healthcare site, for instance), test the actual rendered form with a screen reader and keyboard-only navigation after any custom styling is applied, rather than assuming either plugin’s out-of-the-box accessibility carries through untouched.
Comparison
| Feature / Aspect | WPForms | Gravity Forms |
|---|---|---|
| Ease of Use | Beginner-friendly, intuitive UI | Drag-and-drop, slightly more setup depth |
| Free Version | Yes (WPForms Lite) | No, paid license required from $59/year |
| Starting Price (Paid) | $49.50/year intro (Basic, 1 site) | $59/year (Basic, 1 site) |
| Renewal Price | $99-599/year across tiers | Same as initial ($59-259/year) |
| Templates | Wide variety of pre-built templates | Fewer templates, but highly customizable |
| Integration Options | Good, covers major services | Extensive, largest add-on ecosystem of the two |
| Advanced Features | Limited in free tier, more in Pro | Conditional logic and multi-page forms built in at every paid tier |
The Pricing Detail Worth Knowing Before You Buy
WPForms’ headline pricing is genuinely misleading if you don’t read past the first-year rate. That $49.50/year Basic tier is an introductory price; renewal jumps to $99/year, and the pattern holds across every tier, Plus renews at $199 (up from a $99.50 intro), Pro at $399 (from $199.50), Elite at $599 (from $299.50). Gravity Forms, by contrast, charges the same $59/$159/$259 every year, no introductory discount, no renewal jump. Over a three-year horizon, WPForms Basic actually costs more in total than Gravity Forms Basic once the renewal pricing kicks in, the opposite of what the flashy “starting at $49.50” headline implies. This doesn’t make WPForms a bad deal, the free Lite tier alone is worth a lot for simple use cases, but it’s worth running the actual multi-year math rather than comparing the two products’ first-year sticker prices side by side.
Spam Protection and Security, Side by Side
Both plugins handle spam and basic security reasonably well, but the defaults differ. WPForms ships with its own honeypot-style spam protection plus optional Google reCAPTCHA or hCaptcha integration, all configurable per form without needing a separate plugin. Gravity Forms takes a similar approach, honeypot by default with reCAPTCHA/Turnstile add-on support, but leans more heavily on its broader third-party ecosystem for advanced anti-spam (Akismet integration is more commonly paired with Gravity setups specifically because Gravity’s user base skews toward larger, higher-traffic sites where spam volume justifies the extra layer). Neither plugin substitutes for basic WordPress hardening, keeping core, themes, and all plugins updated, using strong admin credentials, still matters regardless of which form plugin handles the spam filtering on the frontend.
A Concrete Scenario: Event Registration With Payment
To make the abstract comparison concrete, walk through the same build on both: a paid workshop registration form collecting attendee details, a session choice, and a card payment. In WPForms, this needs the Pro tier at minimum (payment add-ons for Stripe or PayPal aren’t available on Lite or Basic), and the form builder handles it cleanly with a payment field type plus conditional logic to show/hide session options. In Gravity Forms, the same build works at the Basic tier and up, since core payment add-ons (PayPal, Stripe) are included rather than tier-gated the way WPForms structures its payment features, worth checking specifically if payment collection is part of the plan, since it changes which tier of WPForms you actually need to buy.
Performance Impact on a Real Site
Neither plugin is heavy in isolation, but both load their own CSS/JS on any page containing a form, and both, by default, load those assets sitewide unless configured otherwise. WPForms includes a setting to load assets only on pages that actually contain a form, worth enabling explicitly rather than assuming it’s on by default; Gravity Forms offers similar page-specific asset loading through its own settings and through common performance plugins’ script-management features (Perfmatters’ per-page script control, mentioned in other speed-focused comparisons, applies cleanly to both). On a site running many forms across many pages, the cumulative weight of unoptimized form-plugin assets is a real, measurable contributor to page weight, checking this setting takes under a minute and is one of the more overlooked performance wins available on either plugin.
Multi-Site and Agency Considerations
For an agency managing multiple client sites, licensing structure becomes a real cost factor rather than a footnote. WPForms’ Elite tier covers unlimited sites at $299.50/year introductory ($599 renewal), while Gravity Forms’ Elite tier covers unlimited sites at a flat $259/year with no renewal jump, a meaningfully better long-term rate for anyone managing more than a handful of client sites under one license. This is one of the clearer places where Gravity Forms’ pricing structure, higher entry cost but flat and predictable, pulls ahead of WPForms’ lower-entry-but-escalating model once the use case scales past a single site.
Frequently Asked Questions
Can I migrate an existing WPForms setup to Gravity Forms later?
Not automatically, there’s no official import tool between the two. Plan on manually recreating forms if you switch, which is a real cost worth weighing before committing to either platform for a large number of forms, and worth factoring into the initial decision if there’s any realistic chance the site’s needs will outgrow whichever plugin you start with.
Does the free WPForms Lite tier include payment collection?
No, payment integrations (Stripe, PayPal, Square) require at least the Pro tier. Lite covers basic contact and lead-gen forms without payment fields.
Which one is better for a WooCommerce store specifically?
Both integrate with WooCommerce reasonably well for supplementary forms (product inquiry, custom order details), but neither replaces WooCommerce’s own checkout. Gravity Forms’ Advanced Post Creation add-on gives it an edge for building submission-driven content (vendor applications, product suggestion forms) that need to become actual site content, not just an email notification.
Is Gravity Forms worth it if I only need one simple contact form?
Probably not. If the entire need is a single contact form with no payment, no complex logic, and no plans to grow the form usage, WPForms Lite (free) or a simpler dedicated contact-form plugin covers it without paying for capability you won’t use.
How do notifications and confirmations differ between the two once a form is live?
Both send configurable admin and user-facing email notifications, and both support conditional notification routing (sending different emails to different people based on submitted answers). Gravity Forms’ routing rules interface is slightly more flexible for complex branching, useful when a single form needs to alert three different departments depending on which service someone selected, while WPForms handles simpler routing scenarios with less setup for the common one-or-two-recipient case.
Does either plugin support file uploads well?
Yes, both support file upload fields with configurable size and type restrictions. Gravity Forms’ file upload handling has slightly more granular control over storage location and post-submission file handling (useful if uploaded files need to attach to a created post via Advanced Post Creation), while WPForms keeps the configuration simpler for straightforward “attach a resume or document” use cases.
Multi-Step Form UX, a Closer Look
Both plugins support breaking a long form into multiple pages, but the actual visitor-facing experience differs in ways worth testing before committing to one for a longer application or intake form. WPForms’ multi-page fields come with a built-in, visually polished progress indicator out of the box, styled consistently with the rest of the form without extra configuration, useful for anything where completion rate matters and a visible sense of progress genuinely helps (a quote request, a multi-step application). Gravity Forms supports the same underlying functionality but the progress bar styling leans more utilitarian by default and typically needs a bit of custom CSS to match a specific site’s design language closely, not a functional limitation, just more setup work to get an equally polished result. For a public-facing, conversion-sensitive multi-step form, WPForms’ faster path to a good-looking result is a genuine practical advantage; for an internal or admin-adjacent form where visual polish matters less, the difference is largely irrelevant.
Template Quality and Quantity
WPForms ships with a noticeably larger template library out of the box, aimed squarely at getting a non-developer to a finished, reasonably good-looking form in minutes without starting from a blank canvas. Gravity Forms includes fewer starting templates and leans more on its own community and third-party ecosystem (agencies and freelancers sharing form exports) for a comparable starting-point library, meaning the “template gap” between the two is smaller in practice than the plugins’ own built-in counts suggest, once you factor in what’s freely available from the wider Gravity community. Still, for someone who wants to open the plugin and immediately see a relevant starting template without searching elsewhere, WPForms’ built-in library is the more turnkey experience of the two.
Which One Fits Your Needs
WPForms is the lower-friction starting point: free tier, lower first-year paid pricing, wide template library. Choose it for straightforward contact forms, newsletter signups, or anything you want live in minutes without a purchase decision, just budget for the renewal price jump if you go past the free tier.
Gravity Forms costs more from the start (no free tier) but pulls ahead once you need complex conditional logic, multi-page forms, payment collection at the entry tier, or deep integration with a specific CRM or payment processor at scale. It’s the one to reach for when the form itself is a real part of your business workflow, not just a contact page, and its flat, non-escalating renewal pricing makes long-term budgeting more predictable than WPForms’ introductory-then-jump structure. Whichever one you land on, resist the temptation to buy the top tier “just in case”, both vendors make it straightforward to upgrade a license later if a site’s needs genuinely grow, and starting at the tier that matches today’s actual requirements avoids paying a premium for features that may never get used.