

Personalization matters as much as convenience now, Epsilon research puts 80% of customers as more likely to buy from a brand offering a personalized experience. For WooCommerce, that means going past the default name, address, and email checkout form and capturing the specific details your business actually needs.
What Custom Checkout Fields Let You Do
A custom field can capture delivery instructions, gate codes, apartment numbers, safe-drop preferences, the kind of detail a courier needs but a generic address form never asks for. It can offer paid extras directly at the point of purchase, gift wrapping, a personalized message, engraving, turning an upsell into a natural checkout step instead of a separate product a customer has to go find. For B2B stores, it collects the specifics an invoice or accounting department actually needs: PO numbers, tax IDs, internal customer codes. Age-restricted or regulated products can get a compliance confirmation built right into the flow instead of a separate popup nobody reads carefully. And with real, explicit consent, the same mechanism can capture a marketing opt-in for a newsletter or SMS updates, right at the moment a customer is already engaged with your brand.
The payoff across all of these: fewer post-order clarification emails, smoother deliveries, and a checkout that feels tailored instead of generic. None of it requires custom development anymore, which is the part that’s changed over the last few years; this used to mean hiring a developer to hook into WooCommerce’s checkout fields filter directly, and now it’s a settings page.
Why This Is Worth Doing
Missing details at checkout mean chasing customers afterward, which delays fulfillment and costs your team real time, time that a well-placed field at checkout would have captured for free. Custom fields also make sure orders arrive exactly as intended, an engraving spelled correctly, a dietary note actually followed, cutting returns and complaints that stem from information a customer had but was never asked for.
There’s a conversion angle too, though it cuts both ways. Baymard Institute puts cart abandonment around 70%, and a checkout padded with irrelevant questions adds exactly the kind of friction that pushes that number higher. Tailoring the form to only ask relevant questions, rather than padding it with extras nobody needs, keeps checkout fast instead of slowing it down. Used carefully, a custom field is a conversion lever. Used carelessly, it’s the opposite.
And with actual consent, not a pre-checked box buried in fine print, custom fields can capture preferences or short survey responses that are genuinely useful for segmentation later, letting you build a marketing list that reflects real customer intent rather than a guess.
Checkout Add-Ons for WooCommerce
The most reliable no-code option for this is Checkout Add-Ons for WooCommerce (confirmed active, v2.8.1, ~$88/yr), the official extension for adding, editing, and managing custom checkout fields without touching code.
Step 1: Install and Activate
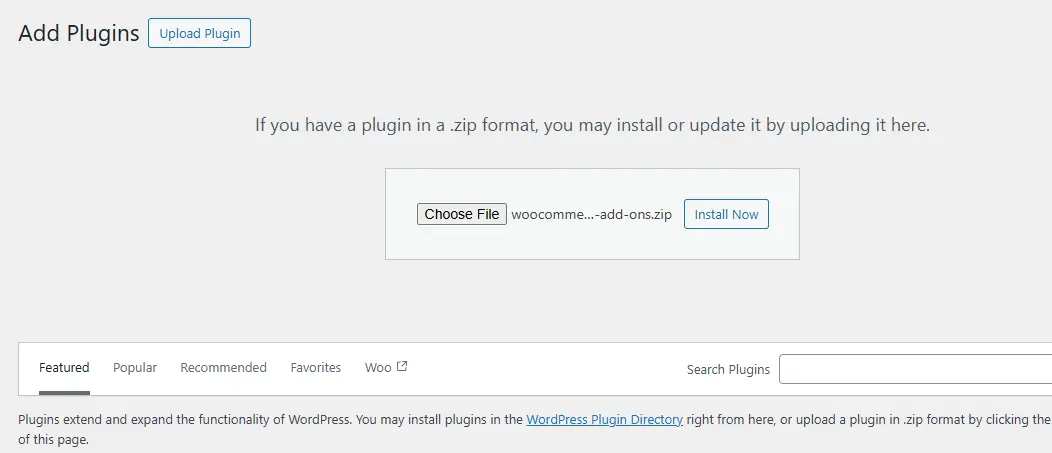
Purchase from WooCommerce.com, upload the ZIP via Plugins > Add New > Upload Plugin, and activate.
Step 2: Open Checkout Add-Ons Settings
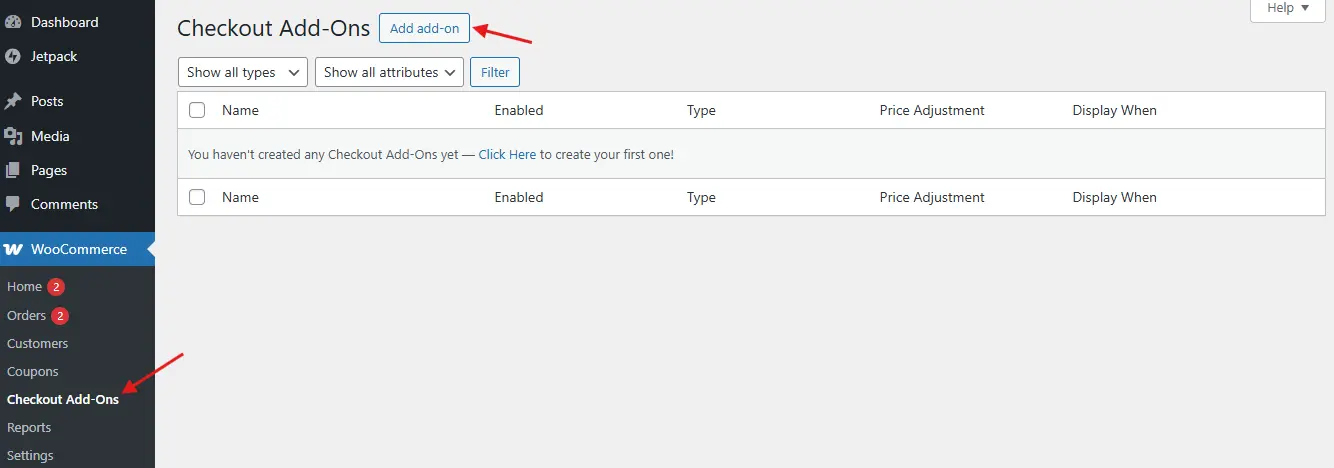
WooCommerce > Checkout Add-Ons in the admin panel shows any existing fields and an option to create new ones.
Step 3: Add a Field
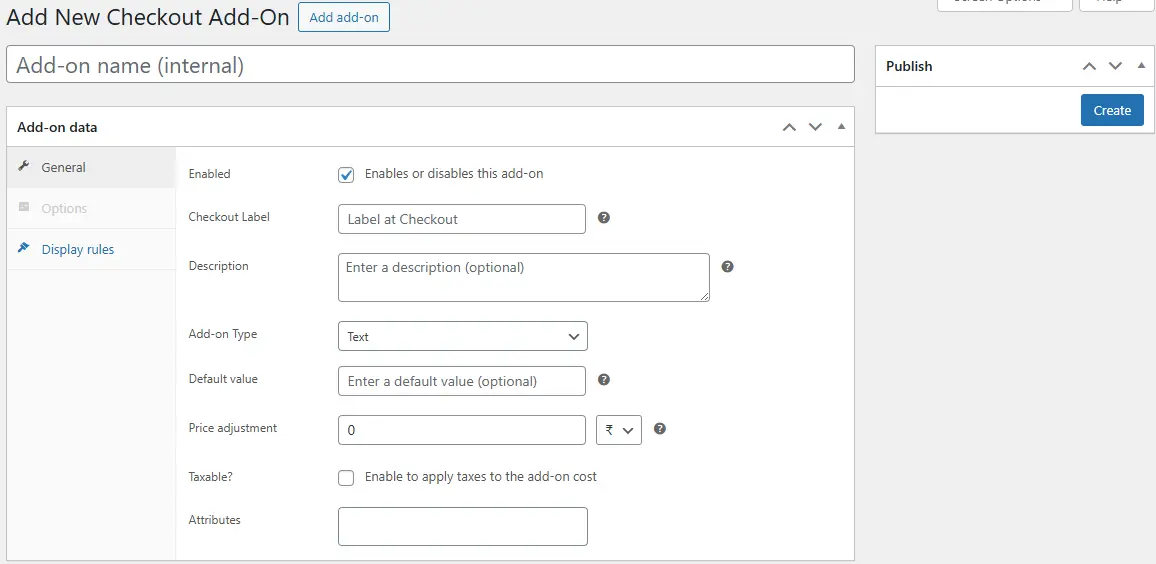
Click Add Field and choose a type: Text for a short input like a preferred delivery time, Textarea for something longer like a gift message, Select for a dropdown, Checkbox for agreements or optional extras, or File Upload for a customer-submitted file, a logo for embroidery, a reference photo for a custom order.
Step 4: Configure the Field
Write a clear label, since this is what customers actually see and it does more work than any setting behind it. Set its position, above payment, after billing, wherever it makes sense in the flow of information a customer is already providing. Mark it required or optional based on whether the order genuinely can’t be fulfilled without it. Add a price if it’s an upsell, gift wrapping for five dollars, say, and control visibility by product, category, or user role so a field about engraving text doesn’t show up on an order for a product that can’t be engraved.
Step 5: Test It
Place a real test order and confirm the field displays where expected, collects data correctly, and shows up in both the backend order details and the customer’s confirmation email. Skipping this step is how a store discovers, weeks later, that a required field was quietly not saving to the order at all.
Best Practices
Ask only for what you need. Extra questions slow checkout down and risk abandonment for no real benefit, and every field you add is a small tax on every single order, not just the ones where it’s relevant. Use conditional logic where the plugin supports it, showing a field only where it’s genuinely relevant, a delivery-time picker only for products that actually need scheduling, rather than making every customer scroll past a question that doesn’t apply to their order. Write plain labels: “Choose Your Delivery Day and Time” beats “Delivery Preferences” for clarity, since a customer shouldn’t have to guess what a field is actually asking for. Design with mobile in mind, dropdowns and checkboxes are easier to tap than long text fields on a phone, and a large share of checkout traffic on most stores is mobile now. And price optional extras clearly, gift wrapping, priority shipping, extended warranties, whatever the upsell, make the cost obvious upfront rather than a surprise that shows up only once the customer reaches the final total.
Field Ideas by Store Type
A gift store benefits from a gift message box and a gift wrapping selection with its own pricing tier. Food and beverage stores do well with a dietary preference dropdown, a spice level selector, and a delivery date or time picker tied to freshness windows. B2B suppliers need a purchase order number field and a department or cost center field, the two pieces of information their business customers’ accounting teams will ask for regardless of what the store itself wants to track. Stores selling custom products benefit from a file upload for design references, an engraving or personalization text field, and a general special instructions box for anything that doesn’t fit a structured field. And event bookings do well with an attendee name list, a meal choice selector, and a seating or table preference field, details that would otherwise require a separate email exchange after the order is placed.
When Custom Fields Become a Liability Instead of a Help
It’s worth naming the failure mode directly, since it’s common enough to be worth planning around. A store that adds a field every time someone on the team has an idea ends up with a checkout form that’s grown organically into something nobody remembers designing on purpose. Six months in, there are eleven fields, three of them no longer relevant to any current product, one of them collecting data nobody’s looked at since the day it was added. Audit your active checkout fields periodically, quarterly is reasonable for most stores, and remove anything that isn’t actively used by fulfillment, accounting, or marketing. A field that exists “just in case” is still a field every customer has to look at, even the ones for whom it’s never relevant. Assign the audit to a specific person and a specific recurring calendar date, not a vague intention to “check on it sometime,” since checkout hygiene is exactly the kind of maintenance task that quietly never happens without an owner attached to it.
Data Handling and Privacy
Any custom field capturing personal information, a phone number, a date of birth for age verification, a marketing preference, falls under the same privacy obligations as the rest of your checkout data. If you’re collecting anything beyond what’s strictly needed to fulfill the order, particularly a marketing opt-in, make sure your privacy policy actually reflects what’s being collected and why, and that the field’s own language makes clear whether checking it is required or optional. A checkbox pre-checked by default for a marketing opt-in is a compliance risk in a growing number of jurisdictions, and it’s also, separately, just bad practice, since consent that wasn’t freely given isn’t really consent a customer will honor when the emails start arriving.
Choosing the Right Field Type for the Job
A text field is the right call when the answer is short, unpredictable, and doesn’t fit a fixed set of options, a delivery-time preference typed in the customer’s own words, a name to engrave. It’s the wrong call when the input actually has a limited set of valid answers, since a free-text field invites typos and inconsistent formatting that a dropdown would have prevented entirely. A dropdown or select field is the better choice whenever the possible answers are known in advance, a spice level, a size, a gift-wrap color, both because it’s faster for the customer to tap through than type, and because it gives you clean, consistent data on the backend rather than seventeen different spellings of “medium spicy.”
Checkboxes work best for genuinely binary choices, agree to a term, opt into a list, add an optional extra, and they’re the clearest way to price an add-on since the price attaches directly to a single, unambiguous action. Textareas earn their place specifically for genuinely open-ended input, a gift message, special handling instructions, where a fixed set of options couldn’t reasonably cover the range of things a customer might want to say. File upload is the most operationally heavy option on the list, since every upload needs somewhere to go and someone to actually look at it during fulfillment; reserve it for cases where a file is genuinely required to complete the order correctly, a logo for an embroidered product, a reference image for a custom illustration, rather than offering it as a vague “attach anything” catch-all.
A Worked Example: Setting Up a Gift Message Field
Walking through one field end to end makes the abstract steps above concrete. Say you’re adding a gift message option to a gift shop’s checkout. Start with the field type: Textarea, since a gift message is open-ended text with no fixed set of valid answers. Set the label to something a customer would actually say to themselves, “Add a gift message (optional)” rather than the more clinical “Gift Message Field.” Leave it optional, since forcing every customer to either write a message or actively skip one adds friction to orders that were never gifts in the first place. Position it after the cart review and before payment, where a customer has already committed to the order and is naturally thinking about the recipient rather than still comparing products.
If you’re bundling this with a paid gift-wrapping option, that’s a second field, a checkbox with its own price attached, positioned just above the message box so the two feel like one coherent “gifting this order” moment rather than two unrelated add-ons scattered across the page. Test the full flow as a customer would: add a product, check the gift-wrap box, write a message, complete a real test order, and confirm both the message text and the wrap charge show up correctly in the order confirmation email and the admin order screen. That last check is the one people skip, and it’s the one that actually catches a misconfigured field before a real customer does.
How This Affects Fulfillment, Not Just Checkout
A custom field is only as useful as the process on the other end that actually reads it. A gate code or apartment number captured at checkout is worthless if whoever prints shipping labels isn’t looking at the order notes section where it appears. A PO number field is worthless to accounting if it isn’t showing up on the invoice they generate. Before rolling out a new field to real customers, walk through your own fulfillment process the way a warehouse or support team member would, and confirm the new data is visible exactly where that person actually looks during their normal workflow, not just theoretically present somewhere in the order record. This is the single most common reason a well-configured custom field fails to deliver its promised benefit: the data gets collected correctly and then nobody downstream ever sees it. Fixing this usually doesn’t require more plugin configuration, it requires a short conversation with whoever handles fulfillment, walking through exactly where they look on an order screen and confirming the new field lands somewhere in that path rather than in a tab they never open.
Frequently Asked Questions
Will adding custom fields slow down my checkout page’s load time?
Negligibly, for a reasonable number of fields. Checkout Add-Ons for WooCommerce is built specifically for this use case and doesn’t add meaningful overhead for a handful of fields. Where load time can suffer is a checkout with dozens of conditional fields and complex show/hide logic; if you’re approaching that scale, it’s worth a direct page-speed test with the fields active versus a clean baseline, the same check worth running for any third-party checkout customization.
Can I make a field appear only for specific products or categories?
Yes, Checkout Add-Ons for WooCommerce supports scoping a field to specific products, categories, or user roles, which is exactly how you avoid showing an engraving field on an order that doesn’t include any engravable products.
Does the data from custom fields show up in WooCommerce’s own reports?
Custom field data attaches to the individual order and displays in the order details in the admin panel, but it doesn’t automatically feed into WooCommerce’s built-in analytics dashboards the way core order data does. If you need to analyze custom field responses in aggregate, gift-message usage rates, for example, you’ll likely need to export order data or use a reporting plugin that can read custom field meta specifically.
Is there a limit to how many custom fields I should add?
There’s no technical limit the plugin enforces, but there’s a practical one worth respecting. Every field is a small cognitive tax on every customer who reaches checkout, whether or not it applies to their specific order, unless it’s properly scoped with conditional logic. A useful mental test: for each field you’re considering, ask whether removing it would create a real operational problem, a delivery that can’t happen, an order that can’t be fulfilled correctly, versus whether it’s just “nice to have.” Fields that fail that test are strong removal candidates during your periodic audit.
What happens to custom field data if I later deactivate the plugin?
Historical order data generally remains attached to past orders in the database even if the plugin is deactivated, since WooCommerce stores it as order meta rather than something the plugin generates fresh each time. What stops working is new field collection on future orders and, depending on your theme and any custom display code, potentially the display of that historical data in places that relied on the plugin’s own rendering. Before deactivating, export any custom field data you’ll need for records or reporting, rather than assuming it’ll remain conveniently accessible after the fact.