

Most online shoppers check on their order at least once after buying, often more than once if the wait stretches past what they expected. Without a way to do that, they email support instead, and “where is my order” tickets pile up while trust in your delivery process erodes. Order tracking closes that gap directly, and it does more than just answer a question, it changes how a customer relates to the wait between checkout and delivery, turning an anxious unknown into something they can watch unfold.
The Problem Without It
No tracking updates means customers are left guessing, which reliably produces a flood of status-check emails and quietly erodes confidence in whether the package is coming at all. That uncertainty doesn’t just affect the current order, it makes people less likely to buy again. It’s worth putting a number on this mentally, if even a small percentage of a store’s order volume generates a support ticket purely because tracking wasn’t visible, that’s a recurring cost that scales with growth rather than shrinking, since more orders without tracking just means more tickets, not fewer.
The Fix: Shipment Tracking for WooCommerce
Shipment Tracking for WooCommerce (confirmed active, v2.7.4, ~$65-70/yr) is the official extension for this: add tracking details to an order and WooCommerce handles surfacing them to the customer automatically.
What It Covers
- Direct WooCommerce integration, no complex setup.
- Multiple carriers: UPS, FedEx, DHL, USPS, and others, plus a custom-provider option for anything not listed.
- Customer-facing display in order confirmation emails and the My Account page.
- Automated updates, no manual follow-up required once it’s set.
Setting It Up
Step 1: Install and Activate
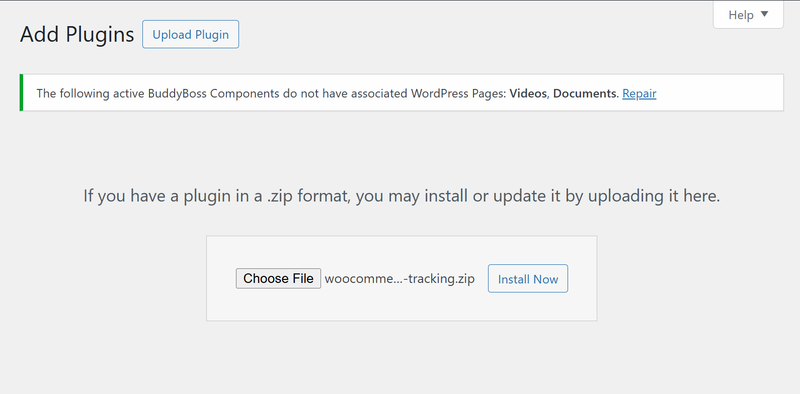
Purchase from WooCommerce.com, upload via Plugins > Add New > Upload Plugin, and activate.
Step 2: Find the Shipment Tracking Panel

WooCommerce > Orders, open the order, and scroll to the new Shipment Tracking panel on the edit screen.
Step 3: Add Tracking Info
- Choose the carrier from the dropdown, or select Custom Provider and enter their tracking URL if it’s not listed.
- Enter the tracking number from the carrier.
- Optionally add the shipping date.
- Optionally preview the link to confirm it actually resolves correctly.
Step 4: Save and Complete
Click Save Tracking, then mark the order Completed. WooCommerce sends the tracking email automatically at that point, no separate step needed.
Step 5: Multiple Shipments (Optional)
For orders split across shipments, click Add Tracking Number to add each additional entry. Customers see everything in their order email and under My Account > Orders.
Also read: How to Add a Free Shipping Limit in WooCommerce.
Beyond the manual workflow: connecting your fulfillment process
The five steps above work fine at low order volume, but manually entering tracking numbers for every order stops scaling somewhere around a few dozen orders a day, depending on how much other work each order requires. If you’re printing labels through a shipping platform like ShipStation, Shippo, or Pirate Ship, or your carrier’s own bulk label tool, it’s worth checking whether that tool can push tracking numbers back into WooCommerce automatically through its native integration or a webhook, rather than requiring someone to copy a tracking number from the label tool and paste it into this plugin’s panel for every single order.
That automation step matters for more than just saving time. Manual entry is where tracking data actually breaks down on stores that otherwise have a perfectly good tracking setup, a tracking number gets copied with a stray character, or an order gets missed entirely during a busy shipping day, and the customer either gets no tracking or a broken link. An automated feed from your label-printing tool removes that human-error step entirely and keeps tracking data accurate even as order volume grows past what manual entry can reliably keep up with.
What good tracking communication actually looks like
Getting the tracking number into the system is only half the job, how it’s communicated matters just as much. The default confirmation and shipping emails this plugin generates are functional but generic, worth customizing to match your brand voice and set the right expectations. A short line noting that tracking can take 24 to 48 hours to show initial movement after a label prints heads off a real chunk of “is my package lost” follow-ups before they happen, since most of that early silence is completely normal carrier processing time, not a lost package, and customers who know that upfront don’t panic on day one.
Worth also thinking about the My Account page experience specifically, not just the email. A customer checking back on an order days later is landing on that account page, not re-reading an old email, so make sure the tracking display there is genuinely clear, the current status visible without requiring a click-through, and the tracking link itself working reliably rather than assuming the email covers everything a customer needs.
Handling delays and exceptions without creating panic
Every store eventually deals with a delayed or stuck shipment, that’s a carrier reality no tracking plugin can prevent. What you can control is how that shows up to the customer. If your store has any visibility into shipments that have stalled, no tracking movement for several days past the expected delivery window, it’s worth proactively reaching out rather than waiting for the customer to notice and escalate to a frustrated support ticket. A short, honest message (“we’ve noticed your package hasn’t moved in the last few days, we’re looking into it with the carrier”) does more for trust than silence followed by a defensive response once the customer already suspects something’s wrong.
This isn’t something the tracking plugin itself automates, but if your order volume is high enough that manually watching for stalled shipments isn’t realistic, some of the more marketing-focused tracking platforms covered in comparison posts on this topic offer automated delay detection and customer notification as a built-in feature, worth considering as a complementary tool if proactive delay communication becomes a genuine operational need rather than an occasional manual check.
International orders need a different set of expectations
If any share of your orders ship outside your home country, tracking visibility gets more complicated in a way worth setting expectations for upfront. A package crossing a border typically changes carrier partway through transit, handed from a domestic postal service to an international carrier and then to the destination country’s local postal service, and each handoff can create a visibility gap while the package sits between systems that don’t share tracking data directly with each other. A customer unfamiliar with this pattern reads that gap as a lost package, when it’s usually just sitting in customs processing or between carrier handoffs that update on their own separate schedules. A line in your shipping policy explaining this pattern specifically for international orders, separate from the general “tracking can take 24-48 hours” note, reduces confusion for the customers most likely to be confused by it.
Best Practices
Add tracking numbers as soon as they’re available, delay defeats the purpose. Stick with carriers that actually deliver accurate, timely updates, a tracking link that shows stale data is worse than no tracking at all. Customize the notification emails to match your branding for a more polished impression. And place a real test order yourself so you experience the actual flow before rolling it out, watching the confirmation email arrive, the tracking link populate once a label is entered, and the account page reflect the update, end to end, on both desktop and a phone.
Measuring whether it’s actually reducing support load
It’s worth tracking, deliberately, whether adding shipment tracking actually reduces “where is my order” tickets rather than just assuming it does because it seems like it should. Compare your support ticket volume tagged to order-status questions in the weeks before and after rollout, if it’s genuinely down, that’s the clearest evidence the investment is paying off. If it isn’t moving much, that’s worth investigating rather than ignoring, the tracking feature might be technically working but poorly surfaced (customers not noticing it in the email or account page), or your actual issue might be shipping speed and reliability itself rather than visibility into it, a different problem tracking alone can’t fix.
Common setup mistakes worth avoiding
Marking an order Completed before tracking is actually entered is the most common one, since that’s the trigger that sends the tracking email, an order marked complete without a tracking number attached sends a confirmation email with no tracking link, or worse, a broken one, which is more frustrating to a customer than getting no notification at all because it implies information that isn’t there and forces them to reach out for the very details the email should have already provided. Build tracking entry into your fulfillment checklist as a required step before marking an order complete, not an optional add-on someone remembers when they have time.
Selecting the wrong carrier from the dropdown is a smaller but real mistake, since it generates a tracking link pointed at the wrong carrier’s tracking system entirely, which returns a “not found” error even though the tracking number itself might be perfectly valid on the correct carrier’s site. This is an easy typo to make on a busy fulfillment day, worth a quick visual double-check on your first handful of live orders after setup, confirming the tracking link actually opens the right carrier’s page, rather than trusting the entry blindly.
Not testing the custom-provider option before you actually need it is a third. If you occasionally ship through a smaller regional carrier not in the built-in dropdown, test the custom-provider URL format on a real order before the first time you actually need it live, some custom tracking URLs need the tracking number inserted in a specific position within the URL string, and getting that format wrong on your first real use, rather than during a calm test beforehand, means the mistake reaches an actual customer.
Return tracking, a piece worth planning for too
Order tracking conversations tend to focus entirely on the outbound direction, but a customer sending an item back for a return or exchange benefits from the same visibility, and it’s easy to overlook since this plugin is built around outbound shipment tracking specifically rather than the reverse flow. If your store handles a meaningful volume of returns, worth thinking through how a customer knows their returned item has actually been received, whether that’s a manual confirmation email your support team sends once the return arrives, or a more automated solution if return volume justifies it. A customer left wondering whether their return ever arrived, with no tracking visibility on that leg of the journey, generates the same kind of anxious follow-up email that outbound tracking was built to prevent in the first place, undermining a chunk of the goodwill the outbound tracking experience worked to build.
Email versus SMS: is email actually enough
Shipment Tracking for WooCommerce works through email notifications, which covers most stores well, but it’s worth being aware of the limitation given how crowded most people’s inboxes are with promotional email. A shipping confirmation can sit unread in an inbox for hours or days, not because the customer doesn’t care, but because it’s genuinely easy to miss among everything else arriving. If “where is my order” tickets remain a real pain point even after adding email tracking, that’s worth reading as a signal that email alone isn’t reaching some share of your customers reliably, and a store at that point might look at pairing this plugin with an SMS notification option, either through a separate SMS plugin or one of the more full-featured tracking platforms that bundle text alerts natively, rather than assuming the base email setup is automatically sufficient for every customer.
The mobile experience matters more than the setup screens suggest
Confirmation and shipping emails get opened on a phone more often than on a desktop browser these days, which means the actual tracking link a customer taps needs to render cleanly on a small screen, not just technically function. Since this plugin generates a link straight to the carrier’s own tracking page rather than a branded intermediate page, the mobile experience is largely out of your control, it’s whatever the carrier’s own site delivers, which varies in quality across carriers. Worth actually clicking through your tracking links on a phone during setup testing, on more than one carrier if you ship through several, rather than assuming they all handle mobile equally well, since a broken or awkward experience on one specific carrier’s mobile page reflects on your store even though your store had no hand in building it.
Why This Is Worth Doing
- Fewer support tickets asking about order status.
- Better retention, informed customers are more likely to come back.
- A more credible storefront overall.
- Repeat purchases from shoppers who trust your shipping process.
Tracking data as more than a customer-facing feature
Once tracking is flowing consistently, it’s worth using that data for more than just answering “where is my order.” Patterns in delivery performance, a specific carrier consistently running slower to a particular region, a specific shipping method underperforming its promised delivery window, are visible in tracking history if you’re looking for them, even without a dedicated analytics add-on. Reviewing that pattern periodically, rather than only reacting to individual customer complaints as they come in, lets you make proactive decisions, adjusting a shipping zone’s carrier assignment or setting more honest delivery-time expectations on your product pages, before the pattern generates enough individual complaints to become obviously visible on its own. That kind of periodic review turns tracking data from a purely reactive support tool into something that quietly improves the underlying shipping operation over time.
A note on setting realistic delivery expectations upfront
Tracking reduces anxiety about an order already placed, but it works best paired with honest delivery estimates set before checkout, not after. A product page or checkout flow that promises “delivered in 3-5 days” when your actual average is closer to 7 sets a customer up to worry the moment tracking shows anything short of that unrealistic estimate, even when the shipment is moving completely normally. Pulling your actual historical delivery times, which tracking data itself makes visible once you have enough order history, and setting expectations on your site to match reality rather than aspiration removes a whole category of “why is this taking so long” tickets before they start, tickets that no amount of good tracking communication can fully prevent if the initial promise was wrong in the first place.
Final Thoughts
Order tracking is a small addition with an outsized effect on trust: customers who can see their order moving toward them file fewer complaints and come back more often. Shipment Tracking for WooCommerce gets this running without custom development, but the plugin is only the mechanical piece. The workflow feeding it accurate data, the communication wrapped around it, and a proactive approach to the inevitable delayed shipment are what actually turn “technically has tracking” into a genuinely better customer experience worth the setup time.
Treat the initial setup covered above as the starting point rather than the finish line. Revisit the automation, the email copy, and the delivery-expectation numbers on your site every few months as your order volume and carrier mix change, a tracking setup that fit a smaller store well can quietly fall behind as the business grows, and the gap between “we have tracking” and “our tracking experience is genuinely good” is almost entirely made up of the follow-through work covered here, not the initial plugin installation itself.