
Most alumni offices do not need another newsletter. They need somewhere graduates go on their own: to find a classmate, ask someone a few years ahead of them for advice, see who is hiring and decide to come back for homecoming. That place can live on your own WordPress site, under your own domain, with the alumni data in your own database.
This guide walks through the whole build, step by step, using the same setup we used for the Halden Alumni Network, a demo community created for this article. Every screenshot below comes from that demo. By the end you will have alumni profiles with graduation year and employer, private class-year spaces, open city chapters, a mentoring circle that students apply to join, an alumni jobs board, chapter events and a launch plan that does not leave the network quiet after the first week.
Quick answer
To build a university alumni network on WordPress, install the BuddyX theme and the BuddyNext community plugin, set registration to admin approval, add alumni profile fields (graduation year, degree, employer, industry, open to mentoring), create Alumni and Student member types, then build open chapter spaces, private class-year spaces and a private mentoring circle. Add WP Career Board for alumni jobs and Eventonomy for homecoming and chapter events, invite volunteers and recent graduates first, and keep the network active with announcements and email updates.
In this guide
- What you are building, and what you need
- Step 1: Plan the network before you install anything
- Step 2: Install the theme and the community plugin
- Step 3: Decide who gets in, and what outsiders can see
- Step 4: Build alumni profiles with the fields that matter
- Step 5: Add member types for alumni, students and staff
- Step 6: Create class, chapter and career spaces
- Step 7: Set up mentoring between students and alumni
- Step 8: Add an alumni jobs board and events
- Step 9: Seed the network, then invite in waves
- Step 10: Keep it alive after launch
- Mobile, accessibility and data
- Common mistakes to avoid
- Related guides
- How we built this guide
- Frequently asked questions
- The bottom line
What you are building, and what you need
An alumni network is a set of jobs, not a single feature. Before installing anything, it helps to be clear about the jobs your network has to do, because each one maps to a step in this guide:
| Job the network has to do | What it looks like for members | Where it is set up in this guide |
|---|---|---|
| Help graduates find each other | A directory searchable by class year, city and employer | Steps 4 and 5 |
| Give every class and city a home | Private class-year spaces and open chapter spaces | Step 6 |
| Connect students with alumni | A mentoring circle students apply to join | Step 7 |
| Share opportunities | Jobs and internships posted by alumni | Step 8 |
| Bring people back | Homecoming, reunions and chapter meetups | Step 8 |
| Keep the alumni office informed | Up-to-date profiles, activity reports, email updates | Step 10 |
The research on alumni engagement explains why the middle rows matter. The Council for Advancement and Support of Education (CASE) found that only 19 to 20% of alumni engaged with their institution in any way between 2022 and 2024, across 394 institutions in 19 countries, and that most of the engagement it did record was one-way communication (CASE). Among alumni who gave, 31% also volunteered, a bigger overlap than with any other kind of engagement. A network that gives graduates a role, such as mentoring, hosting a chapter or posting a job, reaches the same people who support the institution later.
The software stack
Everything in this guide runs on a normal WordPress site. You need:
- WordPress on hosting you control, with HTTPS. Any reputable managed WordPress host is fine for a network of a few thousand members; plan for more server capacity once the network has tens of thousands of active members.
- The BuddyX theme, which gives the community pages, member profiles and spaces a finished design without extra page-building.
- BuddyNext, the community plugin. It provides member profiles and custom profile fields, member types, the member directory, spaces (open, private and secret), the activity feed, polls, hashtags, notifications, moderation, registration controls and privacy settings.
- MediaVerse, the companion plugin that powers direct messages and media uploads.
- BuddyNext Pro, optional, if you want email broadcasts and drip sequences to segments of members, or paid membership tiers for an alumni association that charges dues.
Then add only the modules your network needs. Each one plugs into BuddyNext’s navigation, feed and search:
- WP Career Board for an alumni jobs board, with alumni posting roles and students applying.
- Eventonomy for homecoming, reunions and chapter events, attached to the space that runs them.
- Jetonomy if you want structured forums or Q&A alongside the feed.
- WB Gamification for badges and a leaderboard that recognise mentors and active volunteers.
- Listora if you want an alumni business directory.
- Learnomy if the network will also run courses or continuing education.
You do not need all of them on day one. A network with profiles, spaces, jobs and events covers almost every alumni office’s first year.

Step 1: Plan the network before you install anything
Half an hour of planning saves weeks of reorganising later. Write down short answers to five questions and keep them next to you while you build.
Who is the network for? Alumni only, or alumni plus final-year students? Including students is the single biggest lever for mentoring and careers, and it means graduates arrive already connected. Decide too whether faculty, staff and parents of current students are in or out.
Who runs it? Name the owner (usually the alumni relations office), the career services contact who will run mentoring and jobs, and the first volunteers: one or two class representatives and one lead per city chapter. A network with no named volunteers depends entirely on staff time, and it shows.
Who gets in, and how do you check? Open sign-up is easy but invites spam and people who are not graduates. Most alumni networks use admin approval, with a graduation year collected at sign-up so the office can check it against its records. Some send personal invitations only. You will set this in step 3.
What structure does the network need? Sketch the spaces: one welcome space, one per graduating year that has a volunteer, one per city with enough alumni to meet, a career network, a mentoring circle and a private board space. The blueprint below is a sensible default.
What does success look like at 90 days? Pick two or three numbers you will check: profiles completed, mentoring requests accepted, jobs posted by alumni, people registered for the first chapter event. Avoid total sign-ups as the main number; a network of 300 people who talk is worth more than 3,000 who never came back.

Step 2: Install the theme and the community plugin
Install and activate the BuddyX theme, then BuddyNext. On activation, BuddyNext creates the pages the community needs (activity, members, spaces, messages, notifications and the sign-in page), and its Get Started checklist in the admin walks you through the remaining setup. You can change which page does what later under BuddyNext > Settings > Pages & URLs.
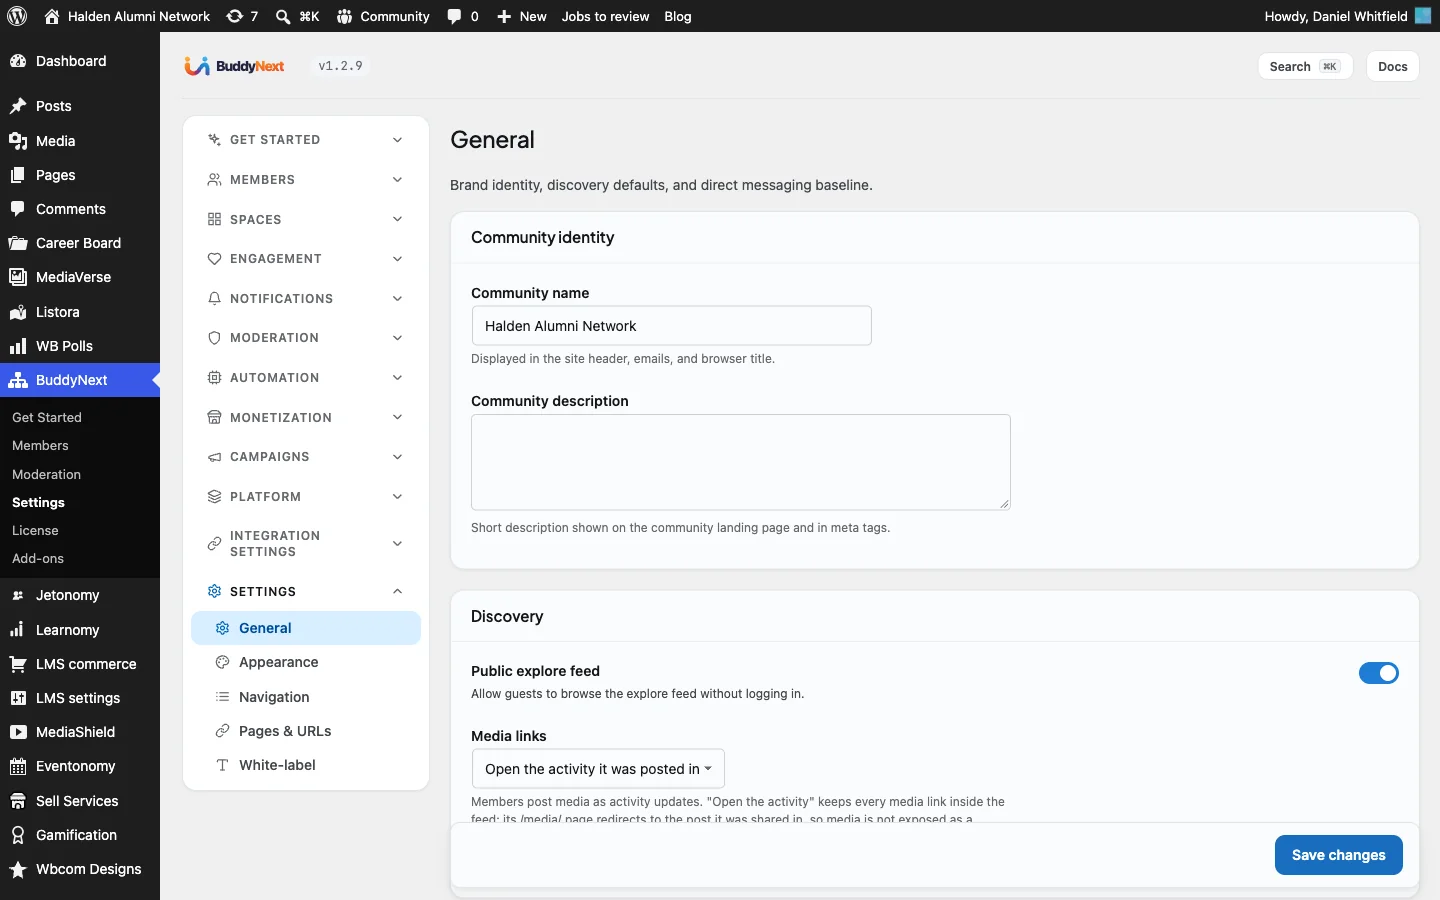
Next, open BuddyNext > Settings > General and set the community name and description. These appear in the header, emails and the sign-in screen, so use the name graduates already know, such as “Halden Alumni Network” rather than the plugin’s name.
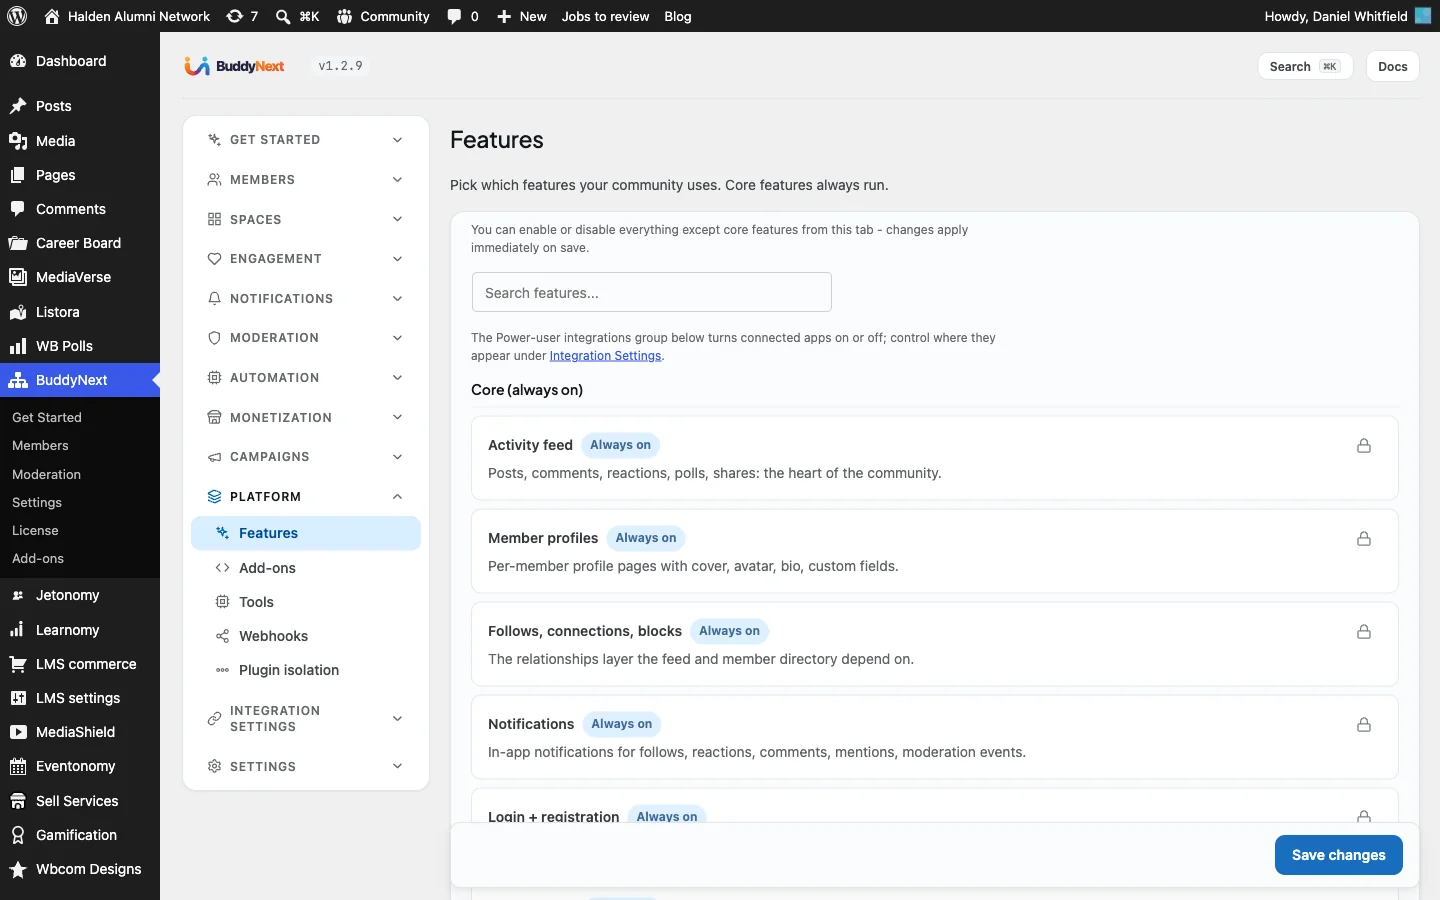
Then go to BuddyNext > Platform > Features. This is where you switch parts of the community on or off. Core features such as the activity feed, member profiles, follows and notifications are always on. For an alumni network, leave direct messages, polls, hashtags and media on, because chapter leads and class volunteers will use all of them. Turn off anything you will not support yet; a smaller menu is easier for a first-time visitor.
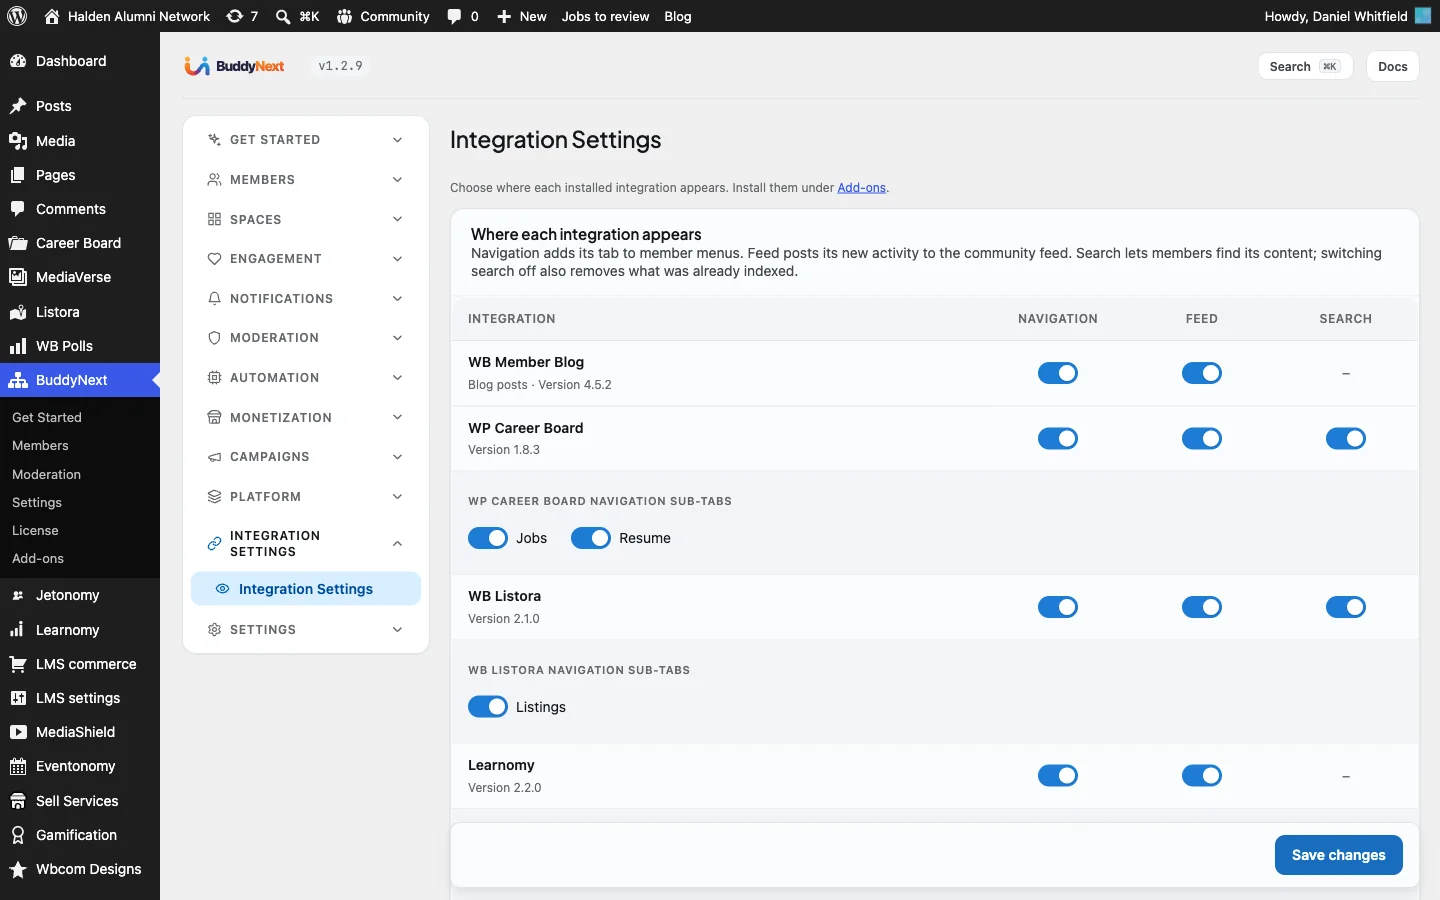
If you install the optional modules, check BuddyNext > Integration Settings next. Each module gets three switches: whether it appears in the community navigation, whether its activity is posted to the feed, and whether it is included in community search. For an alumni network, put jobs in the navigation and the feed (new roles are exactly what people should see), and leave a business directory out of the feed if it would crowd out conversation.
Step 3: Decide who gets in, and what outsiders can see
An alumni network is a trusted space. Members share where they work, where they live and how to reach them, so the default should be private. There are three settings to get right.
Registration mode
Open BuddyNext > Members > Registration & Login. Set Registration mode to Admin Approval. New members can still sign up on their own, but each request waits in a queue until someone from the alumni office approves it. On the same screen:
- Turn on Require members to accept your terms and link your community guidelines and privacy notice.
- Leave Ask new members for their name on, so profiles show real names.
- Turn on Require email verification, so every approved account has a working address.
If you want a closed network where only invited people can join, choose the invite-only mode instead and use the invitations described in step 9.
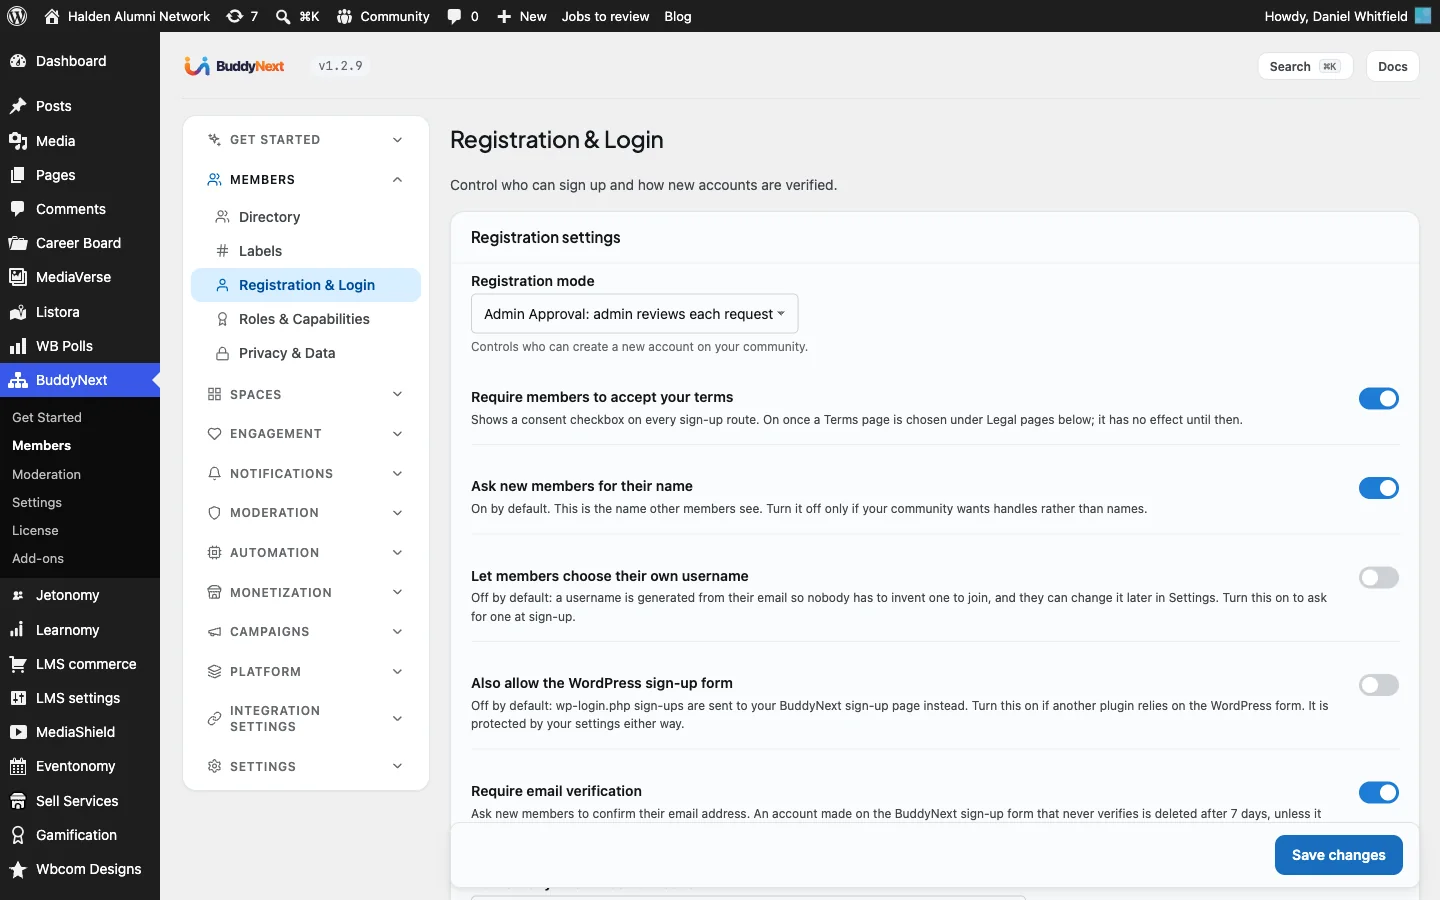
Approval queues fail when nobody owns them. Name one person who checks pending members every working day, and give them a simple rule: approve if the graduation year and name match your records, message the applicant if anything is unclear, and decline only obvious spam. The Pending tab on the Members screen shows everyone waiting.
Privacy
Go to BuddyNext > Members > Privacy & Data. Turn on Require login to view the community. Visitors who are not signed in then see only your homepage and the sign-in page; member profiles, spaces and posts stay behind the login. Set search engine indexing so that, at most, public posts can be indexed. Most alumni networks choose not to have member profiles appear in search engines at all.
If you have members in the EU or UK, turn on the cookie consent notice on the same screen and write a short notice in plain language.

Single sign-on
Many universities want graduates to sign in with their university account. BuddyNext works with established SAML and OpenID Connect plugins for WordPress, so your identity team can connect it to the same sign-in your students already use. BuddyNext also has built-in social login (Google, Facebook, GitHub, Discord and Apple) under BuddyNext > Members > Registration & Login, which helps graduates who would rather not create another password. Keep the normal email sign-in available too: university accounts often expire a year or two after graduation, and older alumni may never have had one.
Step 4: Build alumni profiles with the fields that matter
Profiles are where an alumni network becomes useful. A generic social profile (name, photo, bio) is not enough; graduates search for each other by year, programme, city and employer. BuddyNext lets you add your own profile fields, group them, choose who can see each one and show selected fields on the sign-up form.
Open BuddyNext > Members > Profile Fields and create a new field group called Alumni details. Set it to Single entry, because each member has one set of alumni details. Then add these fields:
| Field | Type | Required | Shown at sign-up | Visible to |
|---|---|---|---|---|
| Graduation year | Year | Yes | Yes | Members only |
| Degree or programme | Text | No | Yes | Members only |
| Current employer | Text | No | No | Members only |
| Industry | Dropdown | No | No | Members only |
| Open to mentoring students | Yes / No | No | No | Members only |
A few choices are worth explaining:
- Graduation year is required and shown at sign-up. It is the one piece of information the alumni office needs to approve a request, and it drives class-year spaces. Mark it searchable so members can type a year into the directory and find their classmates.
- Fields are visible to members only. Signed-in members see each other’s details; the public never does.
- Industry is a dropdown, not free text. A short list (finance, technology, education, health, law, public sector, creative industries, engineering, other) keeps the data clean enough to filter and report on later.
- Open to mentoring is a simple yes or no. It gives career services an easy list of willing alumni and makes it obvious on a profile who a student can approach.

BuddyNext also includes a Work Experience group that allows multiple entries, which suits alumni who want to show career history rather than just a current employer. Keep it if your members will use it; delete fields nobody fills in.
Here is how the sign-up form looks once graduation year and degree are set to appear at registration. New members fill in their alumni details before their account goes to the approval queue, so the person approving has what they need.

And here is the result on a member’s profile. The graduation year appears in the profile header, and the Alumni details group sits on the About tab alongside work experience and skills.

Step 5: Add member types for alumni, students and staff
Member types let you separate groups of people who use the network differently. For an alumni network you want at least three: Alumni, Student and Staff. Each type gets a coloured badge on profiles and member cards and can be filtered in the member directory, so a student can narrow the directory to alumni in one click.
Open BuddyNext > Members > Member Types and add each type with a name, a colour and a short description. Two settings matter:
- Show in directory. Leave this on for all three types, so members can filter the directory by type.
- Self-select. Decide whether members choose their own type. A sensible setting is Once for Alumni and Student, so new members choose at sign-up but cannot switch later, and Off for Staff, which only an administrator assigns.

If you want a separate mark for people with a particular role, such as mentors, chapter leads or board members, use Labels, which BuddyNext Pro adds to the same Members screen. Labels are badges an administrator assigns, such as “Verified” or “Mentor”, and they show beside the member’s name across the community. Unlike member types, a member can have several labels.
With profile fields and member types in place, the member directory becomes a real alumni search. Members can type a year, a city or an employer into the search box, filter by member type and sort by newest or most active. Here the directory is searched for “2015” and returns the Class of 2015.

Step 6: Create class, chapter and career spaces
Spaces are where conversation happens. Each space has its own feed, member list, media and events (plus a shared Files tab if you add MediaVerse Pro), and can be open (anyone signed in can see and join), private (anyone can see it exists, but posts are members-only and joining needs approval) or secret (hidden from the directory and search; members are added by invitation).
Before creating spaces, open BuddyNext > Spaces > Settings and decide who can create spaces. For an alumni network, keep space creation to administrators and a small group of volunteers, set through Members > Roles & Capabilities. If any member can create a space, you will end up with dozens of empty ones. On the same screen you can set the default visibility for new spaces and whether spaces can have sub-spaces.
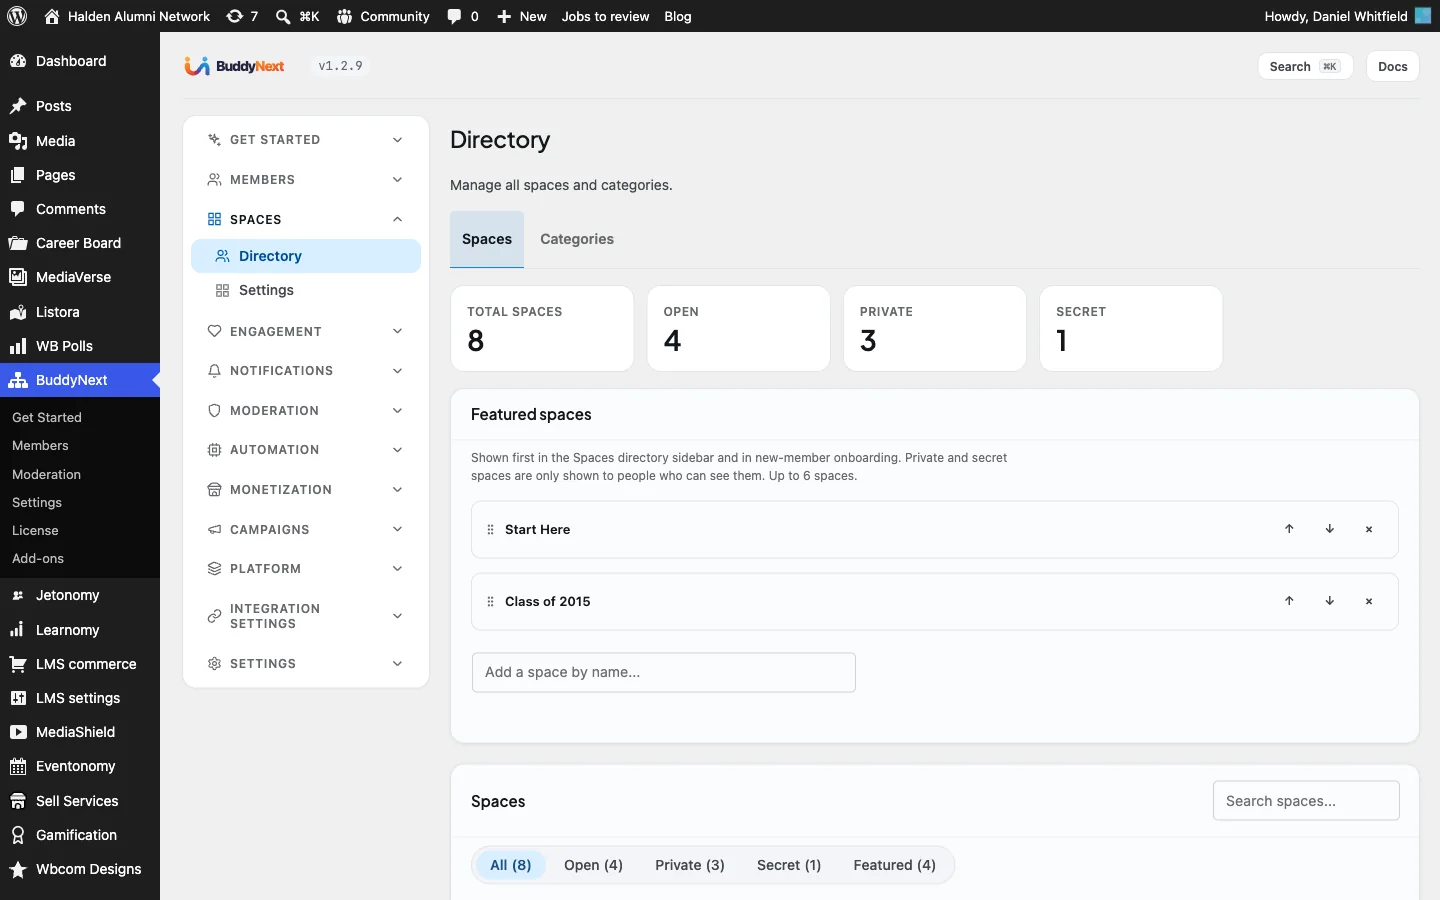
Next, open the Categories tab and create categories that match your structure: Start Here, Class Years, Chapters, Careers & Mentoring and University. Categories group spaces in the directory, so a graduate looking for their city chapter does not have to scroll past every class year.
Now create the spaces. In the Halden demo we used this structure:
| Space | Type | Category | Run by | Purpose |
|---|---|---|---|---|
| Start Here | Open | Start Here | Alumni office | Welcome, introductions, profile checklist |
| Class of 2015 | Private | Class Years | Class volunteer | Class notes, reunion planning, old photos |
| Class of 2020 | Private | Class Years | Class volunteer | Catching up after a disrupted graduation |
| London Chapter | Open | Chapters | Chapter lead | Drinks, talks and local news |
| New York Chapter | Open | Chapters | Chapter lead | North American meetups and visiting faculty |
| Career Network | Open | Careers & Mentoring | Career services | Jobs, referrals and CV reviews |
| Mentoring Circle | Private | Careers & Mentoring | Career services | Students matched with alumni mentors |
| Alumni Board | Secret | University | Alumni office | Board and chapter leads plan programmes |
Why make class years private and chapters open? Class spaces are where people share personal news and old photos, so members are more comfortable when only classmates can read them. Chapters are the opposite: you want every graduate in the city to discover them, so they should be open and easy to join.

On the same admin screen, choose two or three featured spaces. Featured spaces are shown first in the space directory sidebar and in new-member onboarding, so every new graduate is pointed to Start Here, their chapter and the Career Network straight away.
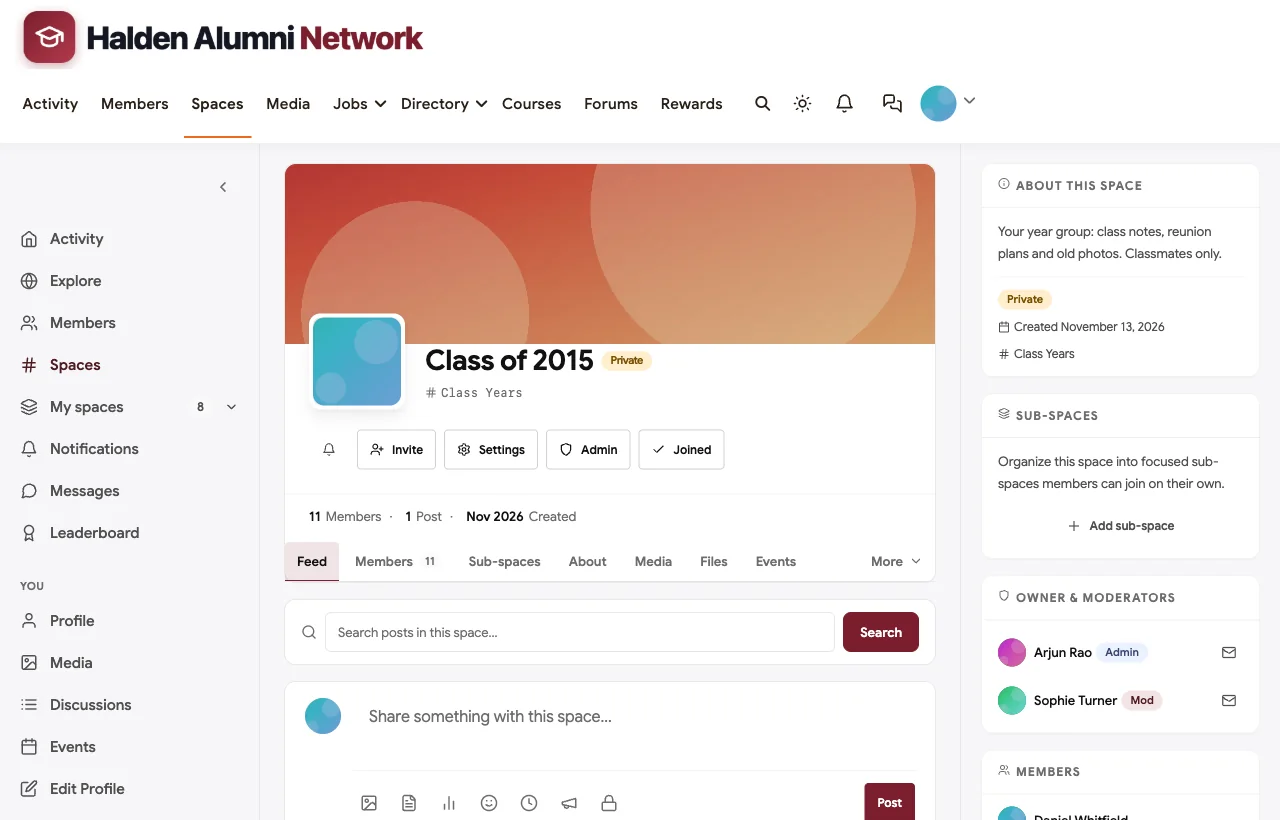
Give each space a clear one-line description, a cover image and at least one owner or moderator. The owner approves join requests for private spaces, pins the welcome post and keeps the space tidy. Here is what members see in the space directory:

And here is a private class space from the inside, with its own feed, members and events:
A good rule for growth: create a class or chapter space when a volunteer asks to run it, not before. An empty space for every graduating year since 1970 makes the network look abandoned. A short list of active spaces, each with a named host, makes it look alive.
Step 7: Set up mentoring between students and alumni
Mentoring is usually the feature students and recent graduates value most, and it is the clearest way to give alumni a meaningful role. You do not need a dedicated mentoring product to start; a private space with a clear process works well for the first few hundred pairs.
Here is the setup we used in the demo:
- Create a private Mentoring Circle space in the Careers & Mentoring category. Write the description as a promise: “Students and recent graduates matched with alumni mentors. Approval required.”
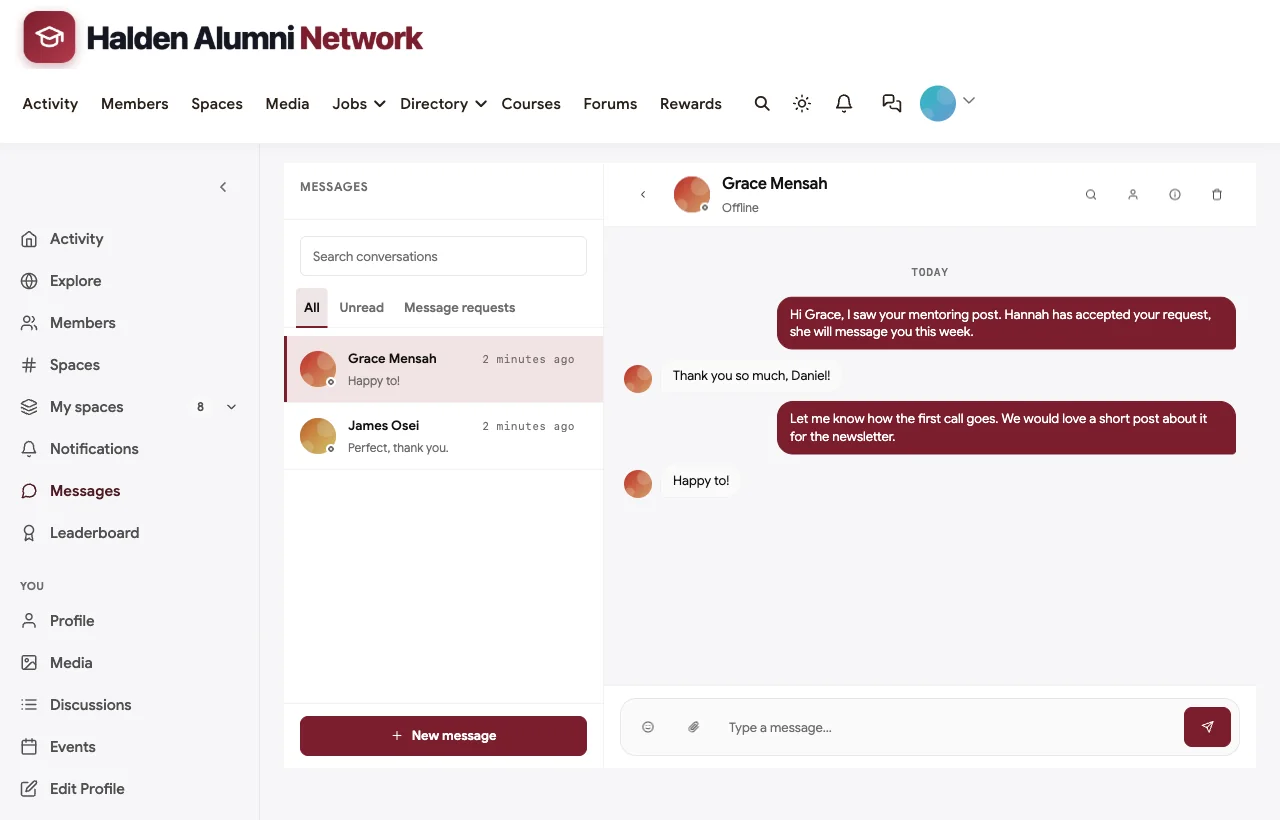
- Let students request to join. Because the space is private, students see a Request to join button. A career services moderator approves each request, which keeps the circle to genuine students and recent graduates.
- Invite mentors directly. Use the directory to find alumni with Open to mentoring students set to Yes, and add them to the space. With BuddyNext Pro, give each one a “Mentor” label so students recognise them everywhere in the community.
- Pin a matching post. Pin a post that explains how matching works: students introduce themselves with the field they want to enter and one question, and mentors reply or send a direct message.
- Use direct messages for the conversations. Once a pair is matched, they talk in direct messages. Ask mentors to suggest one short video call or meeting, and to post a short note in the space when a pairing has helped, so others see it works.

A poll is a quick way to learn how mentors prefer to help. In the demo, a class volunteer asked “How do you prefer to mentor students?” and half the alumni chose short video calls. That kind of answer tells career services how to set expectations for both sides.
When you outgrow informal matching, for example with a formal programme that needs applications, matching criteria and progress tracking, that is the point to look at a dedicated mentoring tool. Our comparison of alumni network software covers the hosted options that specialise in structured mentoring.
Step 8: Add an alumni jobs board and events
Jobs
Jobs posted by alumni are some of the most valuable content a network can have, because they come with a warm introduction built in. Install WP Career Board and open its settings. Three settings matter most for an alumni network:
- Auto-publish jobs. Turn this off, so every job waits for review before it appears. A pending job shows in the admin bar as “Jobs to review”, which makes the queue hard to miss.
- Hide a job after a number of reports. Set a low number, such as three, so a misleading listing disappears quickly while you review it.
- Default listing length. Thirty days is a sensible default; expired roles damage trust in the board.

Then, in BuddyNext > Integration Settings, put Jobs in the community navigation and turn on feed posting, so a new role appears in the activity feed and the Career Network space. Ask alumni who are hiring to post directly, and ask career services to post graduate schemes and internships.

Events
Events are what bring alumni back in person. CASE found that 65% of alumni event attendance was in person, so chapters and homecoming still matter more than webinars. Install Eventonomy and create events from Eventonomy > Events: homecoming weekend, each chapter’s regular meetup and online career panels.
Attach each event to the space that runs it. A chapter meetup created in the London Chapter space appears on that space’s Events tab and in the feed of everyone who belongs to the chapter, so the people most likely to attend are the ones who see it.


Add a venue for each campus and chapter location under Eventonomy > Venues so chapter leads can create events without retyping addresses.
Step 9: Seed the network, then invite in waves
The first members to arrive will judge the network by what is already there. An empty feed tells them nobody else came. So do the seeding before the main launch.
Seed with volunteers
Two to three weeks before launch, invite your volunteers: class representatives, chapter leads, the mentors career services already knows and the alumni board. Ask each of them to complete their profile, join their spaces and post one thing: a welcome in their chapter, a memory in their class space, a job if they are hiring. Twenty volunteers who each post twice give the first wave of members around forty posts to react to.
Send invitations
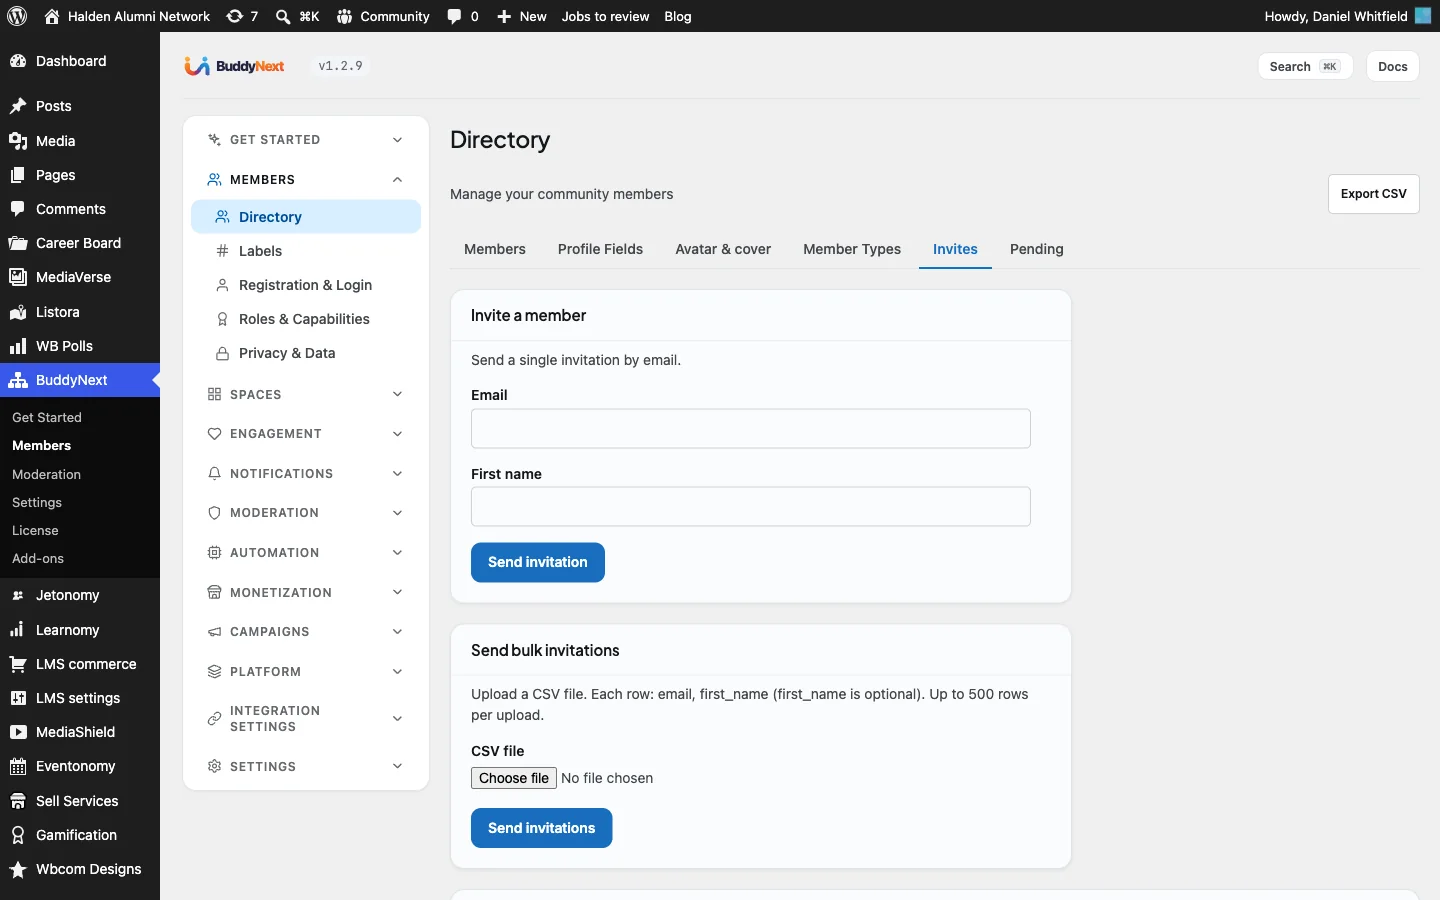
BuddyNext has invitations under Members > Invites. You can invite one person at a time by email and first name, or upload a CSV with an email column and an optional first-name column, up to 500 rows at a time. Use segments rather than one mass send:
- Wave 1: volunteers and mentors. Personal invitation from a named member of staff.
- Wave 2: the last three graduating classes and final-year students. Recent graduates have the highest communication engagement and the most to gain from mentoring and jobs.
- Wave 3: chapter cities. Everyone in each city with a chapter, timed a week before that chapter’s first event.
- Wave 4: everyone else. Once the feed, chapters and jobs board are visibly active.
Make the first visit count
In BuddyNext > Engagement > Announcements, create a site-wide announcement for the launch weeks, such as “Homecoming registration is open” or “Find your class: search the directory for your graduation year”. Announcements sit at the top of the feed until you end them, so every new member sees the one thing you want them to do.

Here is the homepage of the demo network after seeding, with a clear invitation to join and a feed that already shows class news, jobs and chapter plans:

Step 10: Keep it alive after launch
Most alumni networks do not fail at launch; they fade in month three, when the volunteers’ first enthusiasm wears off and nobody has planned what happens next. A light, repeating routine prevents that.
A weekly rhythm
- Monday: the alumni office posts one prompt in Start Here, such as a photo from the archive, a question about careers or a call for chapter volunteers.
- Midweek: career services shares the week’s new jobs and one mentoring success story in the Career Network.
- Friday: chapter leads post what is coming up locally.
Email updates for people who do not log in
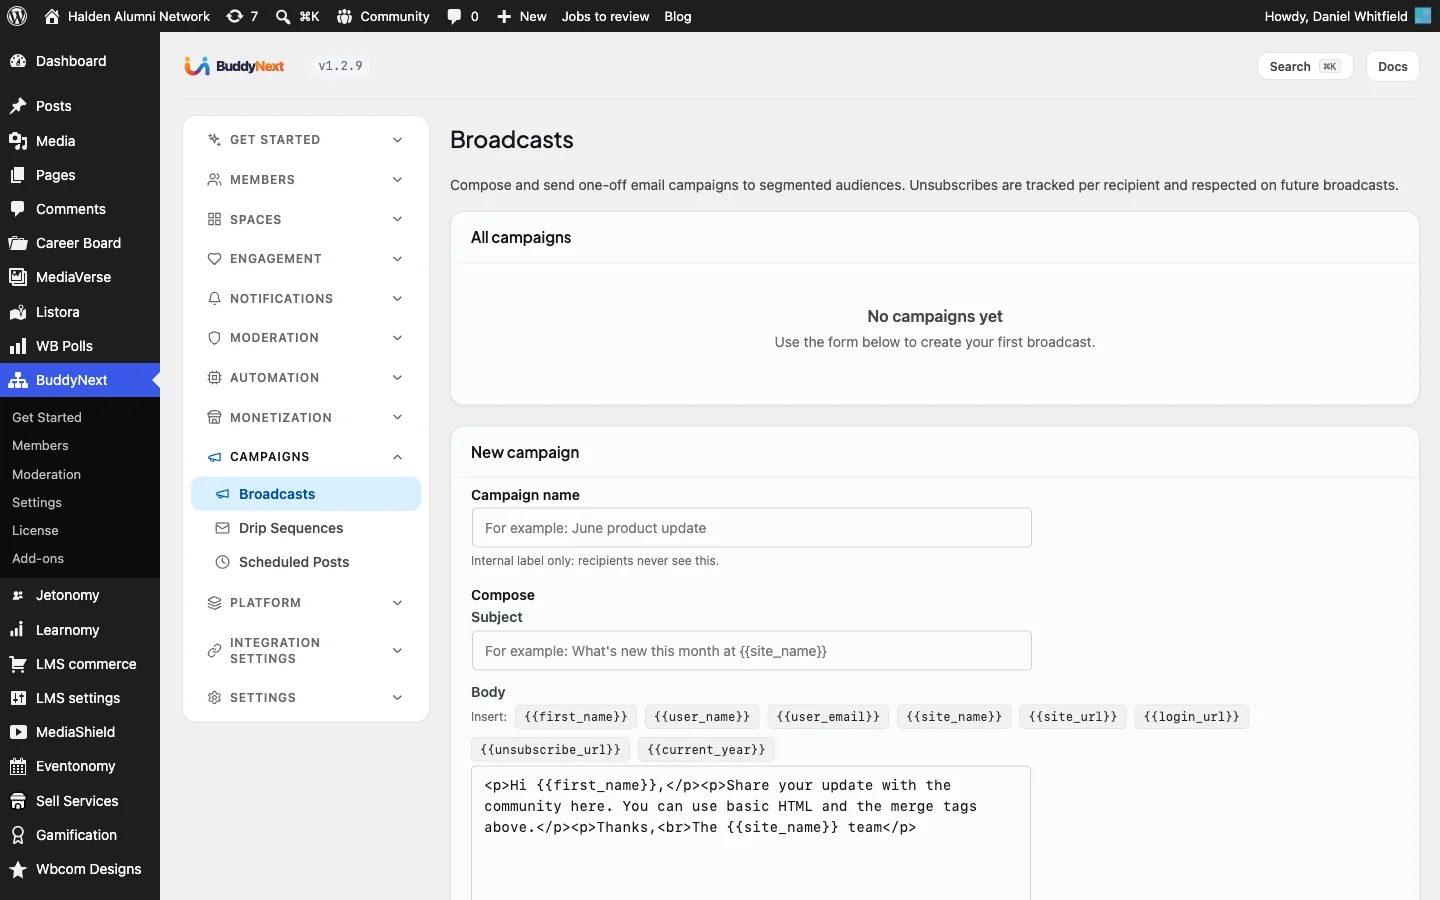
Most alumni will not visit every week, and that is fine. With BuddyNext Pro, you can send email broadcasts to segments of members: everyone in a space (one class year or one chapter), members with a particular label such as Mentor, members by activity level or members by join date, with merge tags for each member’s name, and you can set up drip sequences that welcome new members over their first few weeks. Unsubscribes are tracked per recipient, so you stay on the right side of email rules.
Recognise the people who make it work
CASE’s research shows that the alumni who volunteer are also the ones most likely to give. Make volunteering visible. With WB Gamification, members earn badges automatically for milestones such as their first update, first connection or first poll, and you can create your own badges for mentors and chapter hosts. The community leaderboard shows the most active members each week.


Moderation
Even a trusted alumni community needs basic moderation. Members can report posts, and reports go to a queue under BuddyNext > Moderation. Write short community guidelines (be respectful, no unsolicited selling, no sharing other members’ contact details) and link them from the sign-up form and the Start Here space. Give chapter leads and class volunteers moderator rights in their own spaces, so problems are handled by someone who knows the people involved.
Check the numbers you chose in step 1
Once a month, look at the two or three numbers you picked: profiles completed, mentoring pairs, jobs posted, event registrations. If one is flat, change one thing (a new prompt, a targeted email, a chapter event) and check again next month. Keep this light; a monthly half-hour review is enough for most alumni offices.
Mobile, accessibility and data
Mobile. Many alumni will only ever see the network on their phone. BuddyX and BuddyNext are responsive, so the feed, spaces, profiles and messages all work on a small screen. Check your homepage and one space on a phone before every invitation wave.

Accessibility. Use real text rather than images of text in announcements, add alt text to photos you post, and choose cover images with enough contrast for the space title. BuddyX’s dark mode helps members who prefer it.
Data ownership. Because the network runs on your WordPress site, the member data sits in your own database, alongside the rest of your site. You can export members as CSV from the Members screen, run your own backups and decide your own retention policy. If your institution needs engagement data in its CRM, plan that connection with your IT team; many institutions start with a regular CSV export and automate it later.
Privacy requests. Members can update or remove their own profile information, and administrators can export or erase a member’s personal data through WordPress’s built-in privacy tools. Mention this in your privacy notice.
Common mistakes to avoid
- Creating every space on day one. Fifty empty class spaces make the network look abandoned. Create spaces when volunteers ask.
- Making everything public. Alumni share personal news and contact details. Require login and keep class spaces private.
- Inviting everyone at once. A single mass invitation to every graduate, sent to an empty feed, burns your best chance at a first impression. Seed first, invite in waves.
- No owner for the approval queue. If sign-up requests wait a week, people give up. Approve daily.
- Collecting fields nobody uses. Every required field lowers sign-up completion. Require graduation year and nothing else.
- Leaving mentoring vague. “Mentoring available” means nothing. A private space with a clear request process and named mentors means a lot.
- Measuring sign-ups instead of activity. Track profiles completed, conversations started, jobs posted and events attended.
Related guides
- Best software to build a university alumni network: how BuddyNext compares with Graduway, Hivebrite, PeopleGrove, Almabase and the free social groups.
- Best software for a professional association community: useful if your alumni association charges dues or runs chapters like a professional body.
- How to set up a community space on WordPress with free plugins: the general setup guide behind every community in this series.
Want to try it before building your own? The live demo gives you a full BuddyNext community to click through.
How we built this guide
We built the Halden Alumni Network on a local WordPress site running the BuddyX theme, BuddyNext, BuddyNext Pro, WP Career Board, Eventonomy and WB Gamification, with fictional members, spaces, jobs and events created for this guide. Every screenshot comes from that site, taken in November 2026. Admin screens may look slightly different in later versions. Alumni engagement figures come from CASE’s published findings. buddyxtheme.com is published by the team behind BuddyNext.
Frequently asked questions
Can I build an alumni network on WordPress?
Yes. With the BuddyX theme and the BuddyNext community plugin, a WordPress site gets alumni profiles with custom fields, a searchable member directory, class and chapter spaces, an activity feed and registration approval. Companion plugins add direct messages (MediaVerse), an alumni jobs board (WP Career Board) and homecoming and chapter events (Eventonomy).
How long does it take to set up an alumni network?
The technical setup in this guide takes one to two days for someone comfortable with WordPress. Plan two to three more weeks for seeding with volunteers before inviting graduates, and a further month or two to invite in waves.
What profile fields should an alumni network have?
Graduation year, degree or programme, current employer, industry and whether the member is open to mentoring. Make graduation year required and show it on the sign-up form, since it is what the alumni office checks before approving a member. Keep everything else optional.
How do I make sure only real graduates join?
Set registration to admin approval, require graduation year at sign-up and check new requests against your alumni records every working day. For a fully closed network, use invite-only registration and send invitations from your records instead.
Should the alumni network be public or private?
Private. Require login to view the community so profiles, class spaces and posts are visible only to signed-in members. Keep your homepage public so prospective members understand what they are joining.
How do I set up mentoring between students and alumni?
Add an “open to mentoring” field to alumni profiles, create a private mentoring space that students request to join, invite willing alumni as mentors (with a visible mentor label if you use BuddyNext Pro) and let pairs continue in direct messages. Move to a dedicated mentoring tool only when you need formal applications and matching rules.
Can alumni sign in with their university account?
Yes. BuddyNext works with established SAML and OpenID Connect plugins for WordPress, so your identity team can connect the network to the university’s sign-in. Keep email sign-in available for alumni whose university accounts have expired.
How do I add a jobs board to an alumni network?
Install WP Career Board, turn off auto-publishing so new jobs are reviewed first, and enable it in BuddyNext’s integration settings so jobs appear in the navigation and the activity feed. Ask alumni who are hiring to post directly.
How do I keep alumni engaged after the launch?
Run a light weekly rhythm of prompts, jobs and chapter news, send email updates to segments of members who do not log in often, recognise mentors and chapter hosts publicly and hold regular in-person chapter events. CASE found that most alumni event attendance is still in person.
Who owns the alumni data?
On a self-hosted WordPress network, the institution does. Member data is stored in your own database, you can export it as CSV and you control backups and retention.
The bottom line
An alumni network that graduates actually use is built in the right order: a clear plan, private by default, profiles that make people findable, a few spaces with real hosts, mentoring and jobs that give alumni a role, and invitations that arrive at a network that is already talking. WordPress with BuddyX and BuddyNext gives you all of that on your own domain, with your own data and no per-member limits.
And start building your alumni network today.