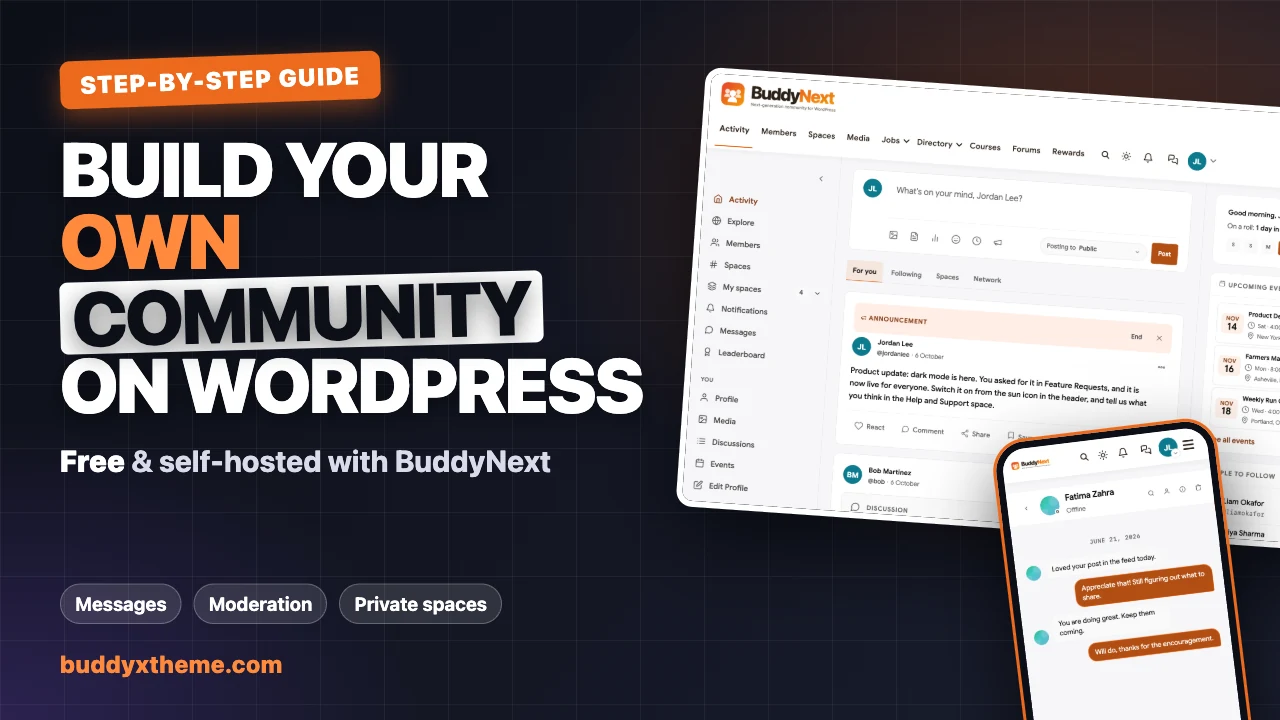
Every few months another community platform raises its prices, changes its rules or quietly shuts down a feature people relied on. If you run your community on someone else’s platform, you find out about those changes the same day your members do. Hosting the community on your own WordPress site changes that. The members, the conversations, the data and the rules all live in a database you control.
This guide shows you, step by step, how to set up a community space on WordPress using free, self-hosted plugins. We use BuddyNext as the community engine, WPMediaVerse for member messages and media, and the BuddyX theme as the design layer. Every screenshot comes from a real BuddyNext site, so what you see here is what you will see on your own dashboard.
Quick answer
To set up a community space on WordPress for free, install the BuddyX theme and the free BuddyNext and WPMediaVerse plugins, run BuddyNext’s setup wizard, then set your messaging, moderation and privacy rules before inviting members. Everything runs on your own hosting, with no platform fees.
- Install BuddyX, BuddyNext and WPMediaVerse.
- Run the 7-step setup wizard: name, registration mode, profile fields, spaces, pages and add-ons.
- Create Open, Private and Secret spaces for your members.
- Set who can message whom and a minimum account age for messages.
- Turn on moderation controls, and switch on members-only mode if the community is private.
We also answer the three questions that come up most often when people compare WordPress community plugins such as BuddyPress and PeepSo:
- How do I manage messages between members?
- How do I moderate a community without it eating all my time?
- How do I make the community private, so only members can see it?
Where a feature needs a paid add-on, we say so clearly in a Go further box. The free setup stands on its own. The add-ons are there to show how far the same community can grow when you need more.
In this guide
- Why host your community on your own WordPress site?
- What you need before you start
- Step 1: Install BuddyNext, WPMediaVerse and BuddyX
- Step 2: Run the setup wizard
- Step 3: Find your way around the BuddyNext dashboard
- Step 4: Set up member profiles and the member directory
- Step 5: Create spaces for your members
- Step 6: Get the activity feed working for you
- Step 7: Manage member messages
- Step 8: Set up moderation that does not take over your life
- Step 9: Make your community private
- Step 10: Configure notifications and email
- Step 11: Grow with BuddyNext Pro and the companion plugins
- Step 12: Get ready for a big community
- Step 13: Launch and run your first 90 days
- Three example setups
- BuddyNext vs BuddyPress vs PeepSo: which free community plugin?
- Your launch checklist
- Troubleshooting common setup problems
- Frequently asked questions
- Start small, then grow
Why host your community on your own WordPress site?
Before we install anything, it is worth being clear about what self-hosting gives you, because it shapes every decision later in this guide.
You own the member list
On a hosted platform, your members are technically the platform’s users. You can usually export a CSV, but the relationships, the posting history and the login accounts stay behind if you leave. On your own WordPress site, every member is a WordPress user in your own database. If you change hosting company, change theme or change plugins, the accounts come with you.
You set the rules
Hosted platforms write a single set of content rules for millions of communities. Your community is not millions of communities. A medical peer-support group needs stricter privacy than a hobby club. A professional association may need real names, while a gaming community may prefer handles. Self-hosting lets you decide what is allowed, who can see what and how moderation works.
No platform tax on growth
Most hosted platforms price by member count, by feature tier or by a cut of what members pay you. A self-hosted community has hosting costs, but those costs do not jump because your community doubled in size. You decide when to upgrade your server, and you keep what your members pay you.
Your community lives next to everything else you publish
Your blog, your shop, your courses and your documentation already live on WordPress. When the community lives on the same site, members use one login, search finds everything, and your community builds the search presence of your own domain instead of someone else’s.
The honest trade-off
Self-hosting means you are responsible for hosting, updates, backups and security. None of that is hard, and good managed WordPress hosting handles most of it, but it is real work. This guide includes a section on running a community at scale so you know what to plan for.
What you need before you start
You need surprisingly little to get a working community online.
Hosting and WordPress
- WordPress 6.9 or newer. BuddyNext declares 6.9 as its minimum.
- PHP 8.1 or newer. Most good hosts already run 8.2 or 8.3.
- A host that allows persistent object caching (Redis or Memcached). It is optional for a small community and strongly recommended once you pass a few hundred active members.
- Working email delivery. Communities send a lot of email: verification links, notification digests and moderation alerts. Use an SMTP plugin or a transactional email service rather than relying on your server’s default mail.
- Pretty permalinks. BuddyNext’s community URLs such as
/members/and/spaces/need them. Go to Settings, then Permalinks and choose any option other than Plain.
The three plugins and the theme
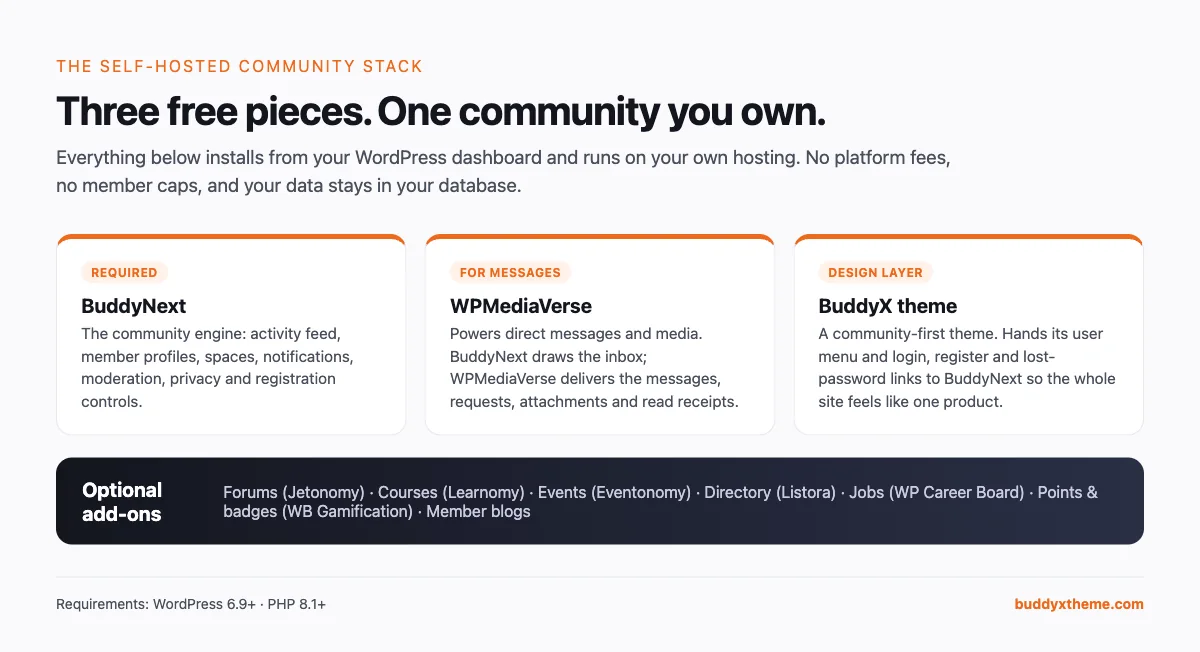
| Piece | What it does | Required? |
|---|---|---|
| BuddyNext | The community engine: activity feed, profiles, member directory, spaces, notifications, moderation, privacy and registration | Yes |
| WPMediaVerse | Direct messages between members, plus photo and video sharing, albums and stories | Needed for messages |
| BuddyX theme | The community-first design layer that BuddyNext plugs into | Recommended |
One detail matters here, because it surprises people: BuddyNext’s direct messages are delivered by WPMediaVerse. BuddyNext draws the inbox, the conversation screen and the composer, but the messaging engine underneath belongs to WPMediaVerse. If WPMediaVerse is not active, BuddyNext hides every “Message” button and never creates the Messages page. So if private messaging is part of your plan, and for almost every community it is, install both from the start.
A short plan on paper
Spend ten minutes answering these before you click anything. The setup wizard will ask you about each one.
- What is the community called? It appears in the header, emails and browser tab.
- Who can join? Anyone, invited people only, people you approve, or nobody for now?
- What should profiles show? Job title and company for a professional network, or interests and location for a hobby group?
- What are the first five spaces? Spaces are BuddyNext’s groups. A welcome space, a help space and three topic spaces is a good start.
- Who will moderate? Even a small community needs a second person who can hide a post when you are asleep.
The community-building consultancy FeverBee recommends starting with a small, hand-picked founding group rather than a big public launch. Richard Millington’s advice is to “build up a list of 50 to 150 potential members of the target audience” and invite them personally before opening the doors (FeverBee, How to start an online community). Keep that founding list in mind when you reach the registration step.
Building a community around AI and automation specifically? Compare the options in our guide to the best platforms to build an AI automation community.
Step 1: Install BuddyNext, WPMediaVerse and BuddyX
- In your WordPress dashboard, go to Appearance, then Themes, then Add New and install and activate BuddyX.
- Go to Plugins, then Add New, search for BuddyNext, install it and activate it.
- Install and activate WPMediaVerse the same way.
When BuddyNext activates, it checks that your database supports everything it needs, creates its tables and then sends you straight to its setup wizard. If you activate it on an unsupported setup, it deactivates itself and tells you why, rather than leaving a half-installed community behind.
Two things happen automatically with the BuddyX theme. First, BuddyX hands its user menu to BuddyNext, so the avatar menu in the header shows the community links. Second, the theme’s login, register and lost-password links point at BuddyNext’s own sign-in pages, so members never land on the plain WordPress login screen.
Step 2: Run the setup wizard
The wizard has seven steps. Each one saves as you go, you can skip any step, and every answer can be changed later from the BuddyNext settings. If you ever want to revisit it, the wizard lives at wp-admin/admin.php?page=buddynext-setup.

Wizard step 1: Branding
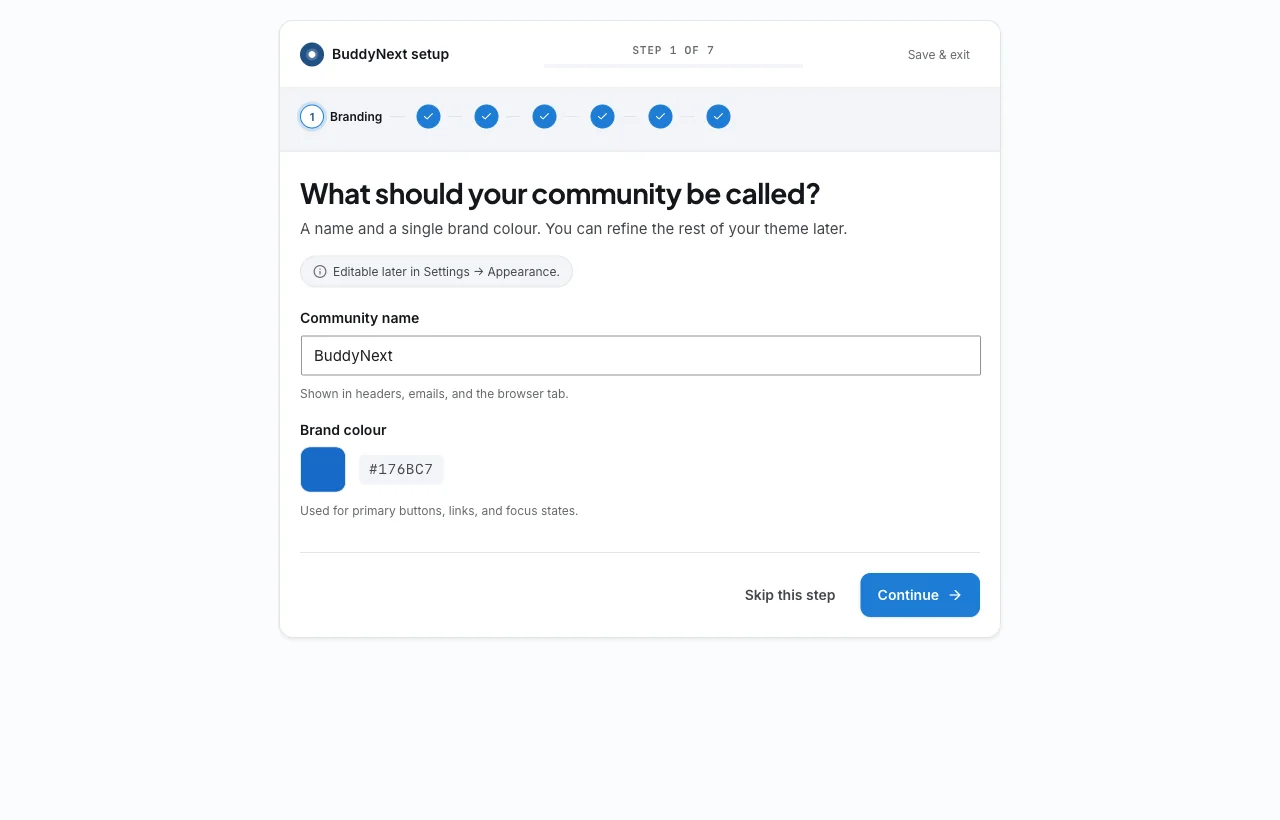
Enter your community name and choose a brand colour. The wizard also uses the community name as your site title, so you do not have to set it twice. The colour is used for buttons, links, active tabs and highlights across the community. Pick a colour with enough contrast against white text, because the same colour fills primary buttons. You can upload a logo and fine-tune the look later under BuddyNext, then Settings, then Appearance.
Wizard step 2: Registration
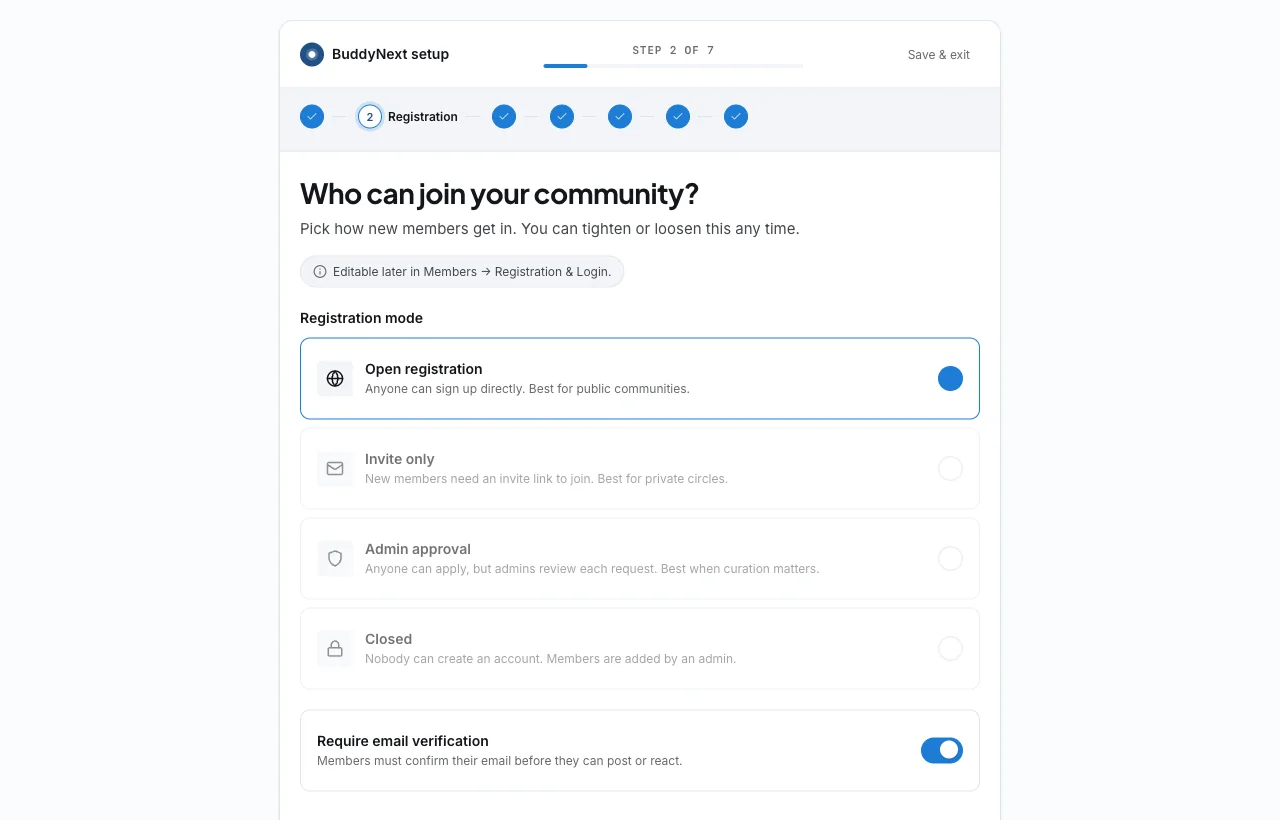
This is the most important decision in the wizard, so take a moment over it. There are four registration modes:
- Open registration. Anyone can sign up. Good for public communities that want growth.
- Invite only. New accounts need an invitation. Good for a founding-member phase or an exclusive network.
- Admin approval. Anyone can apply, and you approve or reject each application. Good for professional or vetted communities.
- Closed. Nobody can create an account. Useful while you prepare the community, or for a fixed cohort.
Below the modes are two switches:
- Require email verification. New members confirm their email address before they can fully take part. Leave this on. It stops most throwaway spam accounts.
- Private community. Every community page requires a login. We cover private communities in depth later in this guide.
If you are following FeverBee’s founding-members approach, choose Invite only now and switch to Open or Admin approval when you are ready to grow.
Wizard step 3: Profile fields
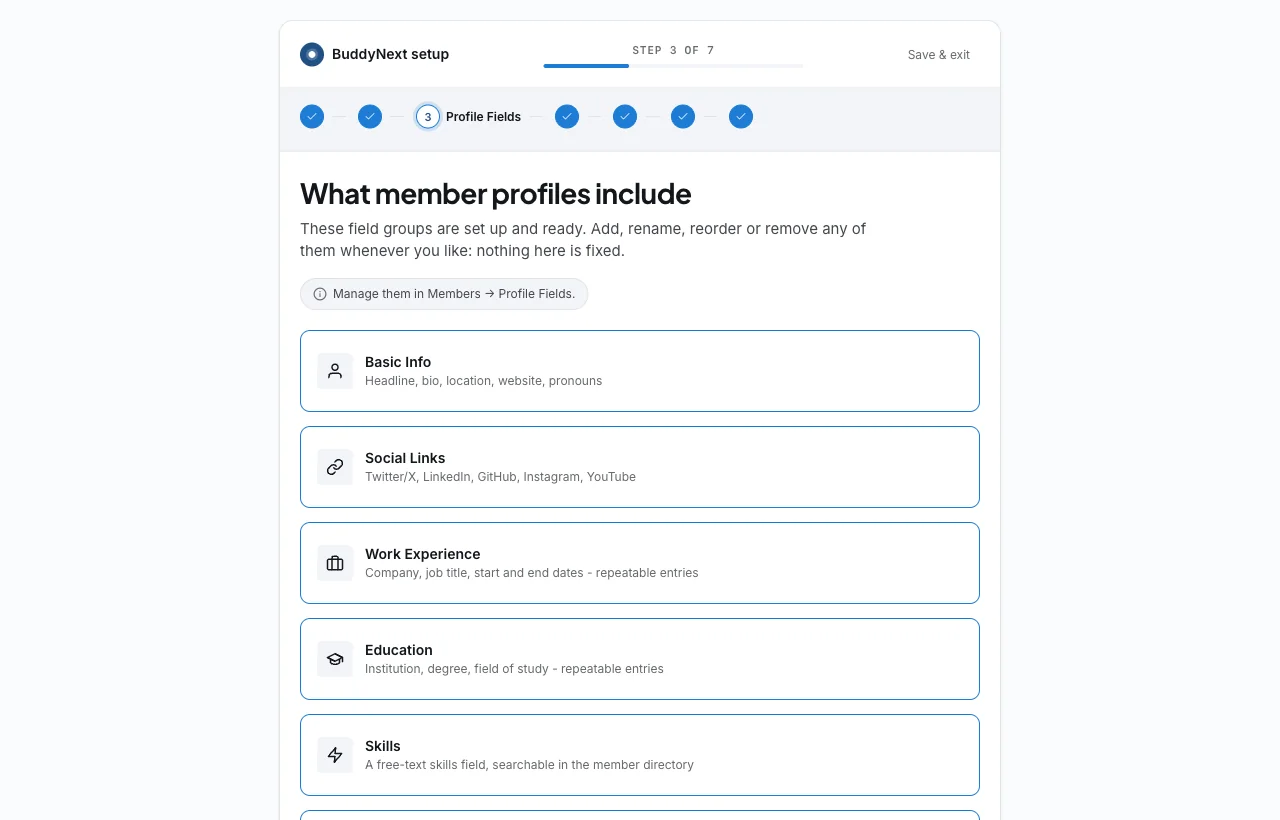
BuddyNext seeds a Basic Info group and an Interests group automatically. The wizard offers four more ready-made groups you can add with one click:
- Social Links for website and social profiles.
- Work Experience, a repeating group so members can add several jobs.
- Education, also repeating.
- Skills.
Only add what your members will actually fill in. Every empty field on a profile makes the community look less alive. You can build custom fields later.
Wizard step 4: Spaces

Spaces are where members gather around a topic, a team or a project. This step creates the categories that organise them, for example General, Announcements, Help and Support, and Off-topic. Categories make the spaces directory easy to browse once you have more than a dozen spaces.
Wizard step 5: Pages

BuddyNext creates the pages members will visit: Community Feed at /activity/, Members at /members/ and Spaces at /spaces/. By default it also makes the Community Feed your site’s home page and adds a Community menu, so members land in the community the moment they arrive. If you want to keep your existing home page, change it afterwards under Settings, then Reading. Behind the scenes, BuddyNext also prepares pages for notifications, sign-in and, when WPMediaVerse is active, messages. You can rename the URLs later under Settings, then Pages and URLs.
Wizard step 6: Add-ons

This step lists companion plugins that plug straight into BuddyNext: WPMediaVerse for media and messages, Jetonomy for forums, WB Gamification for points and badges, WP Career Board for jobs, Learnomy for courses and WB Listora for a directory. Tick the ones you want, and the wizard installs and activates them for you.
For a first launch, we suggest WPMediaVerse only, plus WB Gamification if you want to reward early members. Add the rest when a real need appears. We cover each integration later in this guide.
Wizard step 7: Done
The last step confirms the community is ready, with buttons to open the BuddyNext dashboard or view the community. The Get Started home in the dashboard then shows a checklist of what is configured and what is left.
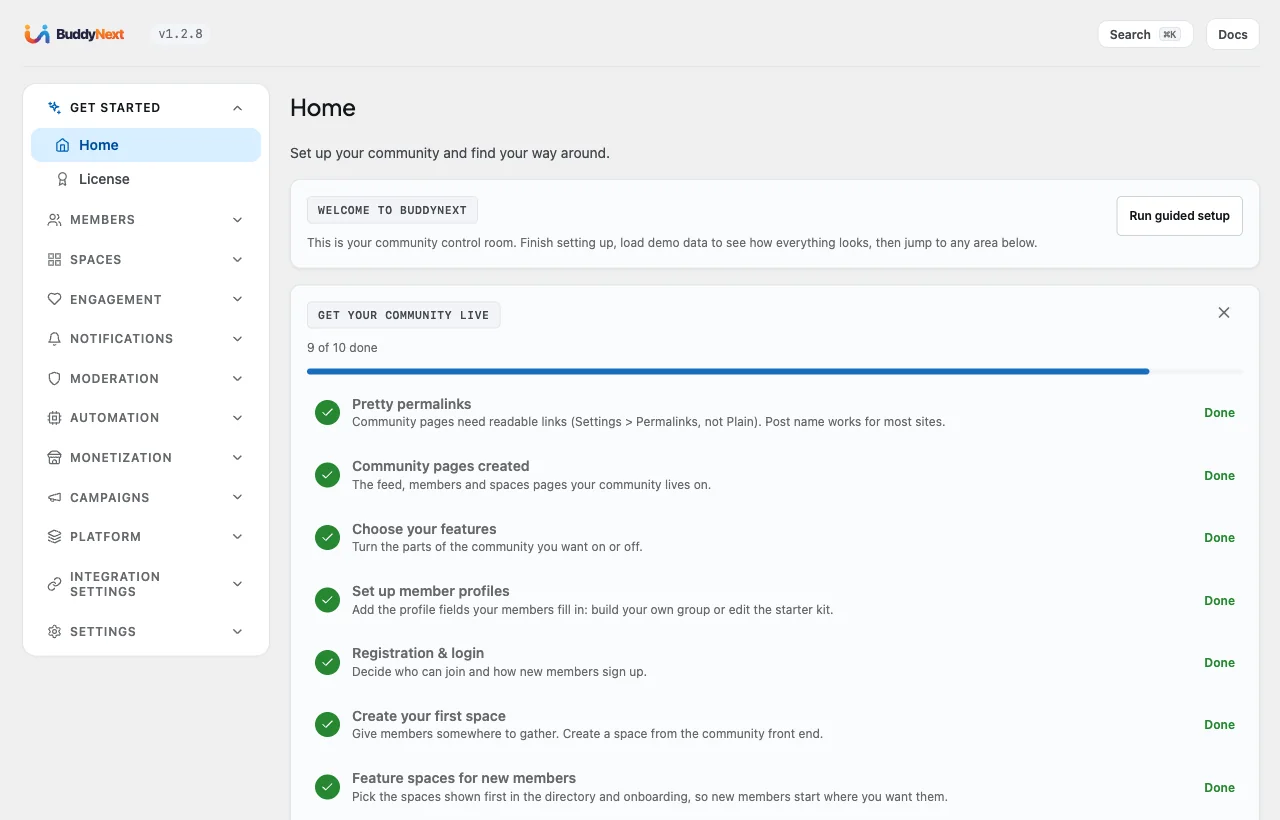
Step 3: Find your way around the BuddyNext dashboard
BuddyNext adds a single BuddyNext item to your WordPress admin menu. Inside, the settings are grouped by job, which makes them easier to find than one long settings page:
| Section | What you manage there |
|---|---|
| Get Started | Setup checklist and quick links |
| Members | Member directory, profile fields, avatars and covers, member types, invites, pending approvals, registration and login, roles, privacy |
| Spaces | Spaces directory, categories and space settings |
| Engagement | Insights, announcements, social settings and reactions |
| Notifications | In-app notifications, email settings, email templates and the email log |
| Moderation | Pending posts, reports, suspensions, appeals and the moderation log |
| Automation | Moderation controls such as thresholds, strikes, banned words and rate limits |
| Platform | Feature switches, add-ons, tools and webhooks |
| Settings | General, appearance, navigation and pages and URLs |
Turn features on and off
Go to BuddyNext, then Platform, then Features. This is where you decide what your community includes. Core pieces such as the activity feed, member profiles, follows and connections, and notifications are always on. Others are switches you can flip: hashtags, reactions, comments, polls, bookmarks, shares, announcements, verification badges, member onboarding, scheduled posts, the installable app experience and webhooks.
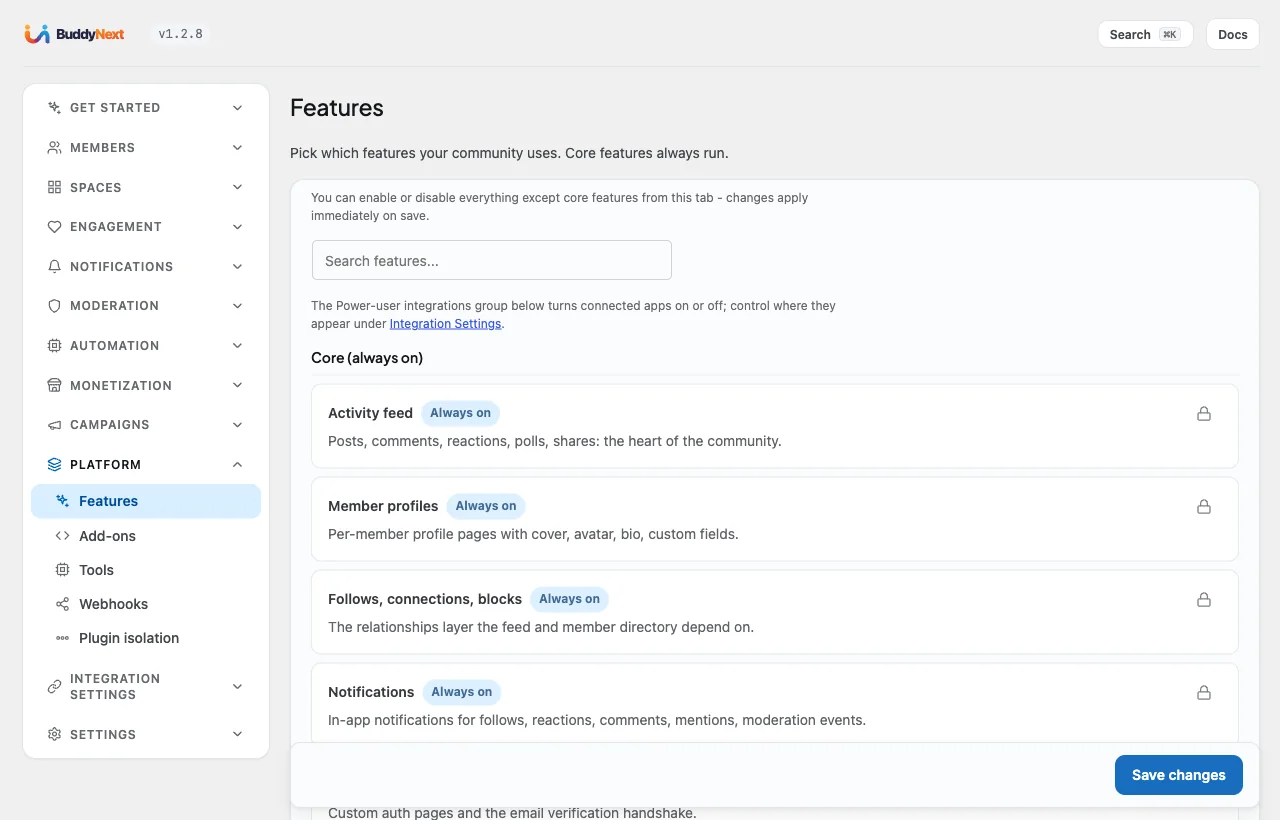
A good rule for a new community is to start with fewer features, not more. A feed, profiles, spaces, reactions, comments and messages are plenty for the first month. Every extra button is one more thing new members have to understand.
Set the look
Under Settings, then Appearance, upload your logo, confirm your brand colour and choose the default theme mode: light, dark, or follow the visitor’s device. BuddyNext also reads colours from your theme’s design settings, so it sits comfortably inside BuddyX.

Step 4: Set up member profiles and the member directory
Profiles are where members decide whether your community is worth their time. A thin profile makes everyone look like a stranger. A good one gives people a reason to start a conversation.
Build your profile fields
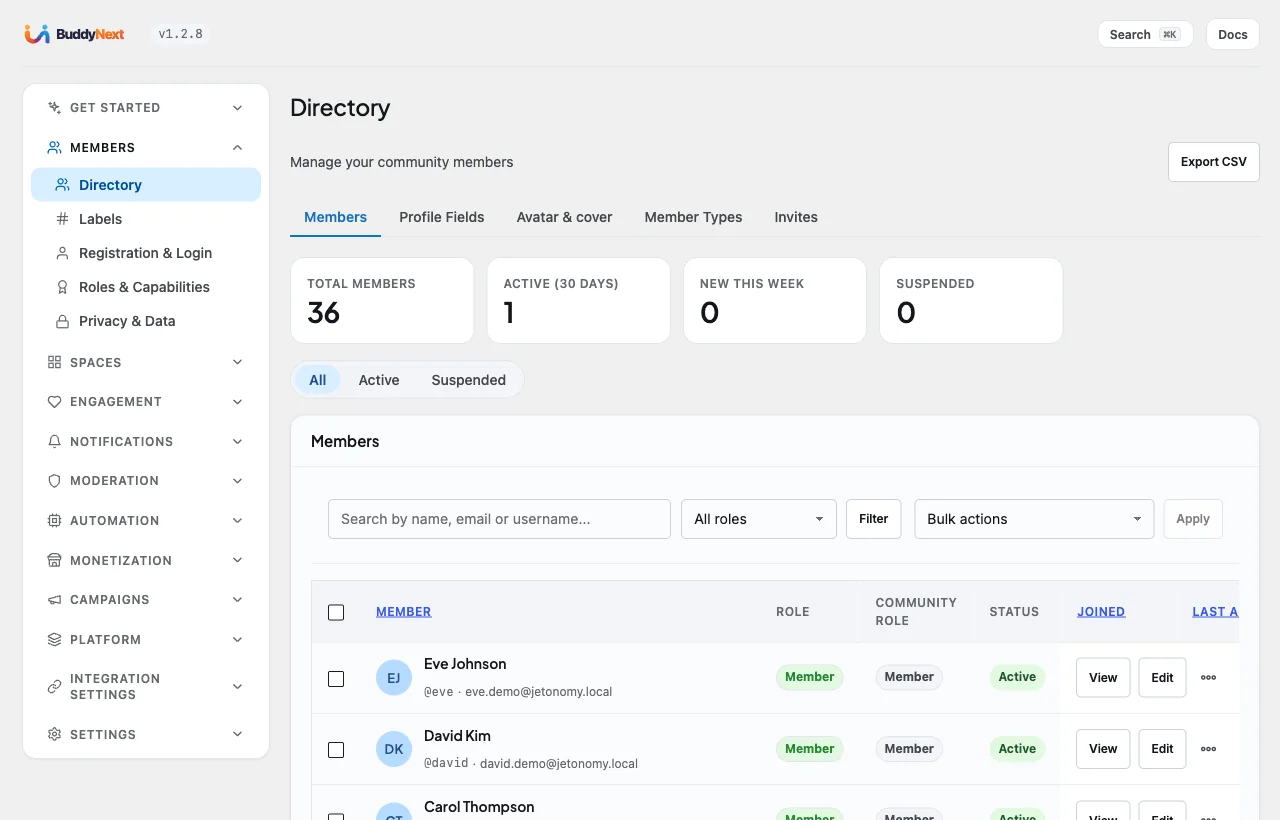
Go to BuddyNext, then Members, then Directory and open the Profile Fields tab. BuddyNext supports a wide range of field types:
- Text, long text (textarea), URL, email, phone and number
- Date and year
- Yes or no (boolean)
- Dropdown (select), radio buttons and multi-select
- Category multi-select and member-type selectors
- Colour
Fields live in groups. A group can be flat, such as Basic Info, or repeating, such as Work Experience, where a member adds as many entries as they need.
Let members control who sees each field
Every field has a visibility level, so members can share their city with other members without showing it to the whole internet. The levels are:
- Public: anyone who can see the profile.
- Members: logged-in members only.
- Followers: people who follow this member.
- Connections: people this member has connected with.
- Private: only the member and administrators.
For a community that collects sensitive information, such as health conditions or employer names, set a sensible default on each field and explain it on the profile edit screen.
Member types
Member types let you label groups of members, such as Students, Mentors and Alumni, or Buyers and Sellers. Members can be filtered by type in the directory, spaces can auto-join members by type, and profile fields can be shown only to certain types. You manage them under Members, then Directory, then Member Types.
What members see
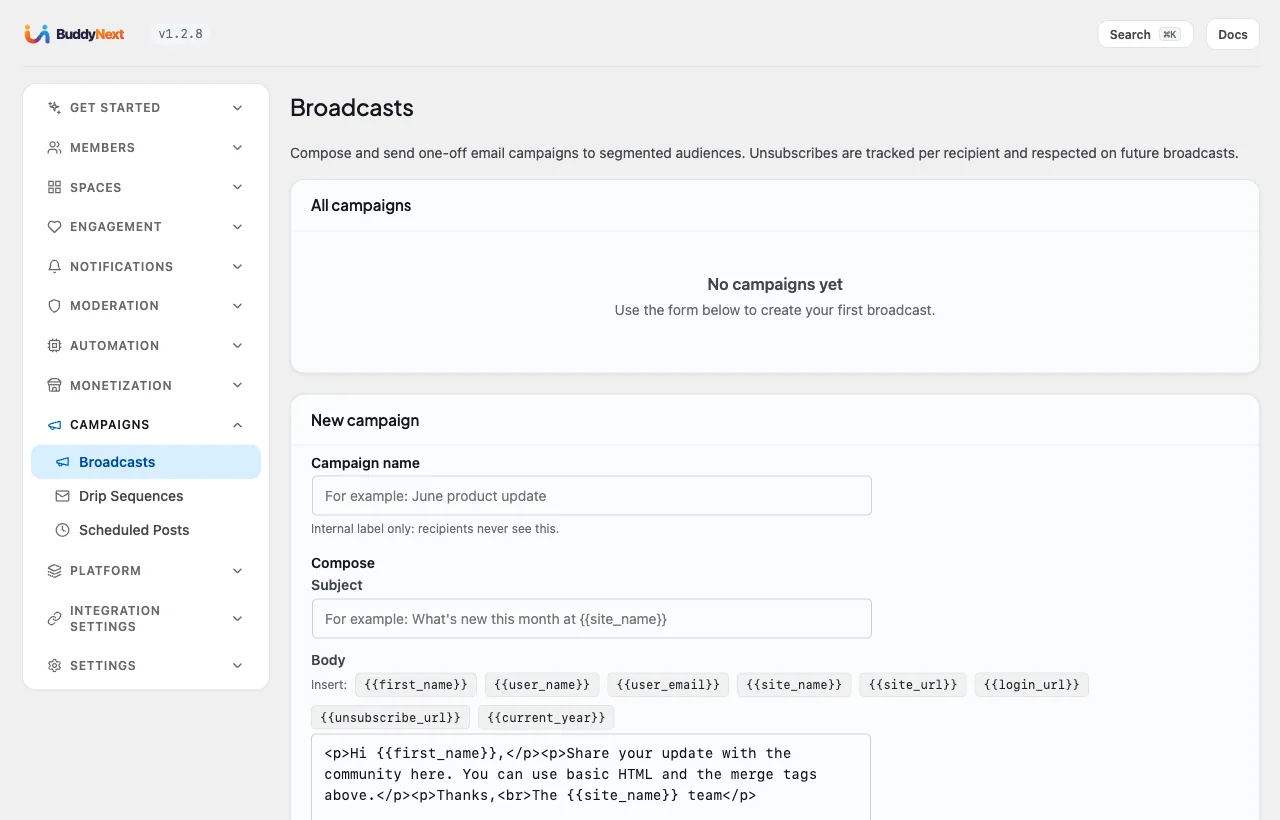
The front-end member directory at /members/ lets members search, filter by member type and follow or connect with each other. Each profile has tabs for posts, about, replies, media, followers, following and connections, and integrations add more tabs, such as Discussions or Events.
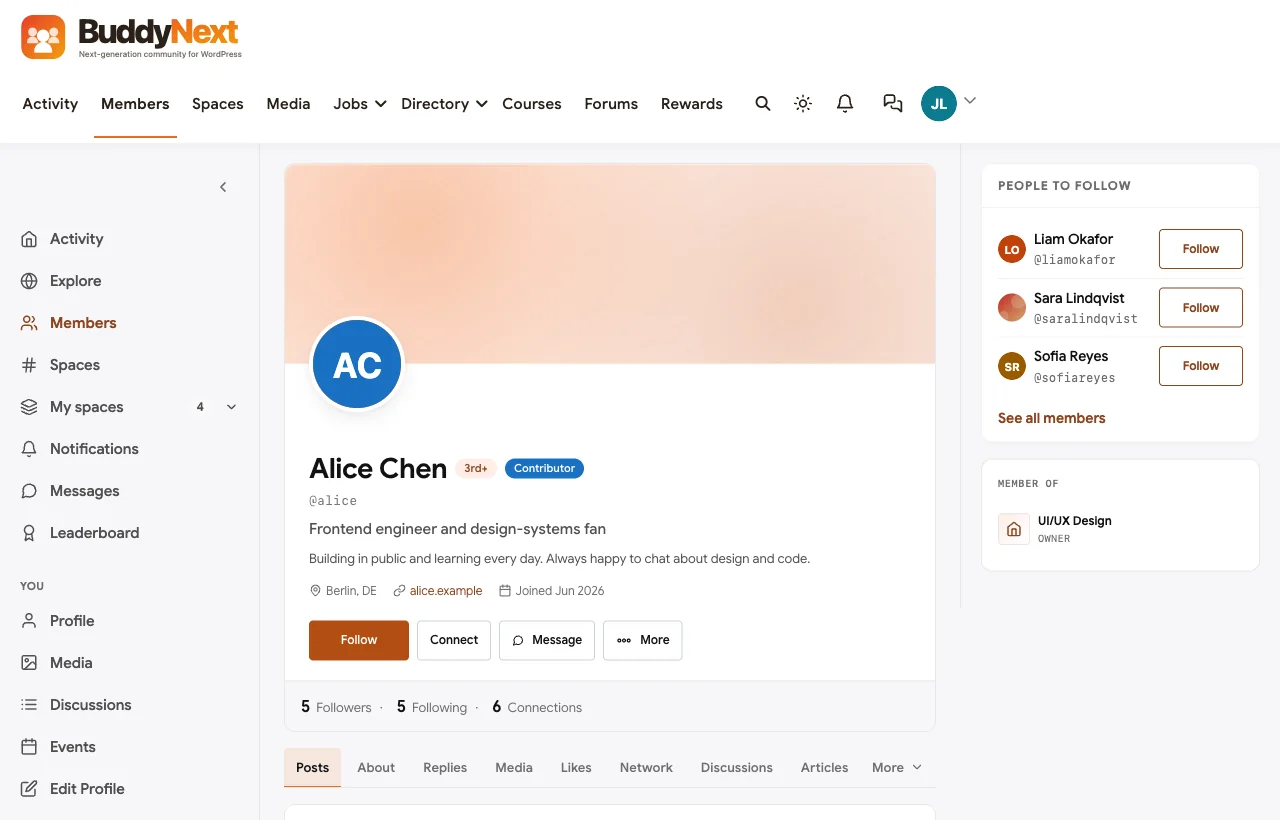
Members also see a profile completion prompt that nudges them to add a photo, a bio and the fields you have asked for. Completed profiles make the directory far more useful, so keep the prompt switched on.
Follows and connections
BuddyNext has two kinds of relationship:
- Follow is one-way, like social media. You see someone’s public posts in your Following feed.
- Connect is two-way and needs both people to agree, like a professional network.
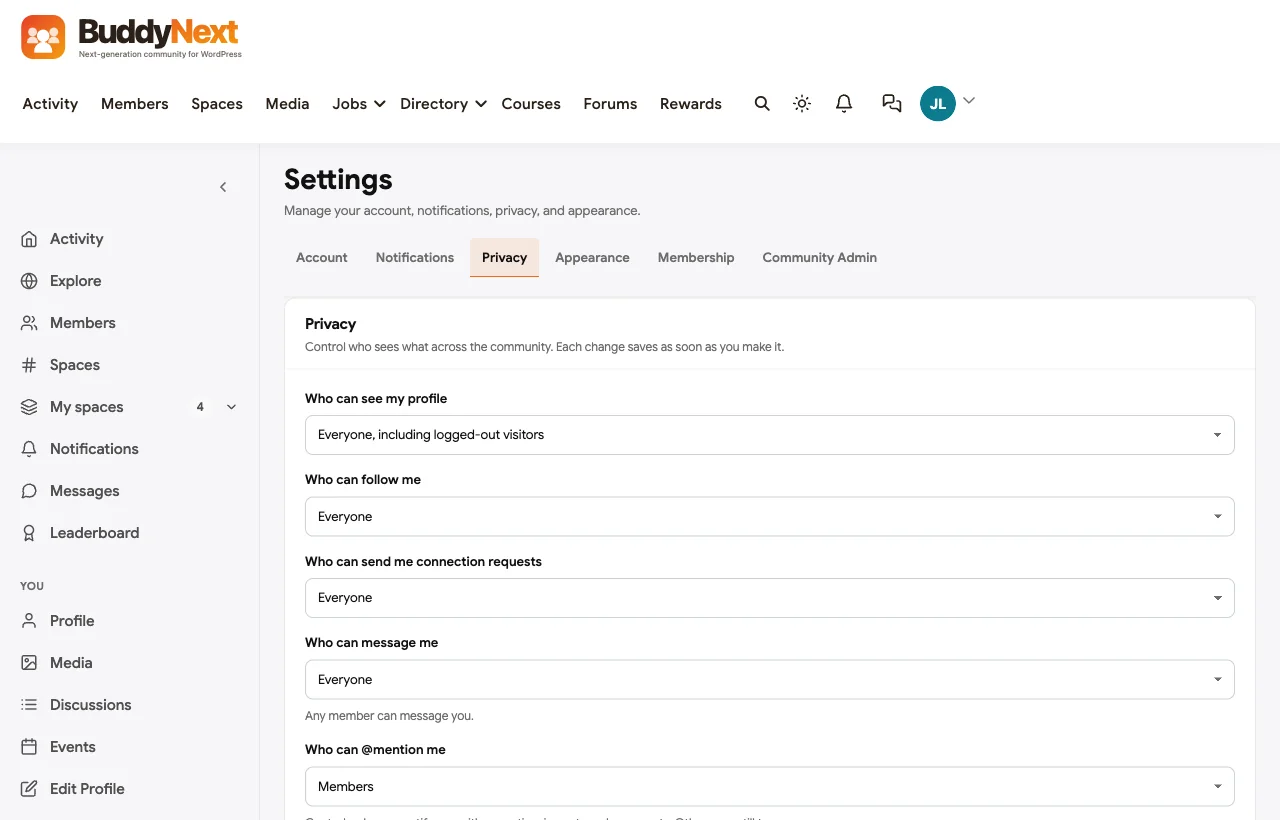
Members decide who can follow them and who can send connection requests under Settings, then Privacy on the front end. That screen also controls who can see their profile, who can message them and who can mention them.
Go further with BuddyNext Pro. Pro adds advanced field types (extended dates, location, advanced multi-select and number fields), conditional logic that shows a field only when another answer matches, member labels such as Staff or Mentor badges, profile view counts, and up to three pinned posts on a profile instead of one.
Step 5: Create spaces for your members
If profiles are the people, spaces are the rooms. A space has its own feed, members, roles and settings. Most active communities have a handful of busy spaces and many quieter ones, and that is healthy.
Choose the right space type
BuddyNext has three space types. Pick by asking two questions: should outsiders be able to find this space, and should they be able to read it?
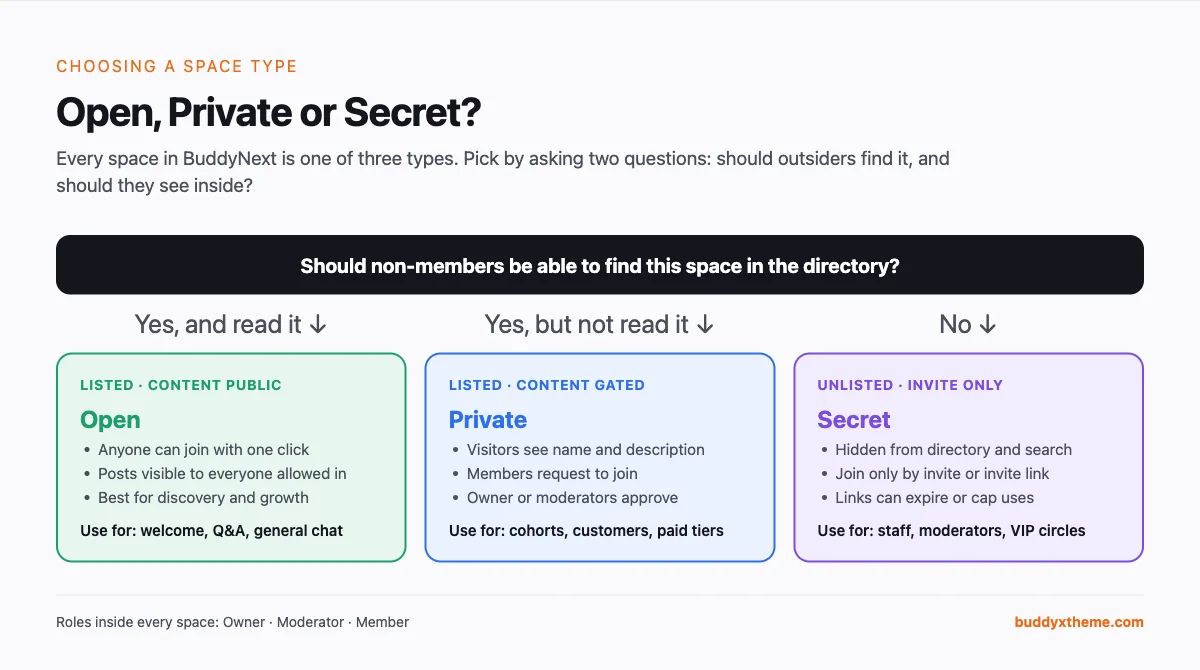
| Type | Listed in the directory? | Who can read posts? | How members join |
|---|---|---|---|
| Open | Yes | Anyone allowed into the community | Join with one click |
| Private | Yes, name and description only | Members of the space | Request to join, owner or moderator approves |
| Secret | No, hidden from directory and search | Members of the space | By invitation or invite link only |
Some practical examples:
- A Welcome or Introductions space should be Open so every new member lands somewhere friendly.
- A customer-only support space or a course cohort works well as Private. Non-members can see that it exists, which makes them want in.
- A moderators’ room or a leadership circle should be Secret. Nobody outside even knows it exists.
Create your first spaces
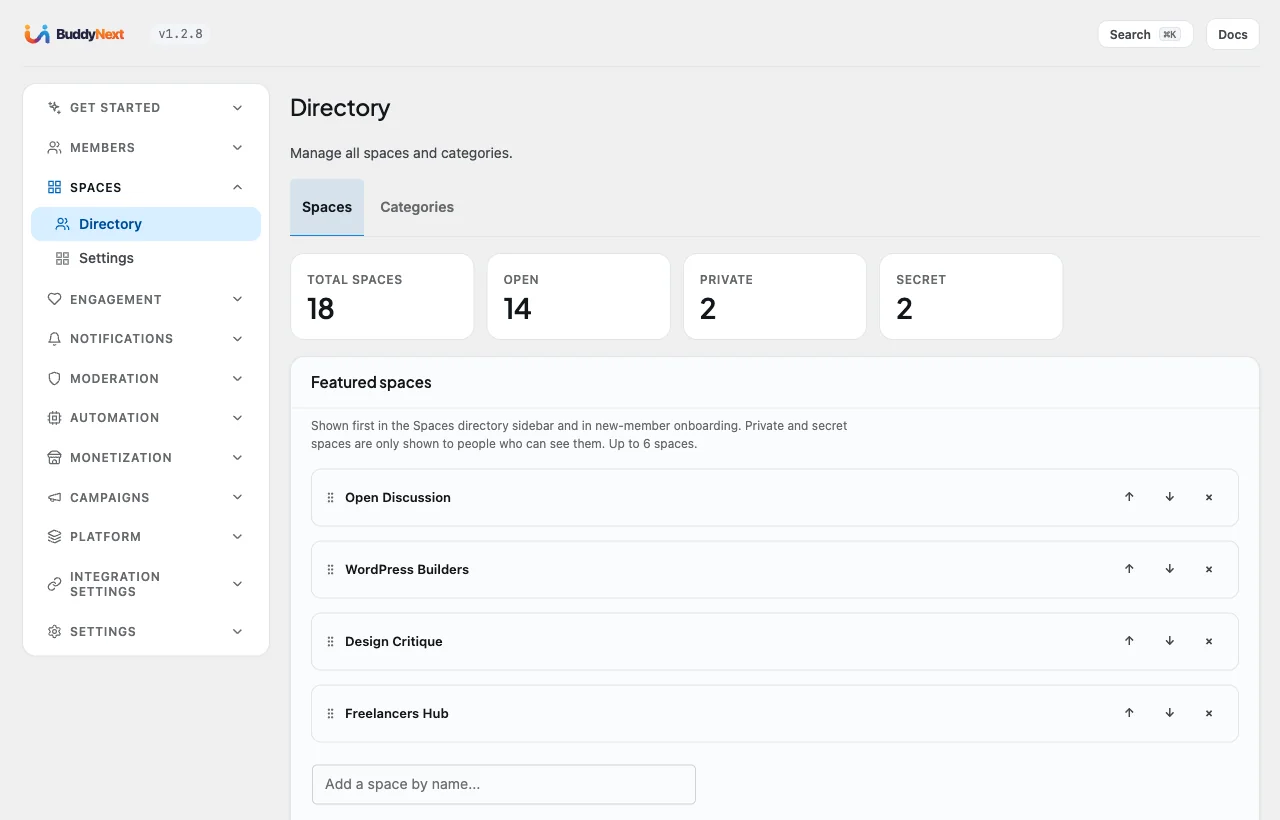
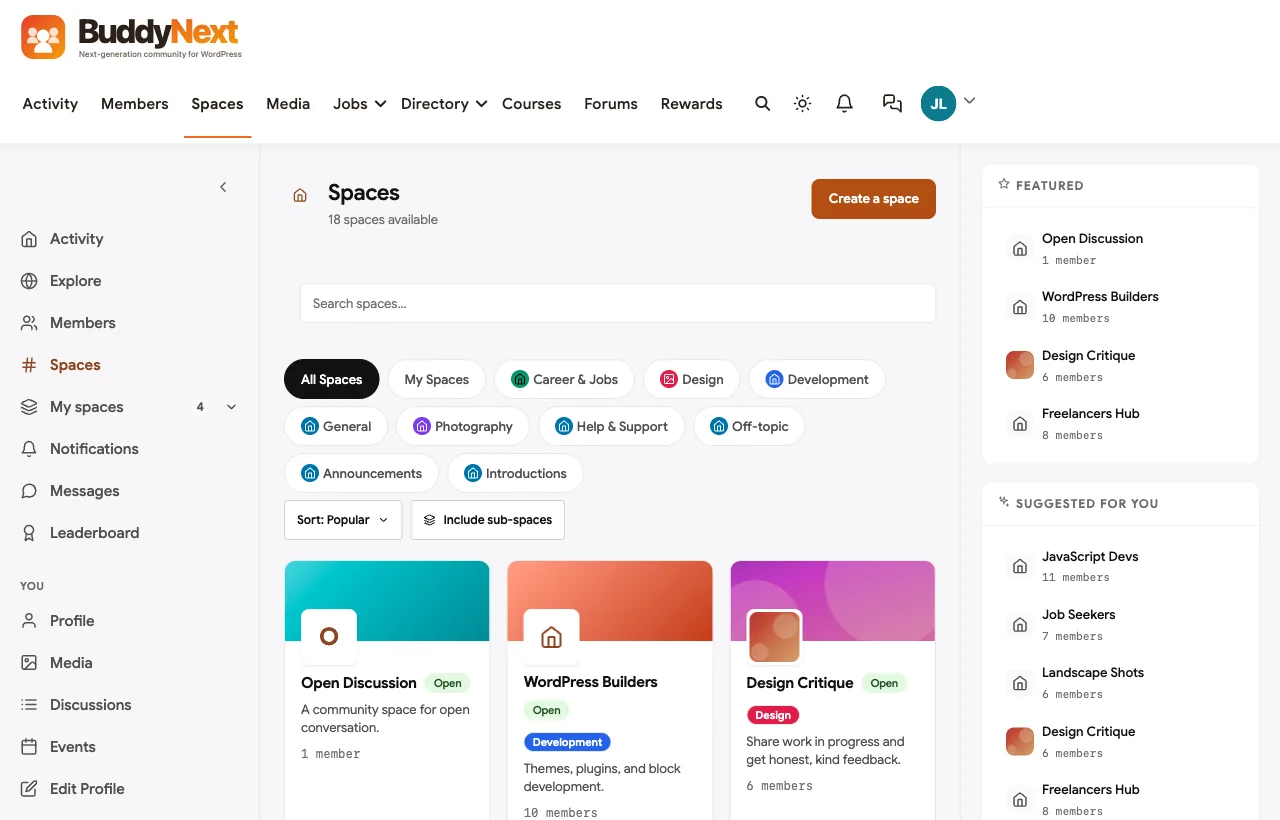
You can create spaces from the front end at /spaces/ with the Create a space button, or manage all of them in BuddyNext, then Spaces, then Directory. The admin directory shows totals by type and lets you feature spaces, which pins them to the top of the directory and suggests them during member onboarding.
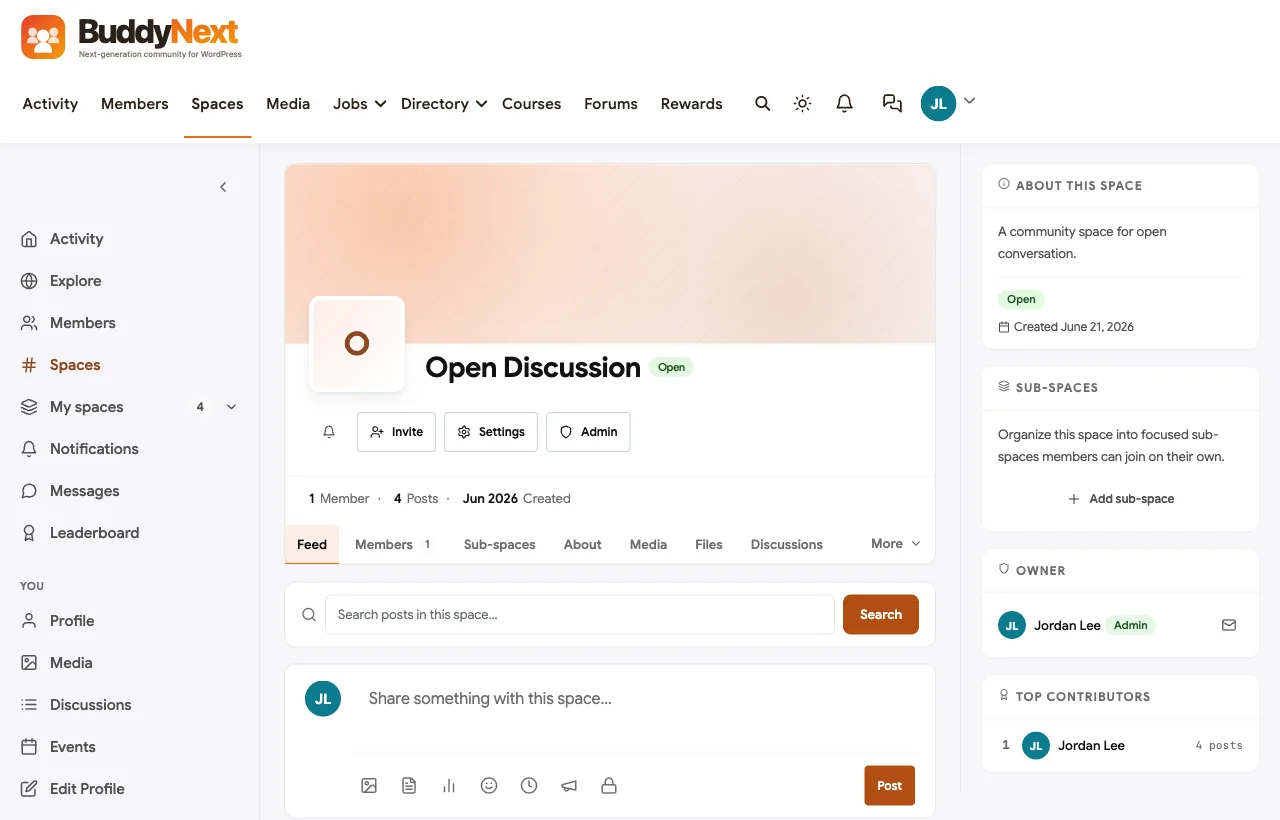
Roles inside a space
Each space has three roles:
- Owner: full control of the space, including settings and deleting it.
- Moderator: approves join requests, removes posts and bans members from the space.
- Member: posts, comments and reacts.
Site administrators can always moderate every space, even ones they have not joined. That matters for safety: no space can become a place your moderators cannot see.
Join requests, invitations and invite links
For Private spaces, members click Request to join and the owner or moderators approve or decline from the space’s moderation screen. Owners can also invite members directly.
For Secret spaces, the best tool is an invite link. Owners create a link with an expiry date and a maximum number of uses (unlimited, 1, 10 or 100). Anyone holding a valid link can open the Secret space’s home page and join. Send a single-use link to one person, or a 100-use link to a cohort, and let it expire after the event.
Auto-join new members
You probably want every new member in your Welcome space without asking them. BuddyNext can auto-join members to chosen spaces when they sign up, and can also auto-join by member type. For example, every member who signs up as a Mentor can land in the Mentors space automatically.
Space limits and sub-spaces
Under Spaces, then Settings, decide who can create spaces, cap how many spaces one member can create, and choose whether spaces can have sub-spaces. Sub-spaces work well for a large topic that needs smaller rooms, such as a Photography space with sub-spaces for Street, Landscape and Portrait.

Go further with BuddyNext Pro. Pro can gate spaces behind membership plans, so a space can be open only to members on a paid plan, with a paywall screen for everyone else. Space owners also get their own space statistics.
Step 6: Get the activity feed working for you
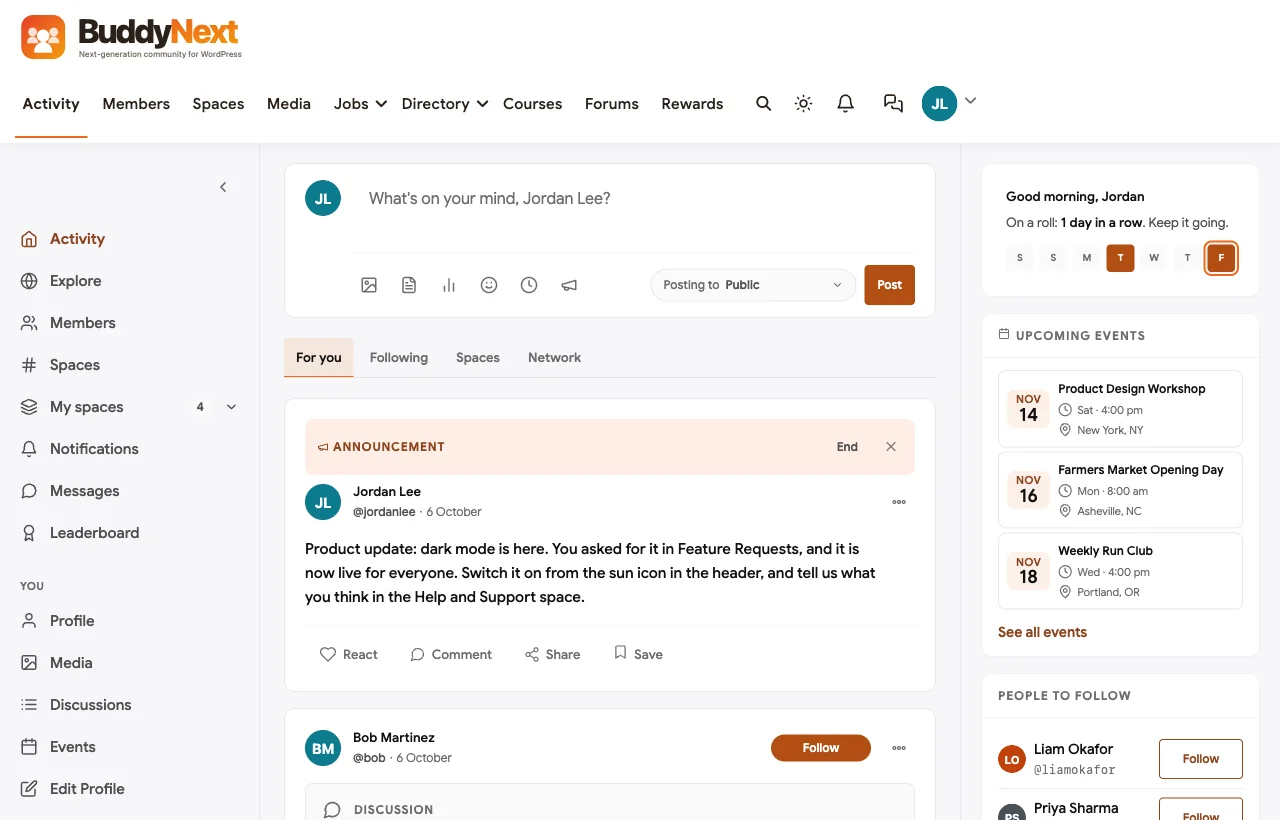
The activity feed at /activity/ is the front door of your community. It shows posts from people you follow, spaces you have joined and the wider network, in tabs: For you, Following, Spaces and Network.
What members can post
From the composer, members can write posts with photos and media, create polls, add emoji, and paste links that turn into link previews. If you enable scheduled posts, they can schedule a post for later.
Every post has a privacy setting:
- Public: everyone who can see the community.
- Followers: people who follow the author.
- Connections: the author’s connections only.
- Space members: when posted inside a space.
- Private: only the author.
Reactions, comments, mentions and hashtags
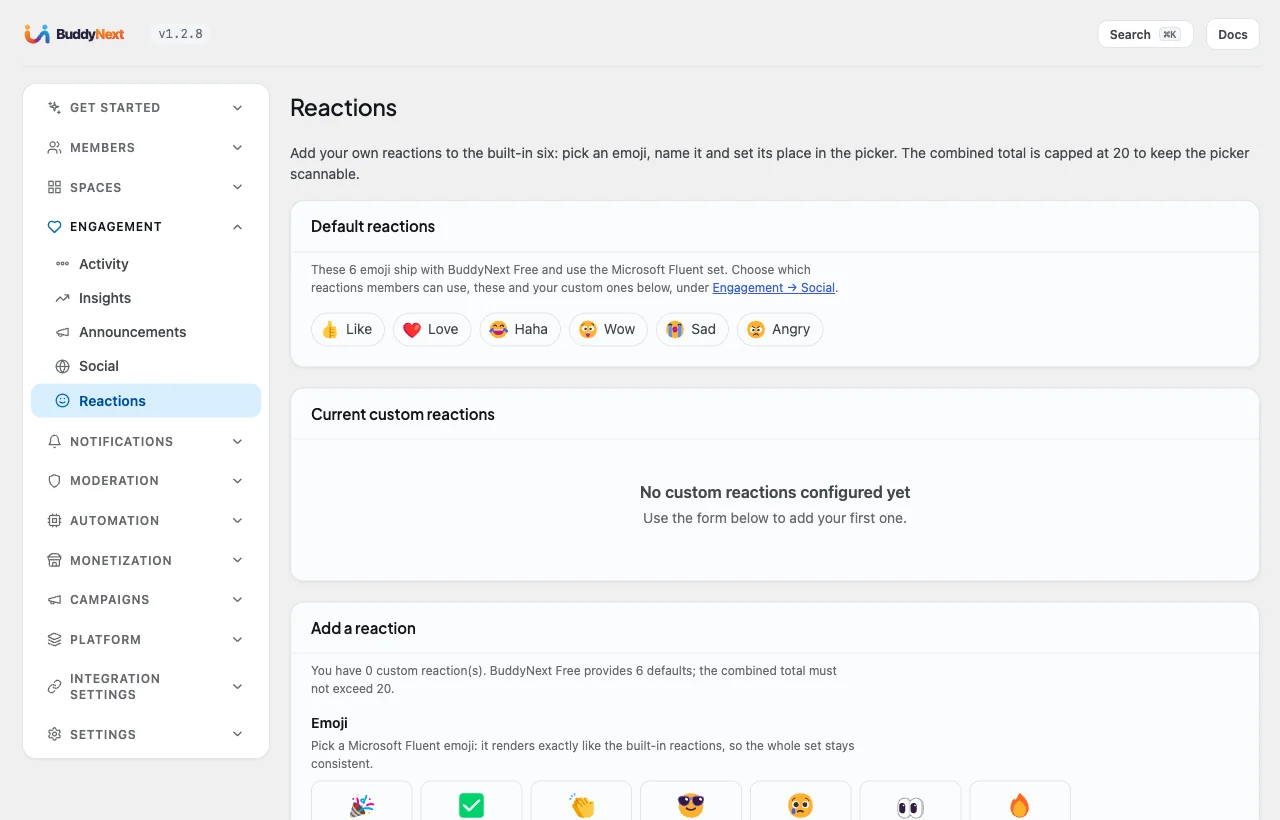
- Reactions: like, love, haha, wow, sad and angry. You can switch any of them off under Engagement, then Reactions if, for example, an “angry” reaction does not suit your community.
- Comments: threaded up to five reply levels deep, so conversations stay readable.
- Mentions: type
@and a handle to notify someone. Members can control who is allowed to mention them. - Hashtags: tags become clickable, with a trending list and a page for each tag. You can ban specific hashtags in the moderation controls.
Explore, search, bookmarks and announcements
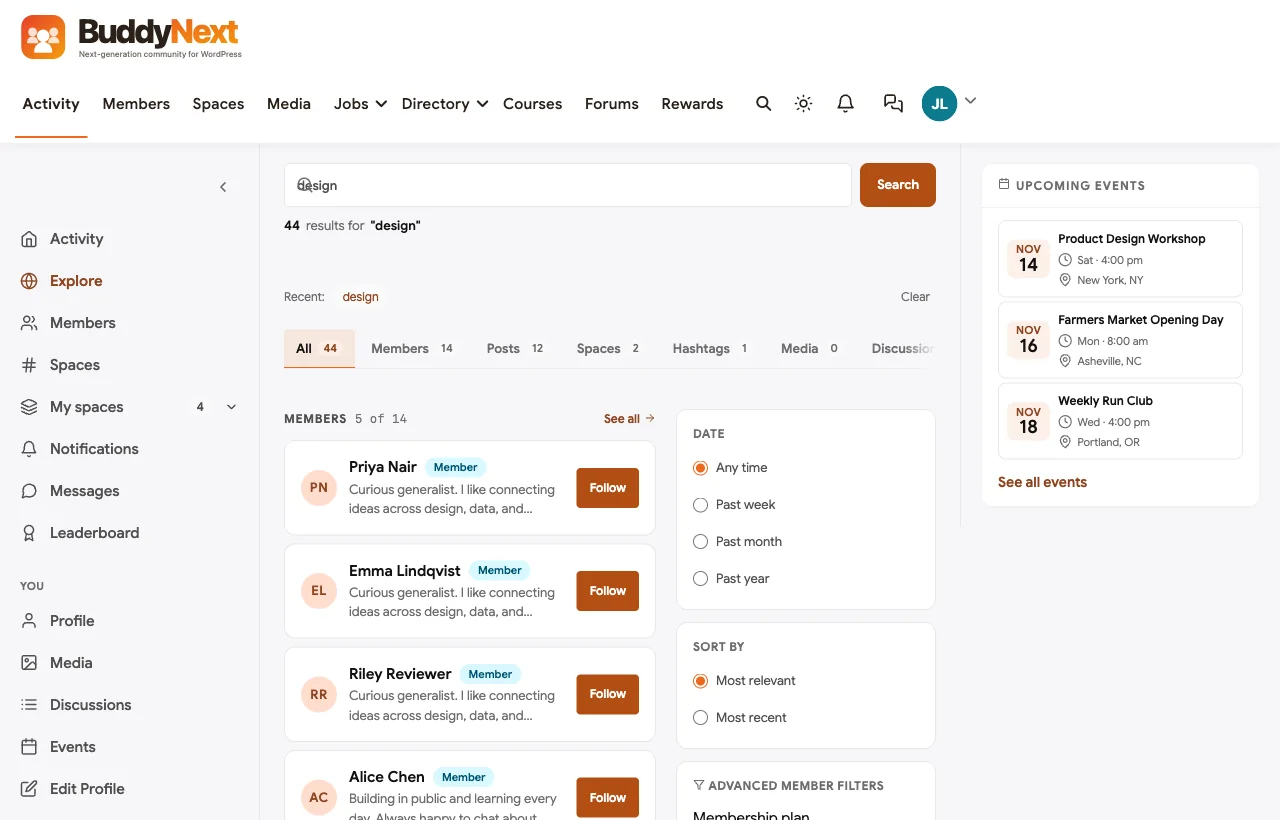
- Explore (
/activity/explore/) helps members discover people, spaces and posts they do not follow yet. - Search (
/search/) covers members, posts, spaces, hashtags and media in one place. - Bookmarks let members save posts privately to read later.
- Announcements let admins pin an important message to the top of everyone’s feed, such as a rules update or an event reminder.
Go further with BuddyNext Pro. Pro adds custom reaction emoji, a scheduled-posts management screen, saved searches, and optional AI features such as feed ranking, semantic search and suggested replies.
Step 7: Manage member messages
Private messages are where many of the strongest relationships in a community form. A mentor answers a quiet question, two members plan a meet-up, or a customer gets help without posting publicly. Messages are also where most abuse happens, because nobody else can see them. Getting the settings right protects both.
Turn messages on
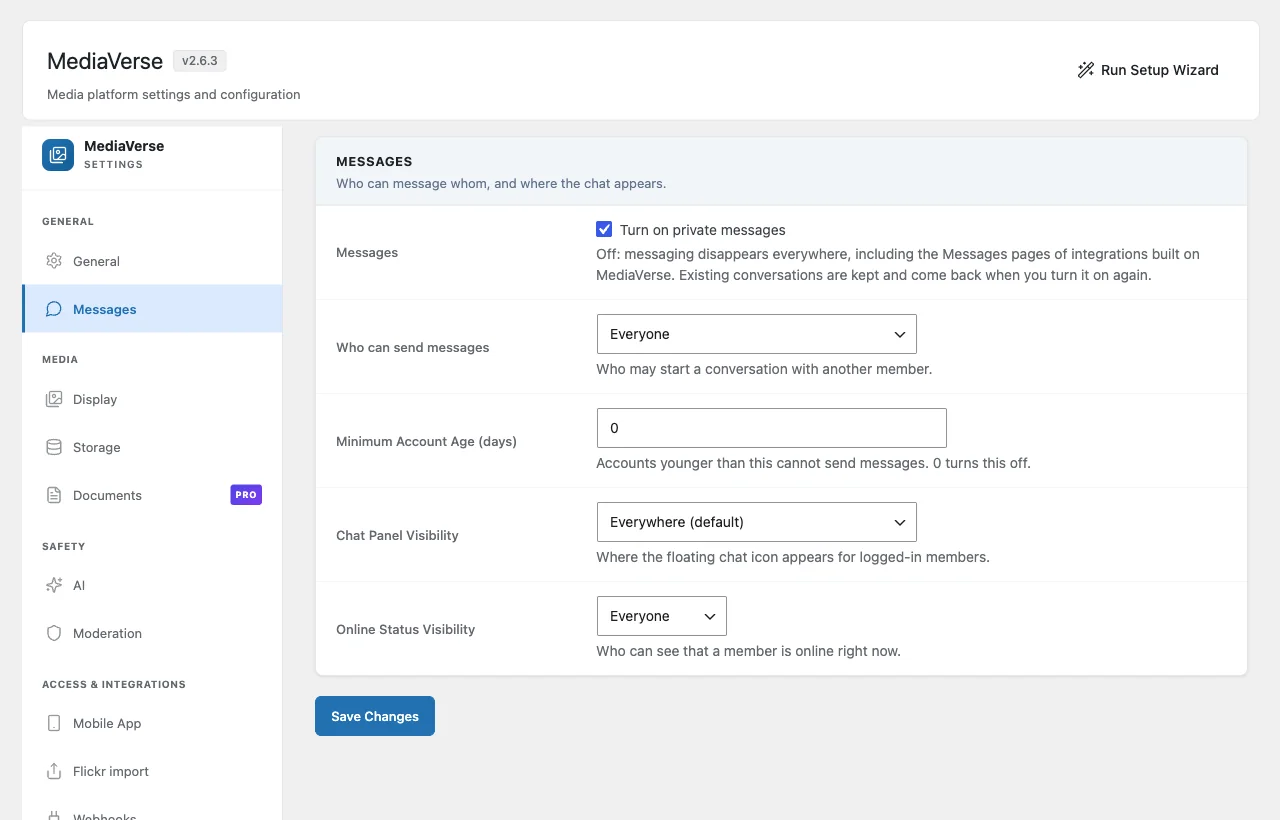
Messages are delivered by WPMediaVerse, so first confirm it is active. Then go to WPMediaVerse, then Settings, then Messages in your admin. BuddyNext’s own Direct Messaging setting shows the current state and links you straight to this screen.
Decide who can message whom
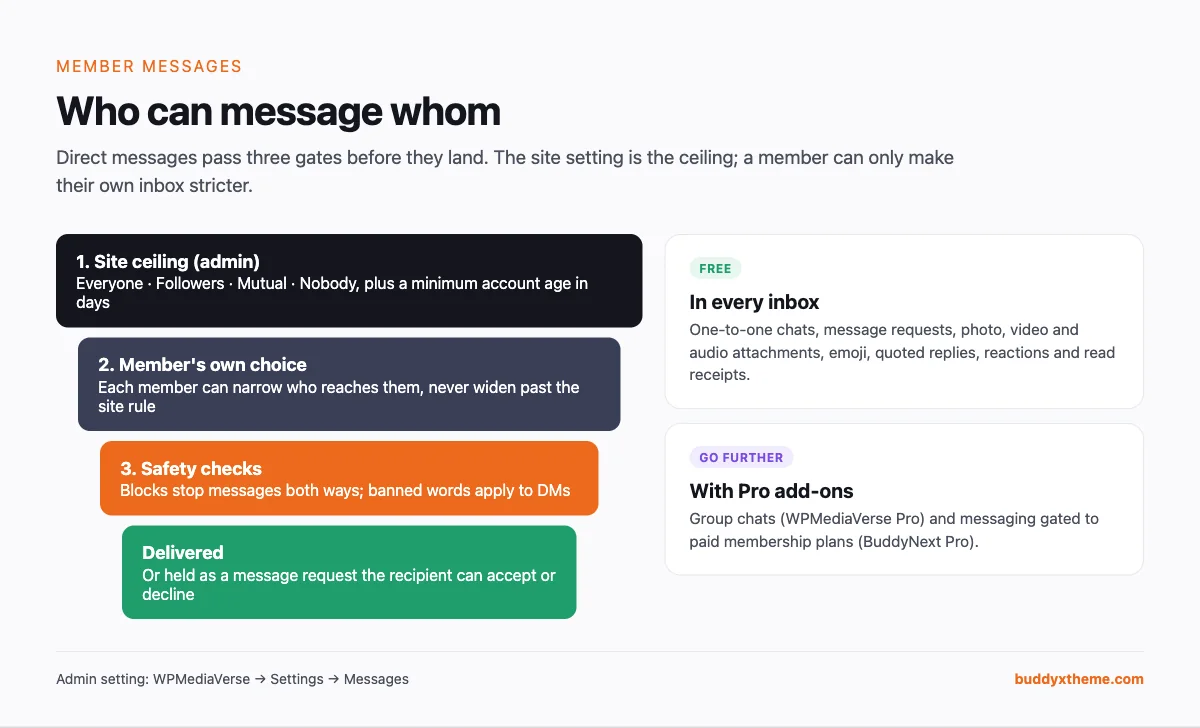
This is the single most important messaging decision. WPMediaVerse sets a site-wide ceiling for who can start a conversation:
- Everyone: any member can message any other member, and messages arrive straight in the inbox.
- Followers: people who follow the recipient message them directly. A first message from anyone else arrives as a message request.
- Mutual: people who follow each other message directly. If you follow someone who does not follow you back, your message arrives as a request. If you do not follow them at all, you cannot message them.
- Nobody: direct messages are switched off.
Each member can then make their own inbox stricter under their privacy settings, but never looser than your site rule. If you set the ceiling to Mutual, no member can open their inbox to everyone.
You can also set a minimum account age, in days, before a new account is allowed to send messages. This one setting stops most spam campaigns, which rely on brand-new accounts messaging as many people as possible before they are caught. Three to seven days is a sensible starting point for an open community.
Message requests
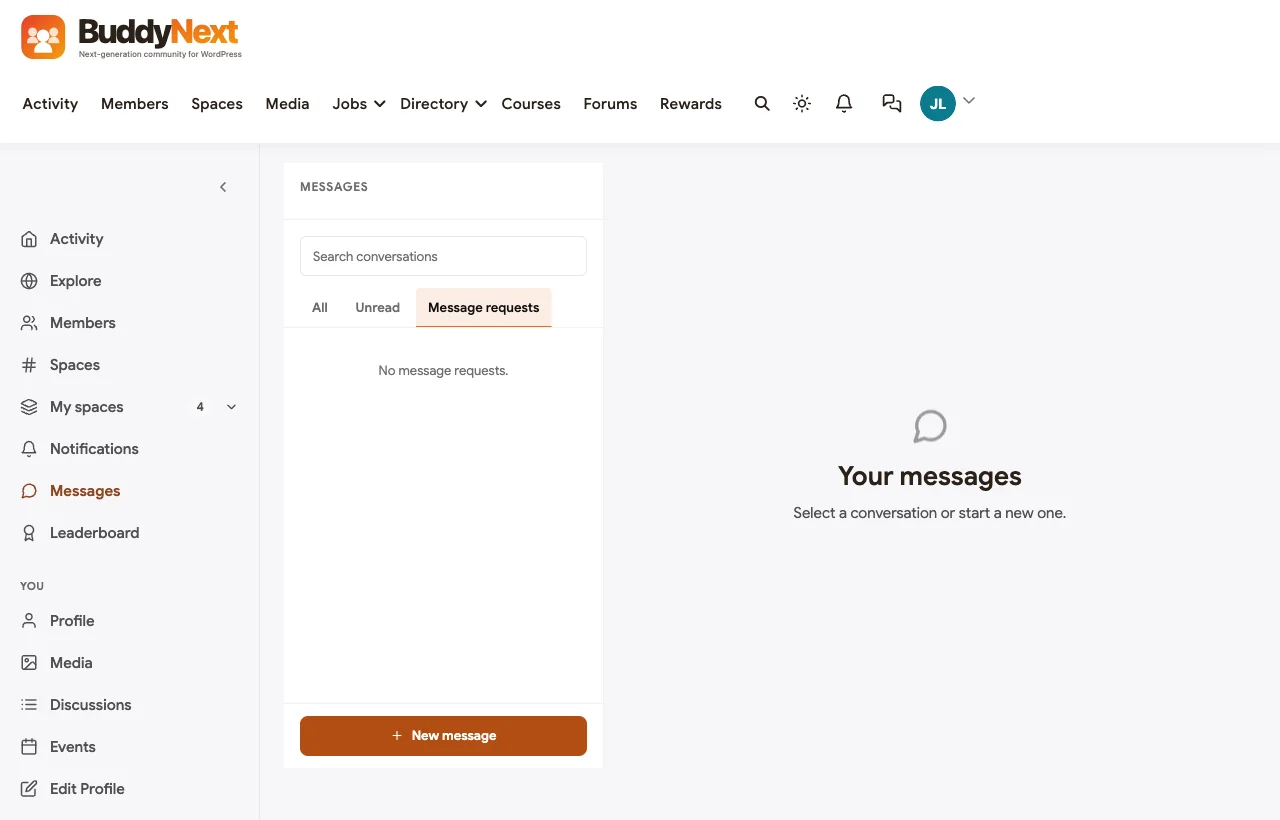
When the Followers or Mutual rule applies, a first message from outside the member’s circle arrives as a message request instead of landing in the inbox. The member reviews requests in a separate tab and accepts or declines them. Nobody is forced to read a stranger’s message, but genuine first contact is still possible.
What a conversation includes
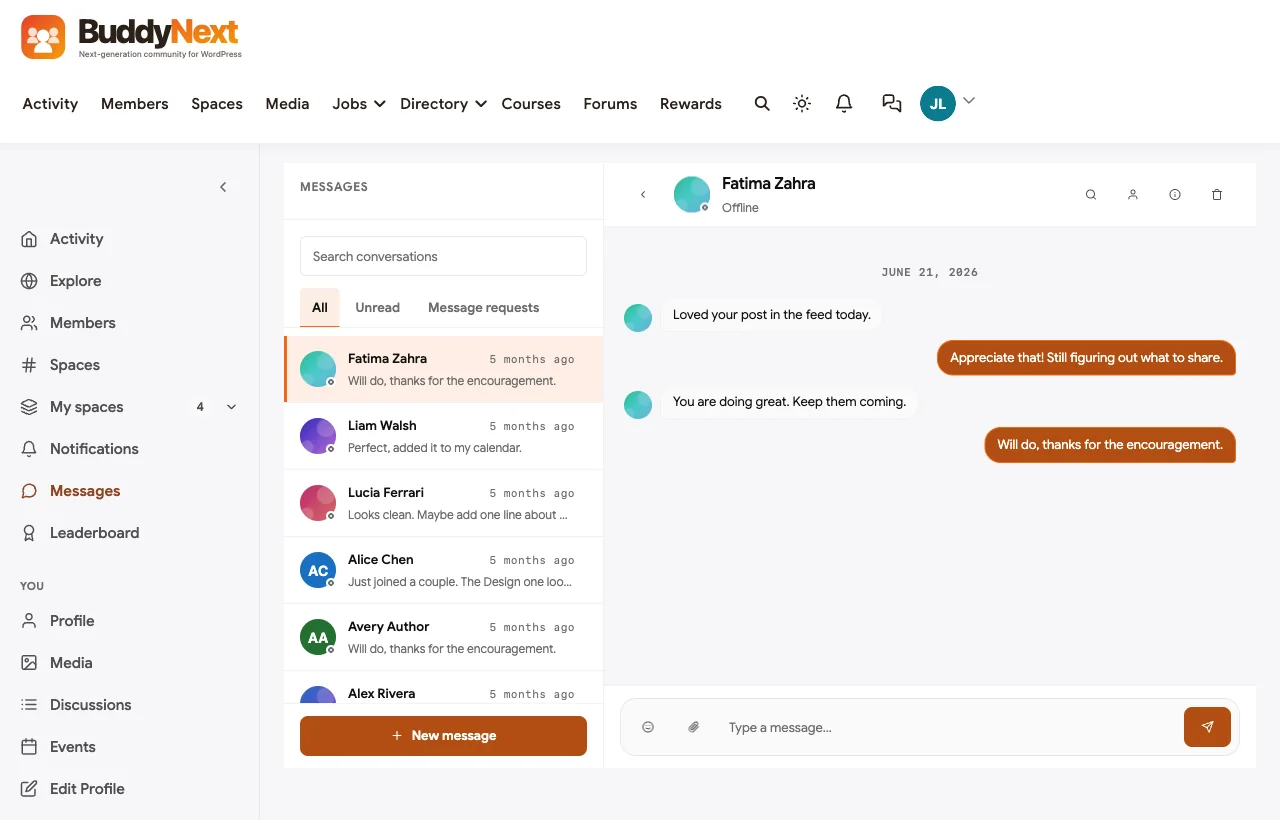
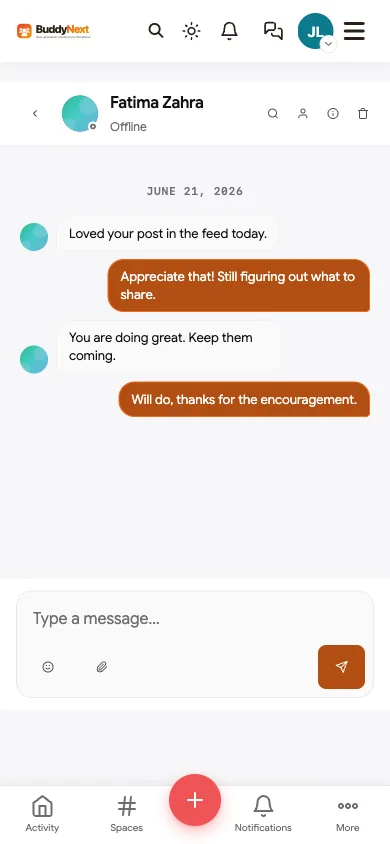
The inbox at /messages/ lists conversations with unread counts and search. Inside a conversation, members can:
- send text with emoji
- attach photos, video and audio
- quote an earlier message when replying
- react to a message
- see read receipts and typing indicators
- unsend a message
Safety built into messaging
Three protections apply to every message automatically:
- Blocking works both ways. When one member blocks another, neither can message the other. Administrators are exempt, so you can always reach a member about a moderation issue.
- Banned words apply to messages too. The banned words list you set for posts also filters direct messages.
- Rules apply to messages. On BuddyNext Pro, automated moderation rules also run on message text.
Messaging policy tips
- Write the rules down. Your community guidelines should say plainly that harassment in private messages is treated exactly like harassment in public.
- Make reporting obvious. Tell members that blocking is instant and that they can report a member from their profile.
- Start strict, loosen later. It is much easier to open messaging up once trust exists than to lock it down after a spam wave.
For a broader comparison of messaging options on WordPress, see our guide to the best WordPress private messaging plugins.
Go further. WPMediaVerse Pro adds group chats, so a project team or a cohort can talk in one thread. BuddyNext Pro can gate messaging behind membership plans, for example letting only paying members send direct messages.
Step 8: Set up moderation that does not take over your life
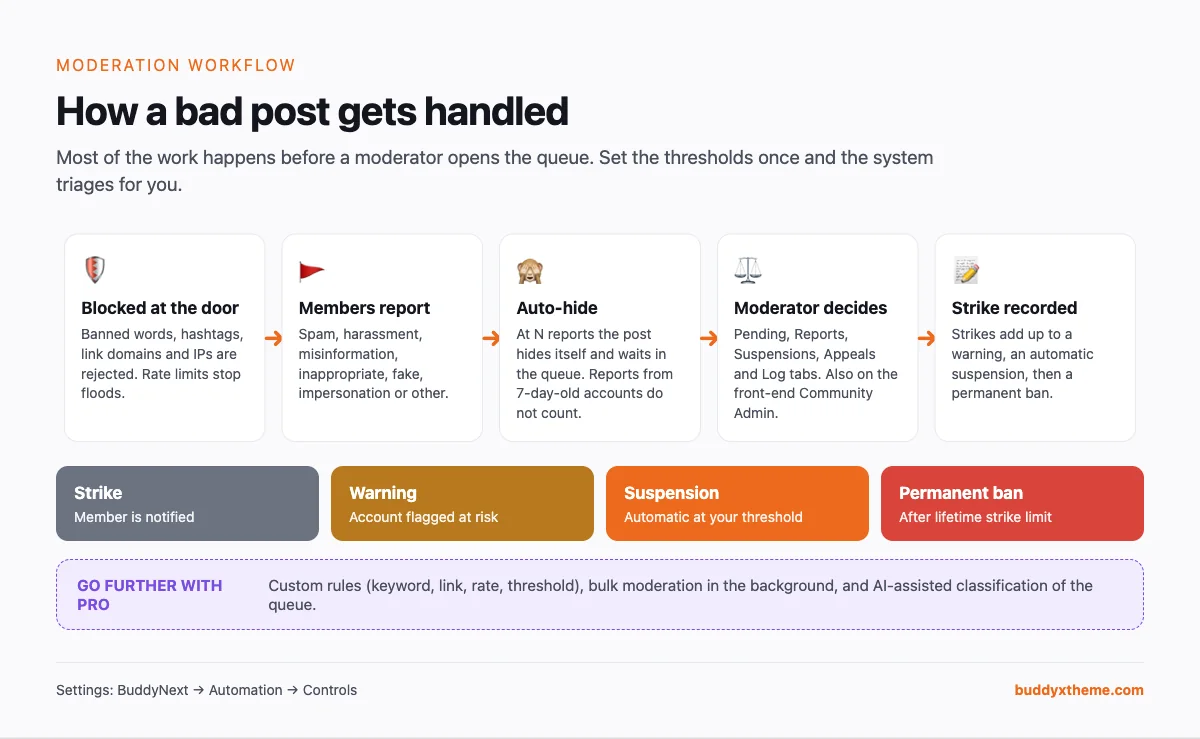
Moderation is the part of running a community that people worry about most, and it is the part where good tools make the biggest difference. FeverBee’s Richard Millington makes a point worth remembering: “every second you spend on reactive moderation hurts the community”, because it is time you are not spending on growing it (FeverBee, Decisive moderation). The goal of this section is to let BuddyNext handle the routine cases, so you only see the ones that need a human.
Write your community guidelines first
Software enforces rules. It cannot write them. Before you touch the moderation settings, write a short guidelines page that covers what is welcome, what is not, and what happens when someone breaks the rules.
Curator.io’s guide to moderating user-generated content offers a useful checklist for this. Its first two tips are to “determine guidelines with all stakeholders” and to “apply moderation rules consistently”, and it recommends that you “use automated rules to filter out profanity” and “moderate content regularly” (Curator.io, Guide to moderating user generated content). Consistency is the important word there. Members accept strict rules far more easily than rules that seem to change with the moderator’s mood.
Publish the guidelines as a normal WordPress page, link to it from the sign-up form, and make accepting it part of registration with the Require members to accept your terms setting under Members, then Registration and Login.
Layer 1: Stop bad content at the door
Go to BuddyNext, then Automation, then Controls. The Content safeguards section blocks content before it is ever published:
- Banned words. One word or phrase per line. Matching is by whole word, so banning “art” does not block “start”. Add an asterisk to catch variants, so
spam*also blocks “spammer”. A post containing a banned word is rejected. - Banned hashtags. Posts using these tags are rejected.
- Blocked link domains. Posts linking to these domains are rejected. Add known spam and scam domains here as you find them.
- Blocked IP addresses. These addresses cannot sign in, register, post or comment. You cannot accidentally add your own address.
Below that are the flood controls:
- Rate-limit posting and rate-limit commenting, measured per minute. These stop one account from flooding the feed.
- Flag duplicate posts. If a member posts identical content again within your chosen window, the post still publishes but is also filed as a report for review.
- Flag posts from new members. Posts from members with fewer than your chosen number of published posts publish immediately and are also filed as a report, so a moderator sees a newcomer’s first posts without making them wait.

Layer 2: Let members report
Every post, comment and profile can be reported by members. A report needs a reason, which helps moderators triage quickly:
- Spam
- Harassment
- Misinformation
- Inappropriate
- Fake account
- Impersonation
- Other
Members can also block someone, which stops all contact, or mute someone, which hides their posts without them knowing.
Layer 3: Auto-hide and alerts
Two settings in Auto-moderation thresholds make reports work while you sleep:
- Auto-hide after N reports. Once a post reaches this number of reports, it is hidden automatically and waits in the moderation queue. Reports from accounts younger than seven days do not count towards the total, so a group of fresh accounts cannot gang up to hide a legitimate post.
- Email admins when the queue builds up. Set a queue alert threshold, and admins get a daily email when unreviewed items pass that number.
For a community under 1,000 members, an auto-hide threshold of 3 to 5 reports is a reasonable start. Raise it if you see legitimate posts being hidden by disagreements.
Layer 4: The moderation queue
Moderators work from BuddyNext, then Moderation, which has five tabs:
| Tab | What it is for |
|---|---|
| Pending | Posts held for approval before they appear |
| Reports | Everything members have reported, filterable by content type and reason |
| Suspensions | Members currently suspended, and when the suspension ends |
| Appeals | Members asking you to review a decision |
| Moderation Log | A record of every moderation action and who took it |
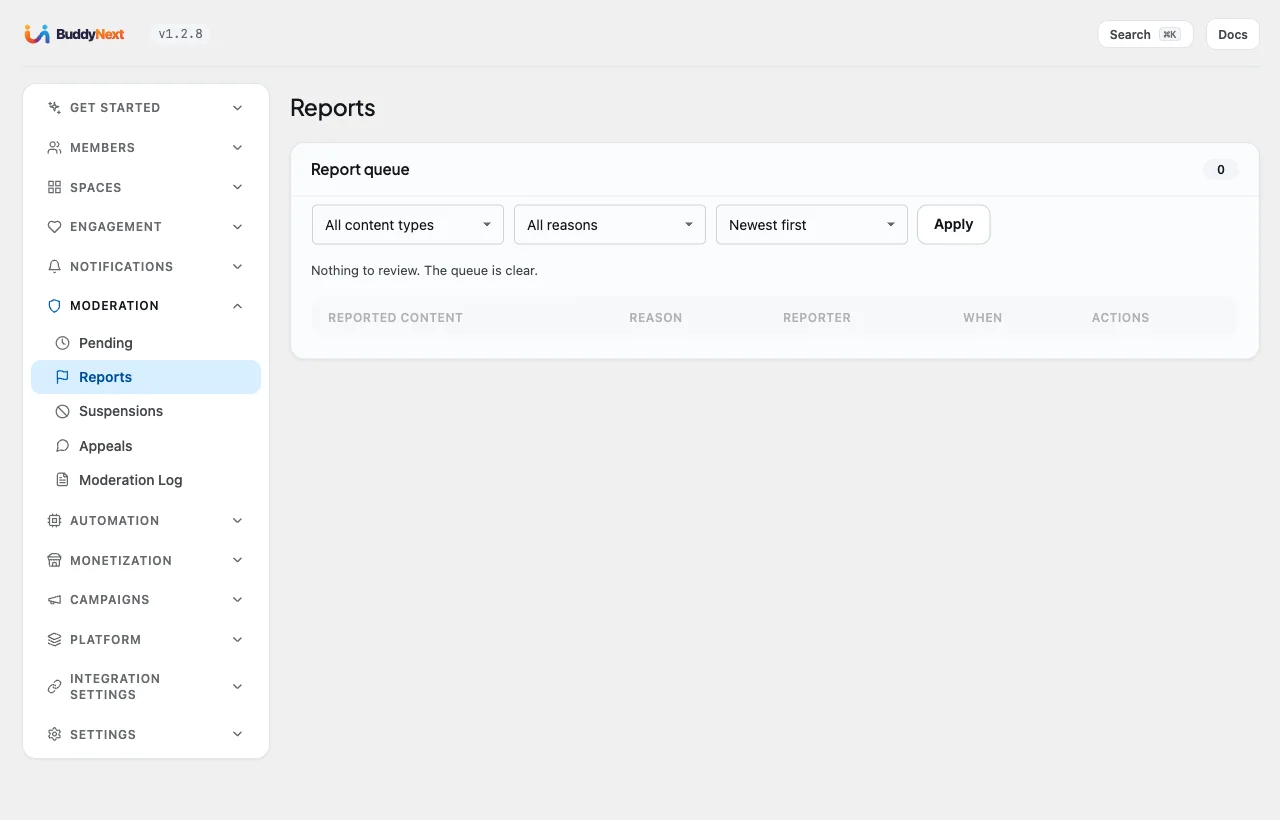
The Moderation Log matters more than it looks. When two moderators disagree, or a member says they were treated unfairly, the log shows exactly what happened and who did it.
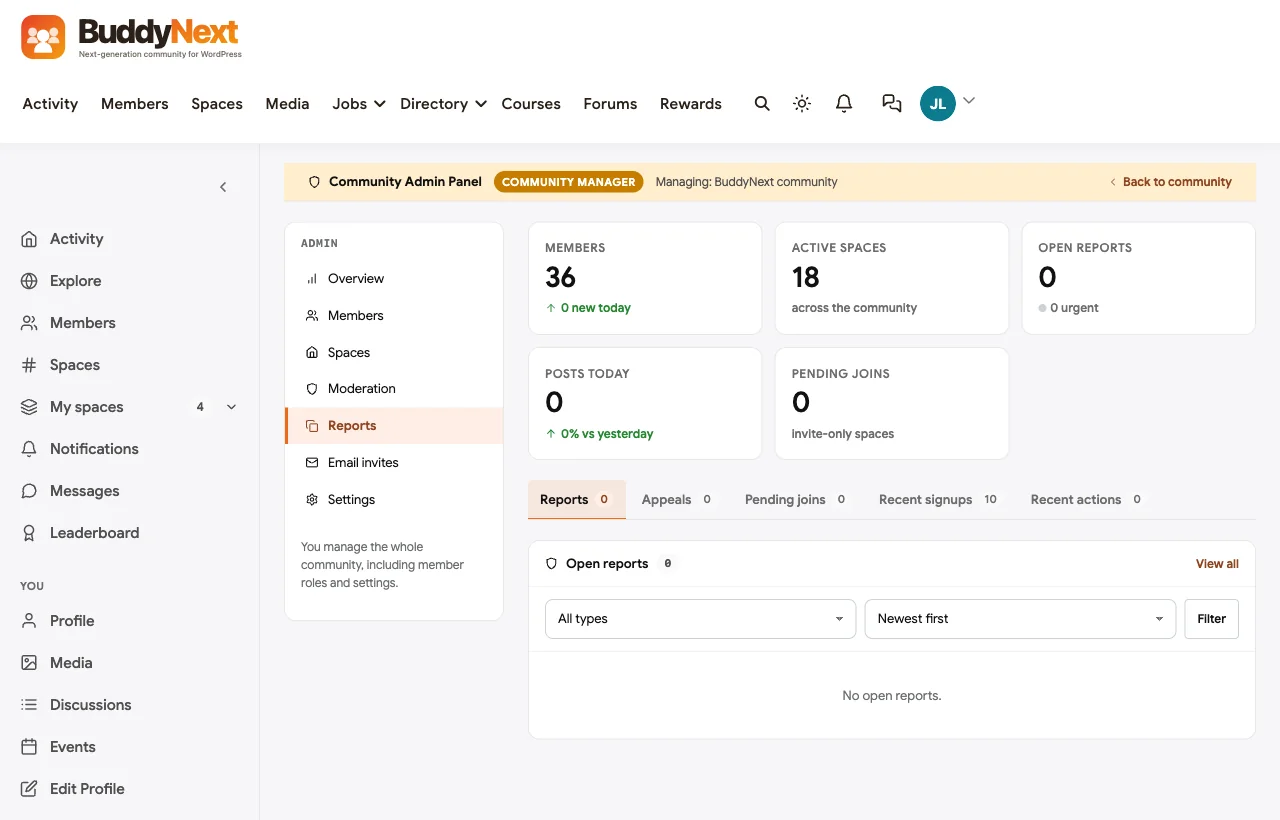
Moderators who do not have WordPress admin access can use the front-end Community Admin at /community-admin/ instead. It has the same Overview, Members, Spaces, Moderation, Reports and email invite tools in the community’s own design, so you can give trusted members moderation duties without giving them the WordPress dashboard.
Layer 5: Strikes, suspensions and bans
The Strike system turns repeated rule-breaking into consistent consequences, which is exactly the consistency curator.io recommends:
- Strikes before warning. From this many active strikes, the notice a member receives also warns them that their account is at risk.
- Strikes before suspension. The member is suspended automatically at this number.
- Permanently ban after enough strikes. Optional. When switched on, the member is banned permanently after a set number of lifetime strikes.
Members can see their own standing at /me/account-status/ and can appeal a decision. Appeals land in the Appeals tab. An appeals route matters: it tells members the system is fair, and it catches the honest mistakes every moderator makes.
Optional: hold posts for approval before they publish
Some communities, such as those for young people or regulated industries, need posts approved before anyone sees them. BuddyNext supports this pre-moderation, but deliberately does not offer it as a simple switch, because a site that silently holds every post with nobody reviewing them looks broken to members. You turn it on with one line of code, added to your child theme’s functions.php or a small custom plugin:
add_filter( 'buddynext_premod_mode', fn() => 'new_members' );
The available modes are:
off: the default; nothing is held.new_members: hold posts from new members until approved.links: hold posts that contain links.all: hold every post.
Held posts appear in Moderation, then Pending. Only switch this on if someone checks the Pending tab every day.
Moderator roles and permissions
Go to Members, then Roles and Capabilities. BuddyNext has three community roles, Admin, Moderator and Member, and you choose the minimum role for each action. For example, all members can create posts and comment, moderators and above can delete anyone’s post, and only admins can post site-wide announcements.
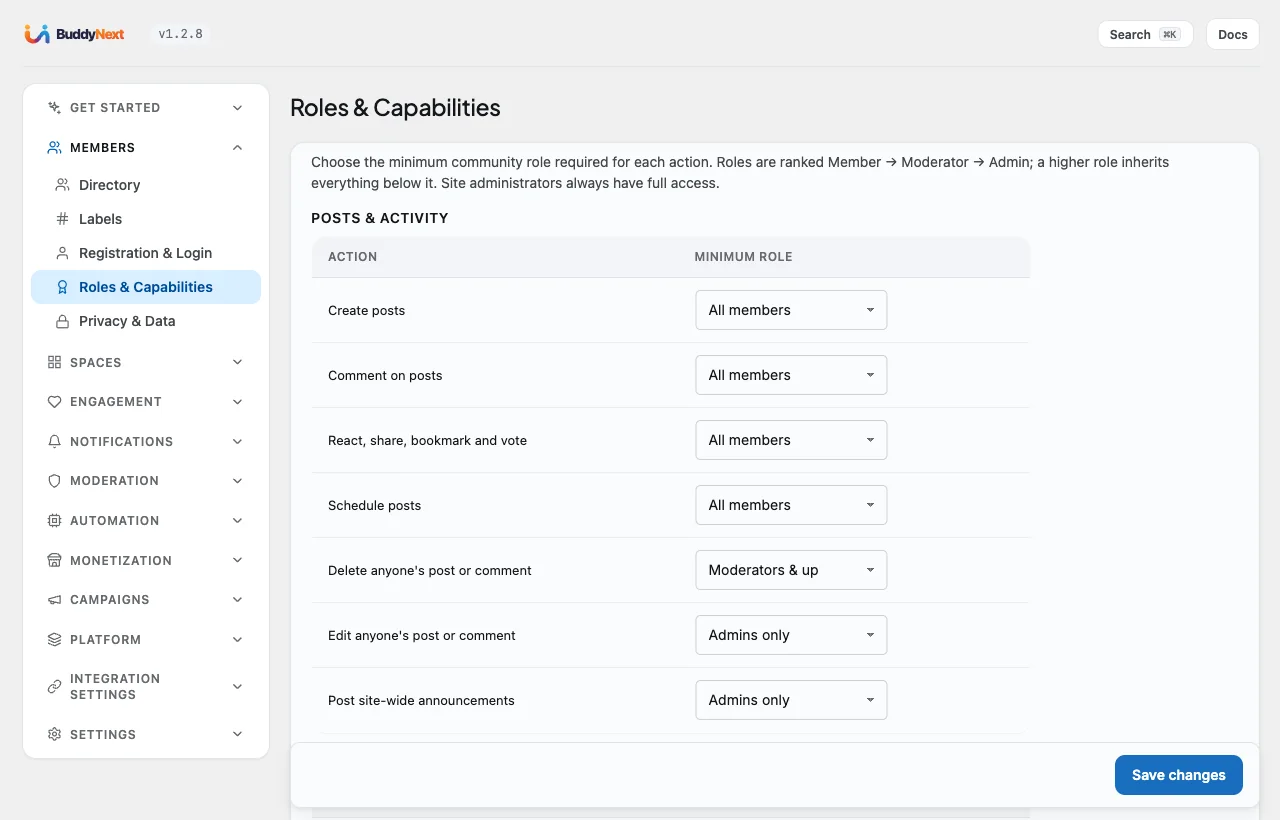
Appoint at least one moderator in a different time zone from you. Most moderation problems happen while the founder is asleep.
Go further with BuddyNext Pro. Pro adds a rules engine for automatic actions (keyword blocks, link blocks, rate limits and “remove when reports pass a threshold”), bulk moderation that processes large batches in the background, and AI moderation that classifies new content and sweeps the queue so moderators start with the most serious items.

Step 9: Make your community private
“Private” means different things to different communities. A paid membership wants nothing visible to non-members. A professional association might want a public member directory but private discussions. A support group might want the whole site public but a few spaces completely hidden. BuddyNext handles all of these by combining four separate locks.
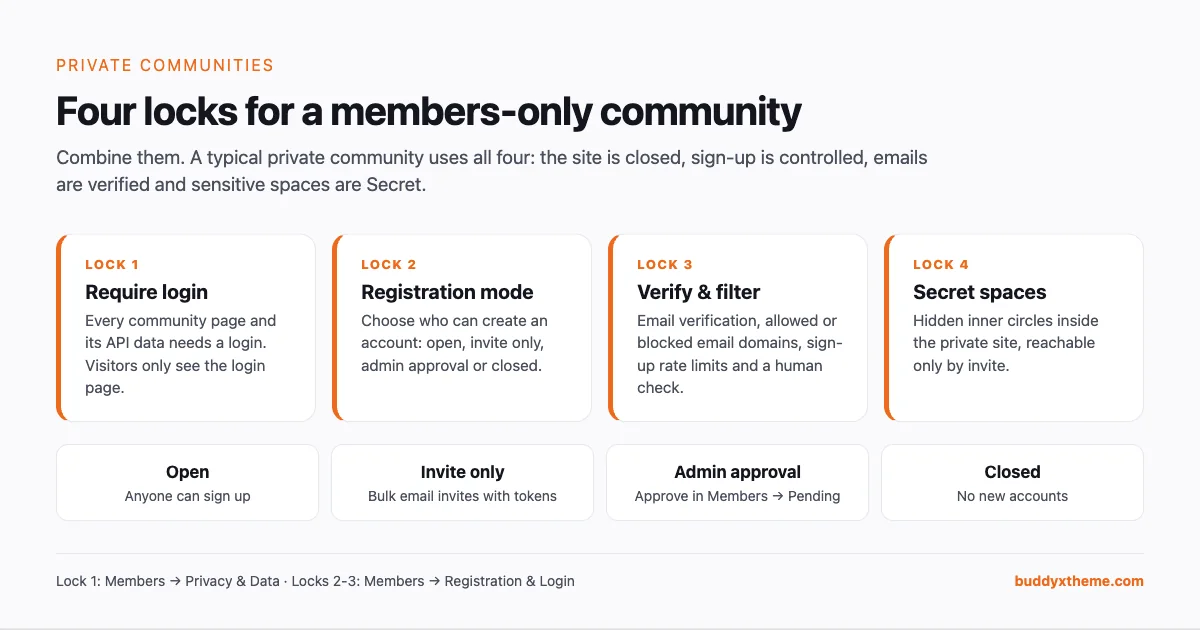
Lock 1: Require login for the whole community
Go to BuddyNext, then Members, then Privacy and Data and switch on Require login to view the community.
When this is on, every BuddyNext page, including the feed, members, profiles, spaces, notifications, settings and search, requires a login. So does the community’s REST API data, which is the part many plugins forget: hiding a page is not enough if the same data can be read from the API. Logged-out visitors are sent to the login page. Only the login, sign-up and password-reset pages stay public.

Your blog, shop and marketing pages are not affected. They stay public, so search engines and new visitors can still find you and see why they should join.
On the same screen you will find search engine indexing controls for community pages, and a cookie consent notice setting.
Lock 2: Control who can create an account
Go to Members, then Registration and Login and choose the registration mode: Open, Invite only, Admin approval or Closed.
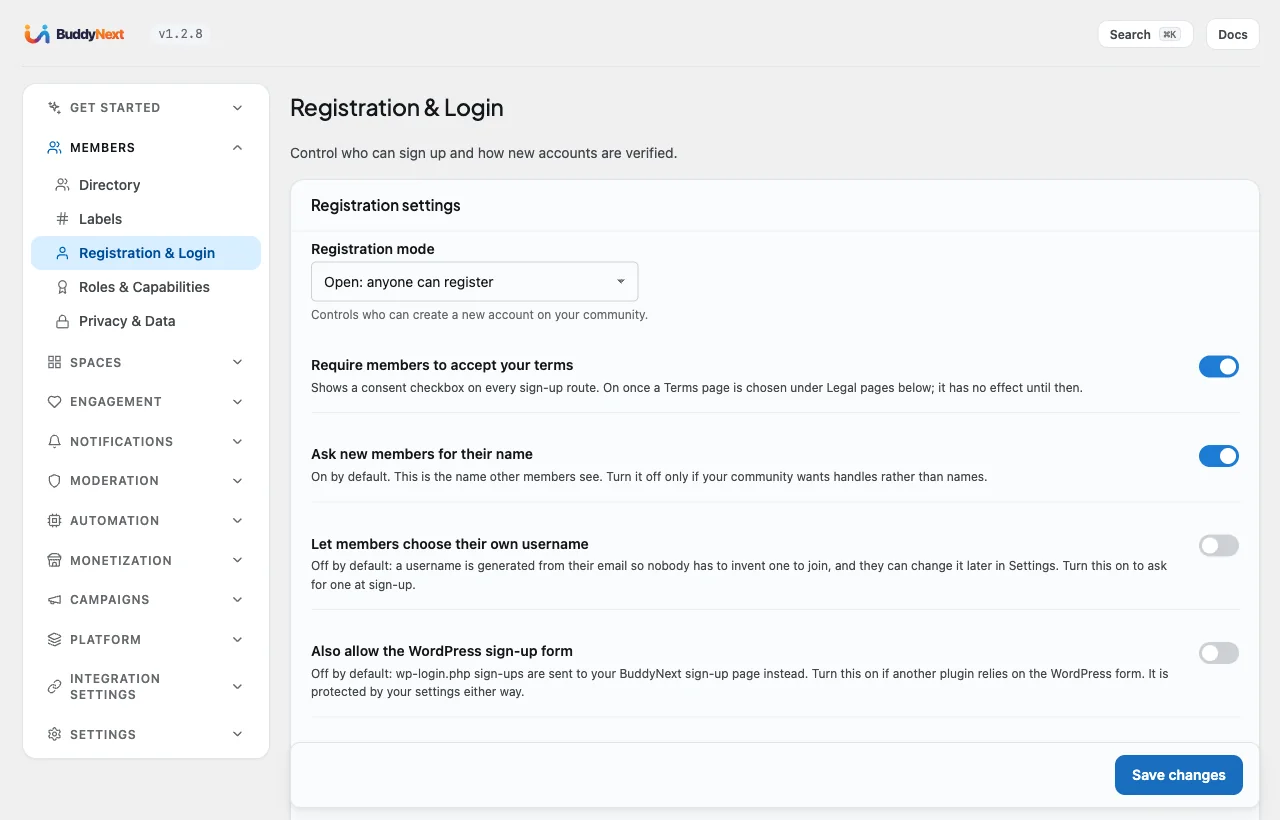
For a private community, the two most useful modes are:
- Invite only. Send invitations in bulk from Members, then Directory, then Invites. Each invitation carries a unique token, so only the person you invited can use it.
- Admin approval. People apply, and you review each application under Members, then Directory, then Pending, approving or rejecting with one click.
The same screen controls the rest of sign-up:
- Require members to accept your terms, linked to your chosen Terms of Service page.
- Ask new members for their name, on by default.
- Let members choose their own username, off by default. When it is off, BuddyNext generates a username from the email address, so nobody has to invent one to join.
- Also allow the WordPress sign-up form, off by default, so sign-ups go through BuddyNext’s own form.
- A branded login and sign-up panel with your own heading, tagline, quote and banner image.
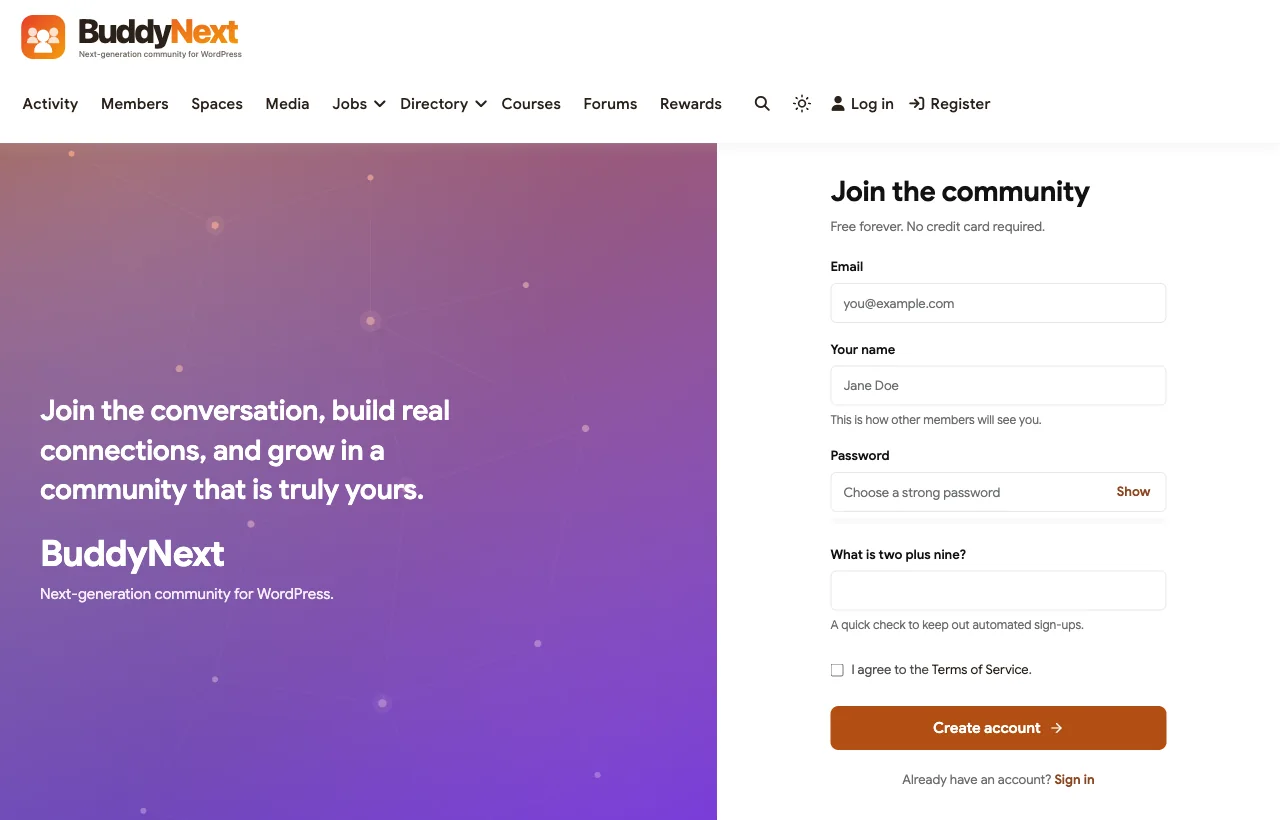
Lock 3: Verify and filter new members
Still on the Registration and Login screen:
- Require email verification. Choose Restricted, the recommended option, where new members can look around but cannot post or comment until they confirm their email, or Full, where they cannot use the community at all until verified.
- Protect the sign-up form. A built-in rate limit, a honeypot field and a time trap catch most bots. It is on by default.
- Show a human-verification question for an extra, accessible check.
- Rate-limit sign-ups per IP, for example 5 sign-ups per hour.
- Allowed email domains. Only these domains can register. This is perfect for a company or university community: allow only
yourcompany.com, and nobody else can sign up. - Blocked email domains. Block known disposable-email services.
- Require two-factor authentication. Members can always switch on two-factor themselves. This setting makes it mandatory.
BuddyNext also supports social login with Google, Facebook, GitHub and Apple, which many members prefer to creating another password.
Lock 4: Secret spaces inside the private community
Even inside a members-only community, some conversations need a smaller room: moderators, staff, a mastermind group or a VIP tier. Make those spaces Secret and use invite links, as described in Step 5. For a full walkthrough of this pattern, see our guide to building a mastermind community on WordPress with BuddyNext.
Common private-community recipes
| Community | Lock 1: login | Lock 2: registration | Lock 3: filters | Lock 4: secret spaces |
|---|---|---|---|---|
| Paid membership | On | Open, gated by plan (Pro) | Email verification | Premium tiers |
| Company or university | On | Open | Allowed email domains | Leadership, HR |
| Professional association | Off (public directory) | Admin approval | Email verification | Committees |
| Support group | On | Admin approval | Verification and 2FA | Moderators |
| Founding-member beta | On | Invite only | Email verification | Founders |
Go further with BuddyNext Pro. Pro adds a paid sign-up flow where new members pick a membership plan as part of registration. Combined with gated spaces and gated messaging, that turns a private community into a membership business without a separate membership plugin. Pro also connects to WooCommerce and Paid Memberships Pro if you already sell memberships with either.
Step 10: Configure notifications and email
Notifications bring members back. Too few and the community feels dead. Too many and members switch them all off, or mark your emails as spam, which hurts delivery for everyone.
Set sensible defaults
Go to BuddyNext, then Notifications, then Notifications. Here you choose the default on or off state for each notification type for new members, including new followers, connection requests, reactions, comments, mentions, new space members and more.
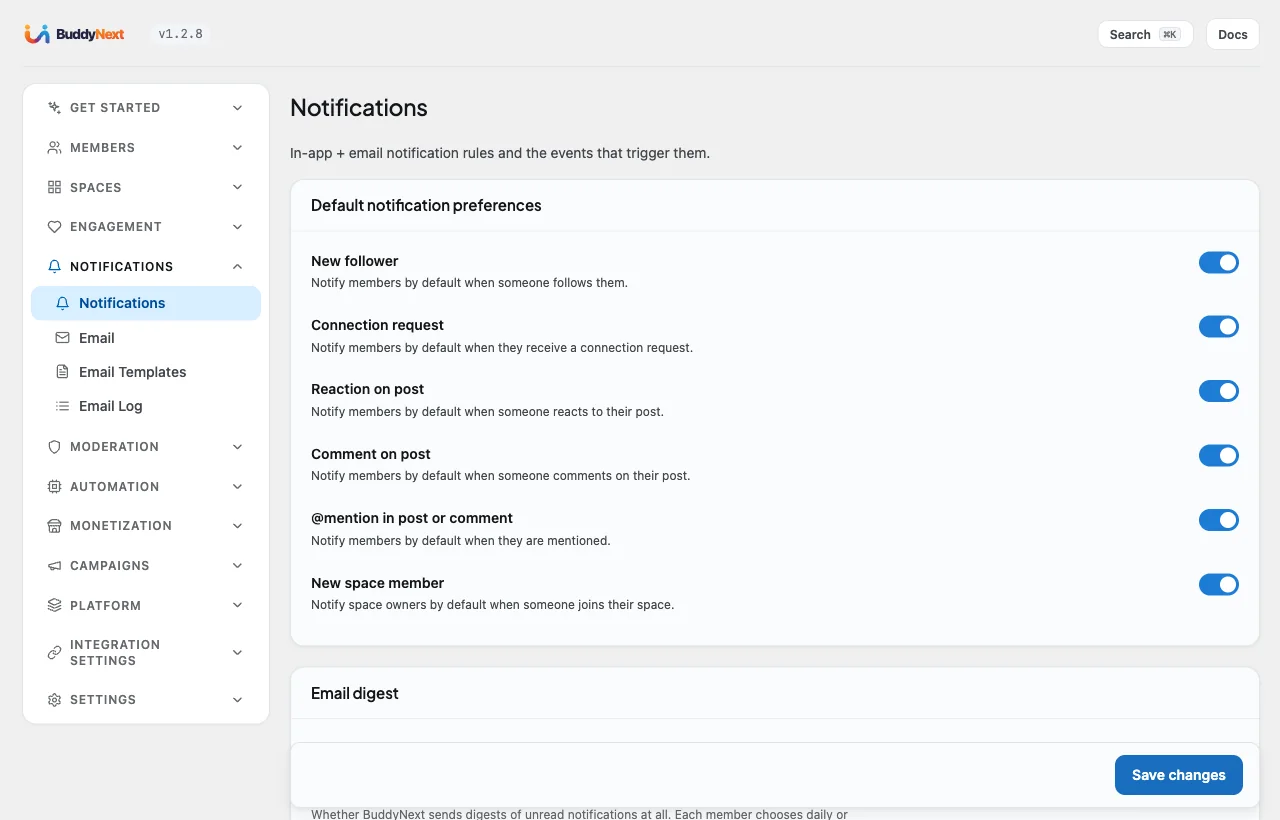
Our recommendation for a new community:
- On: mentions, replies to your posts and comments, connection requests, and space join requests for space owners.
- Off by default: every single reaction. Reactions are better summarised in a digest.
- Digest: turn on the daily or weekly email digest, so quieter members still get a reason to come back.
Edit the emails
Under Notifications, then Email Templates, you can edit every email BuddyNext sends, with HTML or plain text and a live preview. Set the sender name and address under Email, and add a footer with your community address and an unsubscribe note.
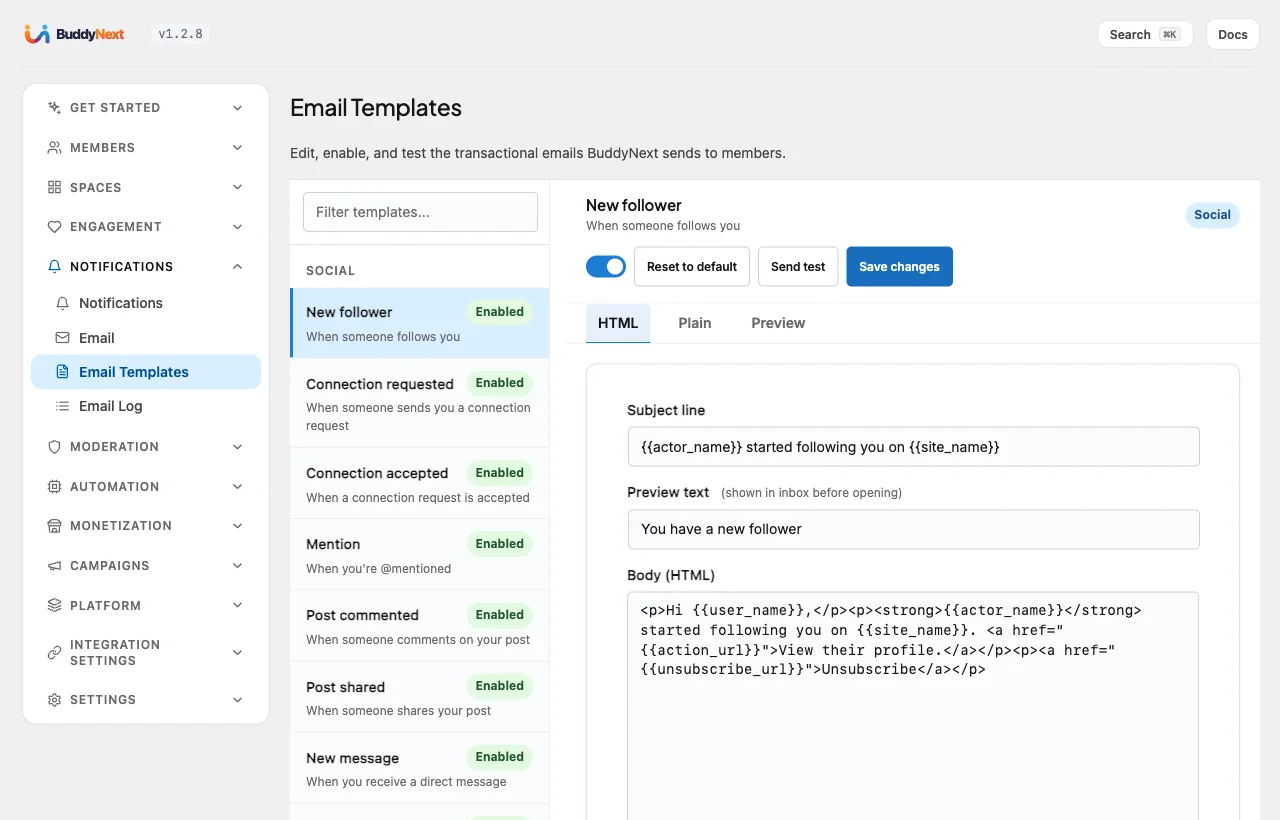
The Email Log shows what was sent and when, which saves a lot of guesswork when a member says they never got their verification email.
Let members choose
Members manage their own preferences from the front end, per channel: in-app, email and, where available, sound and push. Giving members control is the best way to keep them subscribed.
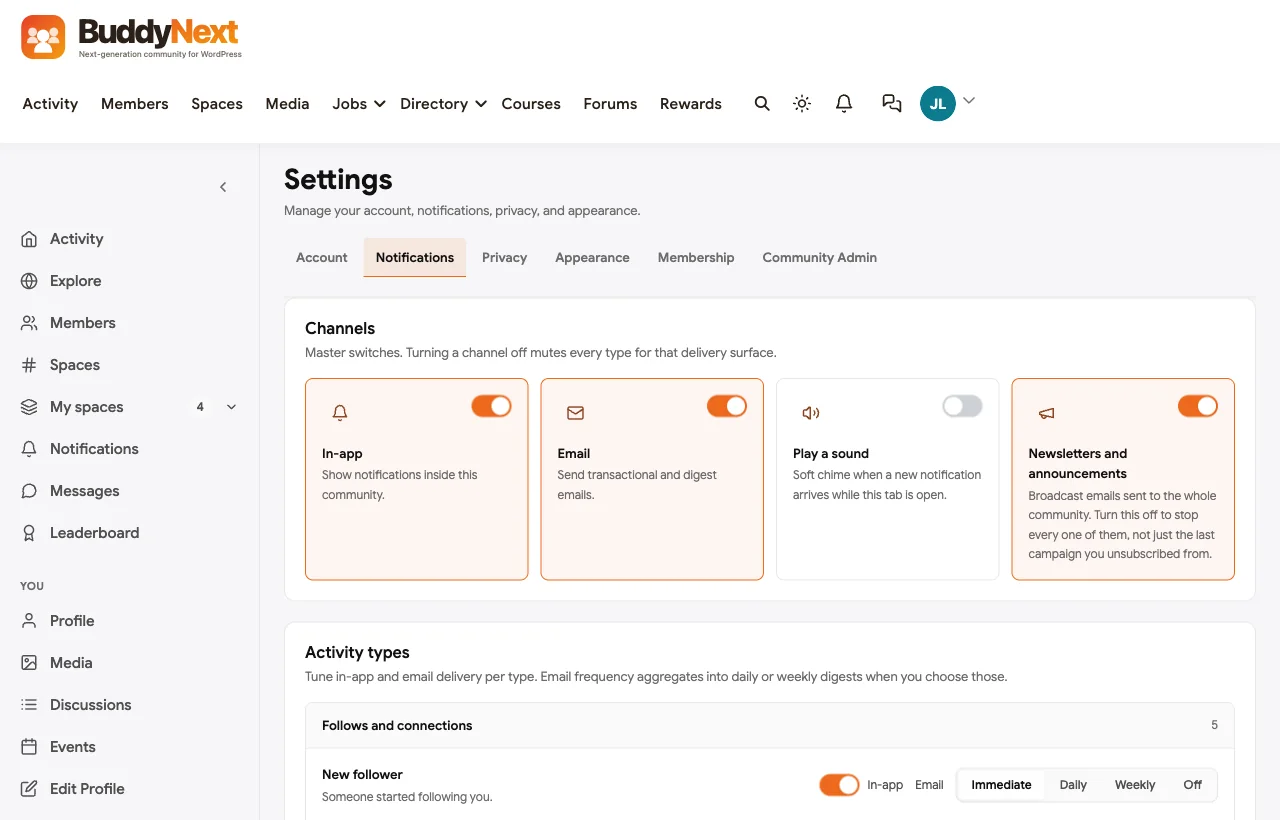
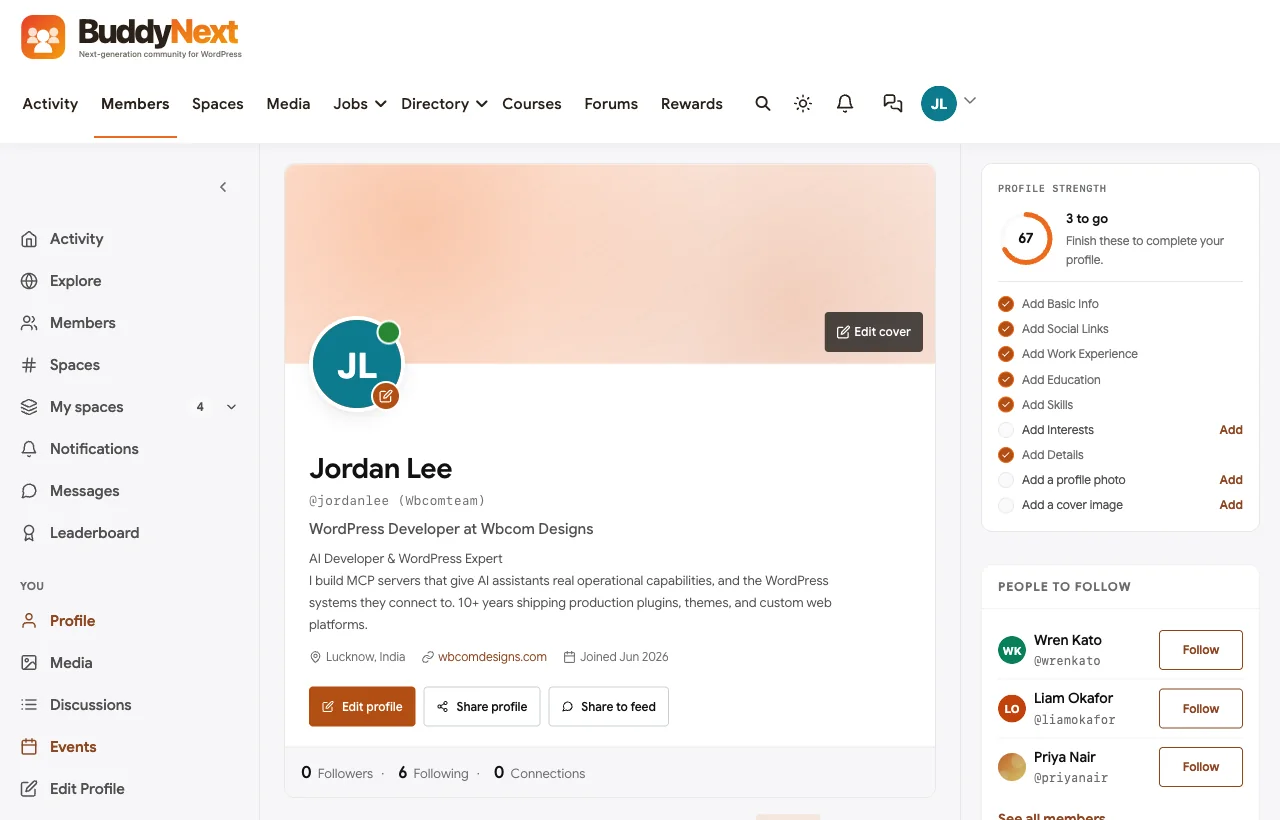
Go further with BuddyNext Pro. Pro adds web push notifications, email broadcasts to segments of your members, and drip sequences, such as a five-email welcome series for new members.
Step 11: Grow with BuddyNext Pro and the companion plugins
Everything so far works with the free plugins. This section shows what becomes possible when your community needs more. You do not need any of it on day one. The point is that you will not have to move to a different platform when your needs grow. Each add-on plugs into the same feed, profiles, spaces, search and notification bell, so members never feel they have left the community.
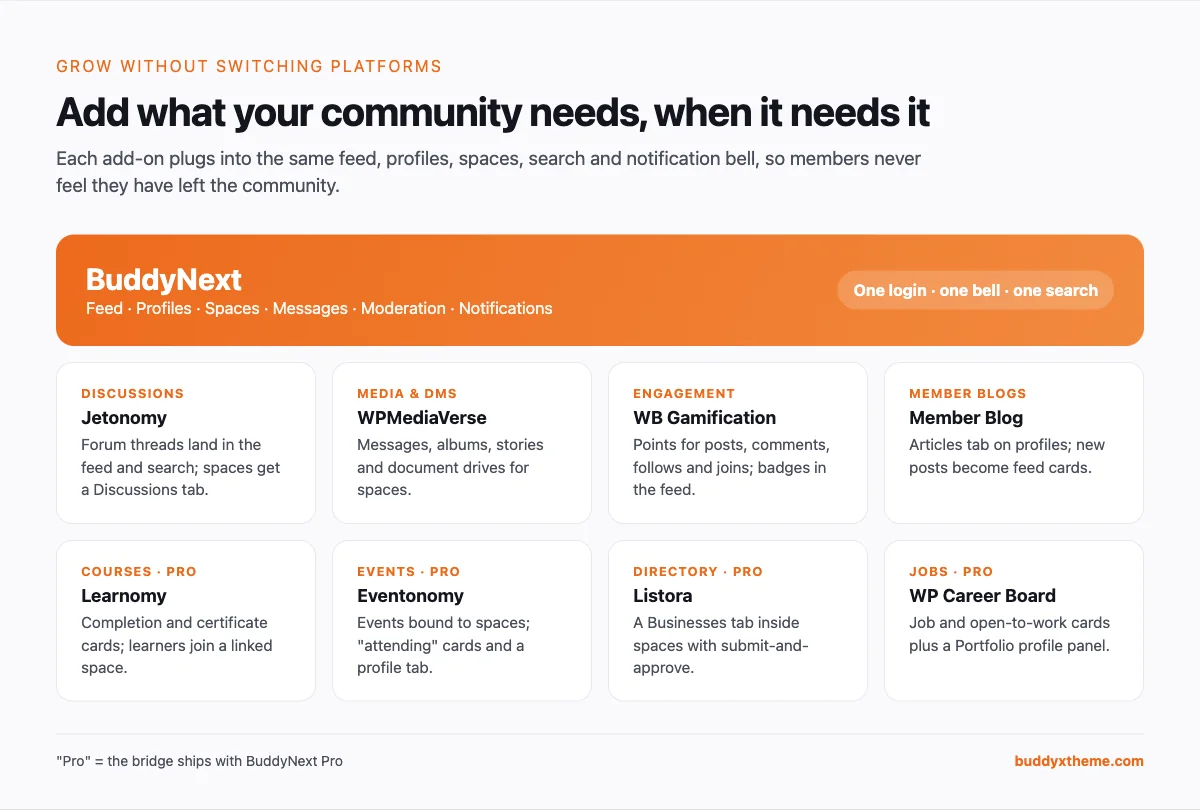
You can see which companions are installed, and install more, under BuddyNext, then Platform, then Add-ons. Fine-tune how each one appears, such as whether it shows in the navigation or posts to the feed, under BuddyNext, then Integration Settings.

Integrations that work with free BuddyNext
Forums with Jetonomy. Jetonomy adds structured, threaded discussions and Q&A. With BuddyNext, new discussions appear in the activity feed and in search, spaces get a Discussions tab, profiles show a discussion count, and space membership stays in sync with forum membership. Jetonomy’s notifications arrive in the BuddyNext notification bell. Read how this works for a support community in our guide to building a SaaS customer support community with BuddyNext and Jetonomy.
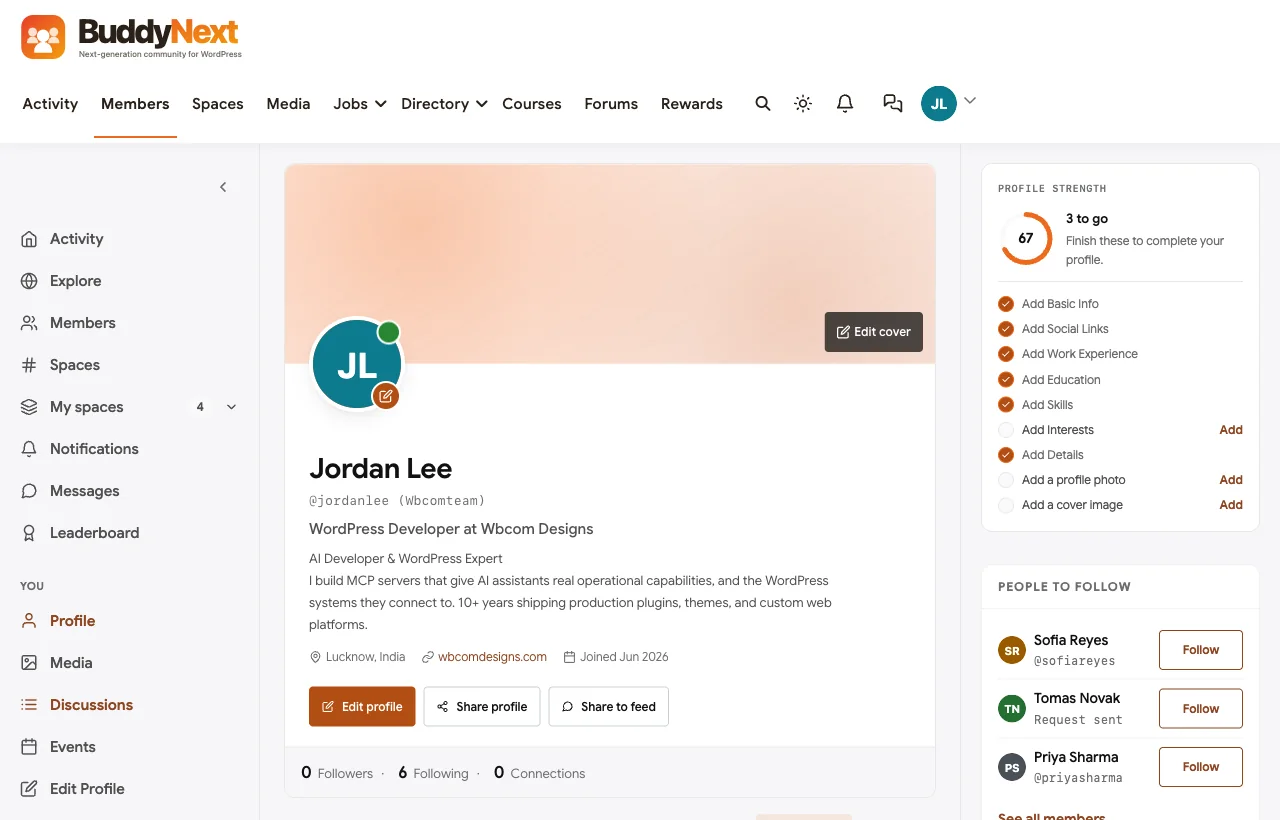
Media with WPMediaVerse. Beyond messages, WPMediaVerse adds a media tab on profiles, a stories bar, media cards in the feed, and albums and document drives inside spaces.
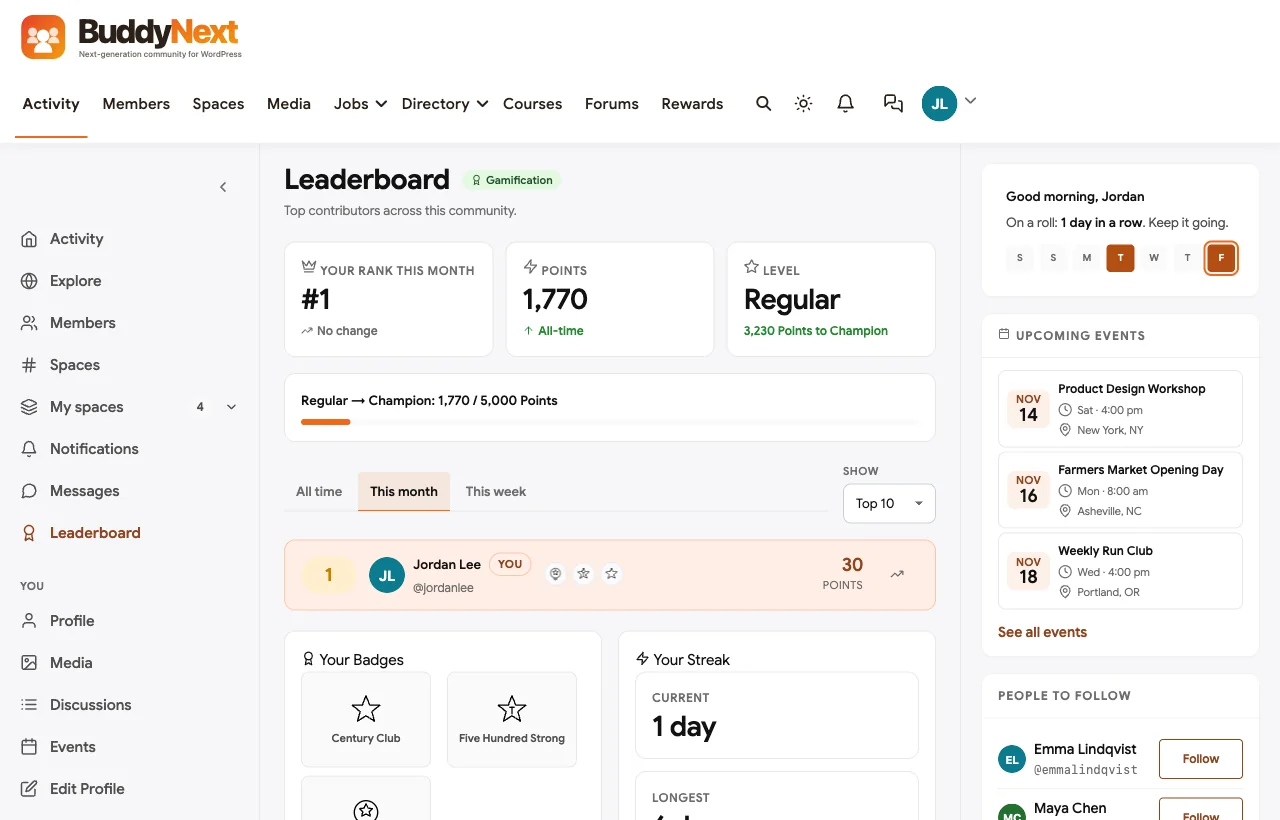
Points and badges with WB Gamification. WB Gamification awards points for BuddyNext actions: posting, commenting, reacting, sharing, voting in polls, bookmarking, following, connecting, joining or creating spaces, completing a profile and finishing onboarding. Earned badges appear in the feed, and the community gets a leaderboard at /activity/leaderboard/.
Member blogs with Member Blog. Members can write full articles. Each profile gets an Articles tab, and newly published articles appear as cards in the activity feed. For a full walkthrough, see how to set up a multi-author community blog with moderation controls.
Integrations that come with BuddyNext Pro
Courses with Learnomy. Course completions and certificates appear as cards in the feed, Learnomy’s notifications arrive in the BuddyNext bell, and learners in a course can be added automatically to a linked space, so every cohort gets its own discussion room. A BuddyNext membership plan can also grant access to courses. See our guide to the best WordPress LMS plugins for more on Learnomy.
Events with Eventonomy. Published events and “attending” updates appear in the feed and search, members get an Events tab on their profile, and events can belong to a specific space, so a local chapter’s meet-ups live inside that chapter’s space.
A business directory with Listora. New listings appear in the feed and search, and each space can have a Businesses tab where members submit listings for the space owner to approve. It is ideal for local, trade and professional communities. Read more in our guide to building a community marketplace with BuddyNext and Listora.
Jobs with WP Career Board. Job posts and “open to work” résumés appear as feed cards and in search, and members get a Portfolio panel on their profile. Alumni networks and professional communities use this to turn conversations into hires.
What else BuddyNext Pro adds
Beyond the integrations, BuddyNext Pro adds features for running a community as a business:
- Monetization: membership plans, subscriptions, coupons and a paywall, with gated spaces, gated messaging and a paid sign-up flow.
- Campaigns: email broadcasts, drip sequences, scheduled posts and an AI-assisted feed.
- Realtime and push: live updates over WebSockets and web push notifications.
- White-label: your own brand name, logo, colours, fonts and custom CSS, including per-space branding.
- Moderation at scale: the rules engine, bulk moderation and AI moderation covered in Step 8.
- Analytics: community insights, profile views and space-owner statistics.
- Profiles: advanced field types, conditional fields and member labels.
Step 12: Get ready for a big community
A community that works with 50 members can grind to a halt at 5,000 if it was not built for it. Here is what BuddyNext already does, and what you should do on your side.
What BuddyNext handles
- Caching. BuddyNext uses WordPress’s object cache throughout, and caches the first page of each member’s feed so the busiest page in the community loads fast.
- Cursor-based pagination. Feeds and lists load the next page from a cursor rather than an offset, which stays fast deep into a long feed.
- Background jobs. Email digests, clean-ups and count recalculations run in the background on Action Scheduler, with WP-Cron as a fallback, so members never wait for them.
- Rate limiting. Post, comment and sign-up limits use the cache, so they protect the database instead of adding to its load.
- Page cache awareness. BuddyNext purges cached public community pages when their content changes.
- A full REST API. Nearly every community action is available through the REST API, which makes mobile apps, integrations and data imports possible. Outbound webhooks can notify other systems when things happen in the community.
What you should do
- Turn on a persistent object cache (Redis or Memcached). This is the single biggest performance improvement for any WordPress community.
- Use a real cron. Disable WP-Cron’s page-load trigger and run it from a server cron job every minute, so background jobs run on time even on quiet days.
- Send email through a transactional email service. Notification email volume grows with your community.
- Keep media off the web server’s disk once you have thousands of uploads. Offload it to object storage.
- Back up daily, and test a restore at least once.
- Update regularly. Keep WordPress, PHP, BuddyNext and your theme current.
Go further with BuddyNext Pro. Free BuddyNext updates the page by polling the server. Pro can switch to WebSocket realtime using any Pusher-compatible service (such as Soketi, Pusher or Ably), so new posts, messages and notifications appear instantly without the server being asked every few seconds.
Step 13: Launch and run your first 90 days
The software is ready. Now the community has to come alive, and that depends far more on what you do in the first three months than on any setting.
Before launch: seed the community
Nobody wants to be the first person to speak in an empty room. Before you invite anyone:
- Write five to ten seed posts across your spaces: a welcome post explaining what the community is for, a “introduce yourself” prompt in the Welcome space, a question in each topic space, and a short post linking to your guidelines.
- Pin an announcement to the top of the feed with the one action you want new members to take first, for example “Introduce yourself in the Welcome space”.
- Feature your three best spaces under Spaces, then Directory, so they are suggested during onboarding.
- Create test accounts for each role and walk through the community as a new member, a moderator and an admin. Check what a logged-out visitor sees.
Turn on member onboarding
BuddyNext’s member onboarding at /onboarding/ walks each new member through five short steps: Profile, Interests, Spaces, Follows and Notifications. Members who finish it arrive in a feed that already has people and spaces they care about, instead of an empty page. Keep the onboarding feature switched on under Platform, then Features, and use your featured spaces to steer people towards the busiest rooms.
You can send members to a specific page after onboarding, login and logout from the Redirects settings under Members, then Registration and Login. Sending new members to the Welcome space after onboarding is a simple way to get their first post.
Weeks 1 to 4: the founding members
Invite your founding list a few people at a time, as FeverBee recommends, rather than all at once. A few new members a day is something you can personally welcome. Two hundred in one afternoon is not.
For each founding member:
- Welcome them by name in the Welcome space, or by direct message.
- Ask them one specific question they are qualified to answer. People come back to conversations they are part of.
- Connect them to one other member with a shared interest.
Watch the Engagement, then Insights screen for the members who post and reply most. They are your future moderators and space owners.
Weeks 5 to 8: create rhythms
Communities stay active when something happens on a predictable schedule. Pick two or three recurring rituals and announce them:
- A weekly thread, such as “What are you working on this week?” every Monday.
- A monthly event or live session, announced with a pinned announcement.
- A member spotlight, where you feature one member’s profile or work each week.
Use polls for quick, low-effort participation. Members who will not write a post will often tap a poll option, and it is a first step towards posting.
Weeks 9 to 12: hand over ownership
The community becomes sustainable when it stops depending on you alone:
- Promote your most helpful members to space moderators or owners.
- Let members create spaces for their own topics, with a sensible limit per member under Spaces, then Settings.
- Review your moderation log together with your moderators, and adjust thresholds based on real cases rather than guesses.
- Read your Insights screen to see which spaces grow and which stall. Merge or archive spaces that stay empty. Too many quiet rooms make a community feel empty even when it is not.
Measure what matters
Total member count is the least useful number in a community. Watch these instead:
- Active members in the last 30 days, shown on the Members directory screen.
- New posts and replies per week, and how many different members wrote them.
- The share of new members who post within their first week. If it is low, your onboarding or welcome post needs work.
- How quickly questions get a first reply. Unanswered questions are the fastest way to lose new members.
Three example setups
To pull everything together, here is how three very different communities would configure BuddyNext. Use whichever is closest to yours as a starting point.
Example 1: An online course community
A course creator wants students to talk to each other and to stay after the course ends.
- Privacy: Require login on. Students should feel safe asking basic questions.
- Registration: Admin approval, or Open with a paid sign-up flow on BuddyNext Pro.
- Spaces: an Open “Start here” space for everyone, a Private space per cohort, and a Secret space for teaching assistants.
- Messages: Followers ceiling, so students who follow an instructor can message them directly while anyone else’s first message arrives as a request, plus a 2-day minimum account age.
- Moderation: auto-hide after 3 reports, the new-member flag on, and teaching assistants as space moderators.
- Add-ons: Learnomy for courses, with the BuddyNext Pro bridge adding each course’s learners to its linked space and posting certificates to the feed, plus WB Gamification for points and badges.
Example 2: A local club or neighbourhood community
A volunteer-run hobby club wants a friendly, mostly public space with very little admin work.
- Privacy: Require login off, so neighbours can see what the club is about before joining.
- Registration: Open, with email verification set to Restricted.
- Spaces: Open spaces by interest, plus a Secret committee space.
- Messages: Mutual ceiling and a 7-day minimum account age, because open communities attract the most spam.
- Moderation: banned words and blocked link domains filled in from day one, rate limits on, and strikes set to suspend after three.
- Add-ons: Eventonomy on BuddyNext Pro for meet-ups bound to each interest space, or simply a pinned announcement for each event if you are staying free.
Example 3: A company or customer community
A software company wants a support and feedback community for its customers.
- Privacy: Require login on for customer-only discussions, or off if the answers should help search visitors too.
- Registration: Invite only, with invitations sent in bulk to customers, or Allowed email domains for an internal staff community.
- Spaces: a Private space per product, an Open “Announcements” space, and a Secret staff space.
- Messages: Mutual ceiling, so customers cannot cold-message each other.
- Moderation: staff as moderators, the front-end Community Admin for the support team, and the moderation log reviewed weekly.
- Add-ons: Jetonomy for structured Q&A threads that stay easy to find, and WB Gamification to reward the customers who help others.
BuddyNext vs BuddyPress vs PeepSo: which free community plugin?
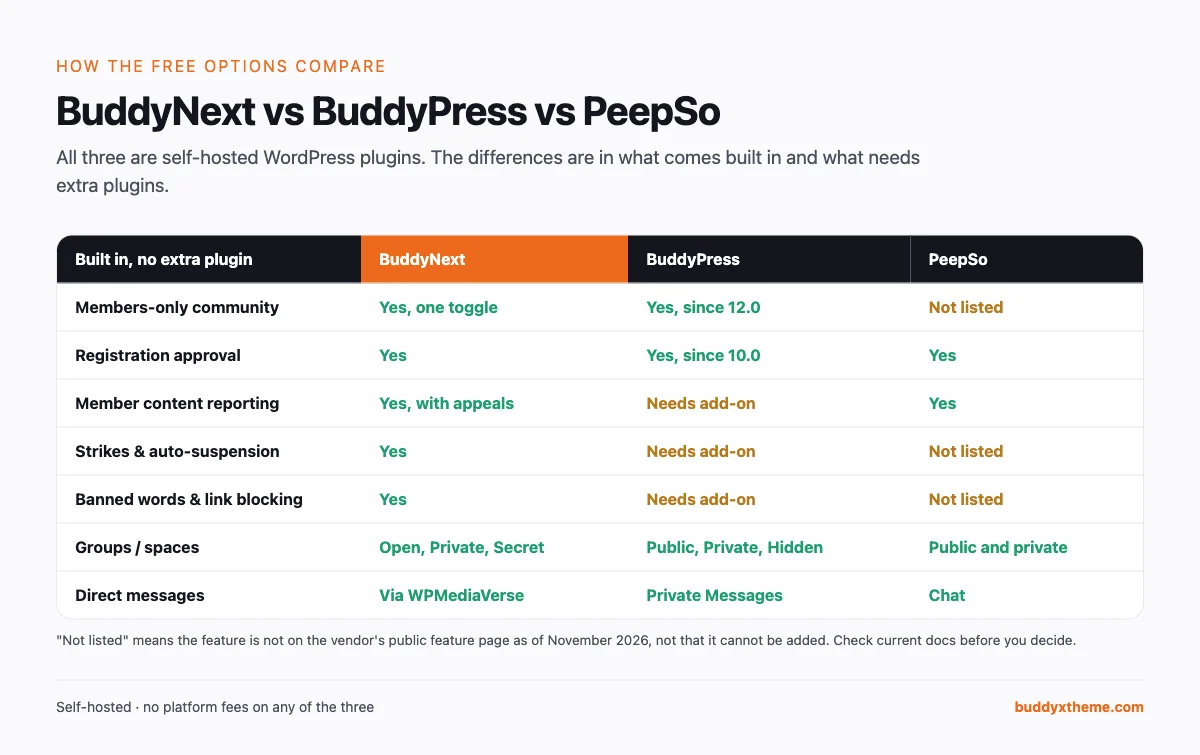
All three are self-hosted WordPress plugins, and all three are good projects. The real differences are in what comes built in and what needs extra plugins.
BuddyPress
BuddyPress is the long-standing community plugin for WordPress, with a huge ecosystem of add-ons. Recent versions closed two gaps that used to need extra plugins: site membership requests, which let administrators approve new members, arrived in BuddyPress 10.0 (BuddyPress Codex, version 10.0.0), and Community Visibility, a members-only setting for community pages, arrived in BuddyPress 12.0 (WP Tavern). Member content reporting, strike systems and banned-word filters still generally come from separate plugins.
Choose BuddyPress if you already run it, rely on add-ons built for it, or want the largest choice of third-party extensions.
PeepSo
PeepSo focuses on a social-network experience and lists chat and private messages, member content reporting and blocking, and registration approval among its features (PeepSo features). Many advanced capabilities are sold in bundles of paid add-ons.
Choose PeepSo if you want its particular social-network look and feel and are comfortable buying bundles as you grow.
BuddyNext
BuddyNext builds the community-safety tools into the core: members-only mode that also protects the REST API, four registration modes, email-domain allow and block lists, a full report queue with appeals, strikes leading to automatic suspension, banned words, link and IP blocking, and per-action role permissions. It also ships a setup wizard and a front-end Community Admin for moderators.
Choose BuddyNext if you are starting fresh, care most about moderation and privacy out of the box, and want a path to courses, forums, events, a directory, jobs and paid memberships from one connected family of plugins.
If you already run BuddyPress, our article on whether your BuddyX site should run BuddyPress or a standalone community platform covers the decision in more depth. If you are leaving a hosted platform, see how to move a Circle community to WordPress and our roundup of Mighty Networks alternatives.
Your launch checklist
Work through this list before you invite your founding members.
Foundations
- WordPress 6.9+, PHP 8.1+, pretty permalinks on
- SMTP or transactional email set up and tested
- Daily backups running
- Persistent object cache on, if your host supports it
Setup
- BuddyNext, WPMediaVerse and BuddyX installed and active
- Setup wizard completed
- Logo, brand colour and default theme mode set
- Unneeded features switched off under Platform, then Features
People
- Profile fields chosen, with sensible visibility defaults
- Five starter spaces created, with a Welcome space set to auto-join
- At least one moderator appointed, ideally in another time zone
Safety
- Community guidelines page published and linked from sign-up
- Terms acceptance required at sign-up
- Email verification on
- Message ceiling and minimum account age set
- Auto-hide threshold, queue alert and strike levels set
- First banned words and blocked domains added
Privacy (if private)
- Require login switched on
- Registration mode set to Invite only or Admin approval
- Secret spaces created for staff and moderators
Launch
- Five to ten seed posts written, so new members do not land on an empty feed
- Founding members invited personally, a few each day
- Notification defaults and digest tested with a test account
Troubleshooting common setup problems
Community pages show a 404 error. BuddyNext’s URLs such as /members/ and /spaces/ rely on WordPress rewrite rules. Go to Settings, then Permalinks and click Save without changing anything. This rebuilds the rules. Also check that you are not using the Plain permalink setting.
Members say they never received the verification email. Check the Email Log under BuddyNext, then Notifications. If the email shows as sent, the problem is delivery, not BuddyNext: set up an SMTP plugin or a transactional email service, and add SPF and DKIM records for your domain.
There is no Message button on profiles. WPMediaVerse is either not active or private messages are switched off in its settings. Activate it and check WPMediaVerse, then Settings, then Messages.
New members can look around but cannot post. Email verification is set to Restricted, which is working as intended. They need to click the link in their verification email. If members regularly miss it, adjust the email template so the subject line is clearer.
Logged-out visitors are sent to the login page. Require login to view the community is switched on under Members, then Privacy and Data. That is the private-community mode. Switch it off if you want public visitors to see the feed.
Members cannot create spaces. Check who is allowed to create spaces under Spaces, then Settings, and the minimum role for the action under Members, then Roles and Capabilities. Also check whether the member has reached the per-member space limit.
A space has disappeared from the directory. It is probably set to Secret, which hides it from the directory and search by design. Members can still reach it, and you can still see it in the admin Spaces directory.
Posts vanish after being reported. The auto-hide threshold under Automation, then Controls is doing its job: the post is hidden and waiting in Moderation, then Reports. Review it there and restore it if the reports were unfounded. If this happens too often, raise the threshold.
A member says they were suspended unfairly. Check the Moderation Log for the strikes that led to the suspension and who issued them, then review their appeal in the Appeals tab. Consistent, documented decisions are much easier to explain than one-off judgment calls.
Compare platforms by community type
Planning a specific kind of community? Each of these comparisons includes a working BuddyNext demo built for that use case, alongside the alternatives checked against their own websites.
- Best software for AI automation community
- Best software for paid coaching membership
- Best software for real estate investor community
- Best software for online course community
- Best software for university alumni network
- Best software for SEO professionals community
- Best software for SaaS customer community
- Best software for freelancer networking community
- Best software for startup founder community
- Best software for online fitness community
- Best software for professional association community
- Best software for Shopify sellers community
- Best software for AI agent developer community
- Best software for content creator community
- Best software for private neighborhood community website
Step-by-step guides for specific communities
This guide covers the general setup. These walk through complete builds for one kind of community each, screen by screen, using the same free plugins as a starting point and showing where paid add-ons come in.
- How to build a university alumni network on WordPress
- How to create an AI agent developer community with Q&A and code sharing
- How to build a SaaS customer community with feature requests and a public roadmap
- How to start a private professional association community
- How to create a paid fitness community with groups and challenges
Frequently asked questions
Can I really build a community on WordPress for free?
Yes. BuddyNext, WPMediaVerse and the BuddyX theme are free, and together they give you a feed, profiles, a member directory, spaces, private messages, moderation, a members-only mode and notifications. Your only unavoidable cost is WordPress hosting.
Do I need BuddyPress to use BuddyNext?
No. BuddyNext is a standalone community plugin. It does not need BuddyPress to run.
Why don’t I see a Messages page or Message buttons?
Direct messages are delivered by WPMediaVerse. Install and activate WPMediaVerse, then check that private messages are turned on under WPMediaVerse, then Settings, then Messages. BuddyNext adds the Messages page and buttons once messaging is available.
How do I stop members from receiving spam messages?
Set the site-wide message ceiling to Followers or Mutual, add a minimum account age of a few days before new accounts can send messages, and make sure blocking and reporting are explained in your guidelines. Banned words also apply to direct messages.
How do I make my community completely private?
Go to BuddyNext, then Members, then Privacy and Data, and switch on Require login to view the community. Then set the registration mode to Invite only or Admin approval under Registration and Login. Your community pages and their API data will only be visible to logged-in members.
Can I keep the community private but my blog public?
Yes. The Require login setting covers BuddyNext’s community pages only. Your blog posts, shop and other WordPress pages stay public.
Can only people with a company email join?
Yes. Add your company’s domain to Allowed email domains under Members, then Registration and Login. Only addresses on that domain can register.
How do I approve posts before they are published?
Add the buddynext_premod_mode filter shown in Step 8, choosing new_members, links or all. Held posts appear under Moderation, then Pending. For most communities, auto-hide after a few reports combined with the new-member flag is a lighter alternative.
Can moderators work without WordPress admin access?
Yes. Give them the Moderator community role and point them to the front-end Community Admin at /community-admin/, which includes moderation and reports.
How does BuddyNext handle large communities?
It uses the object cache, cursor-based pagination, background jobs and cache-based rate limits, and offers a full REST API. On your side, add Redis or Memcached, run cron from the server and use a transactional email service. Pro adds WebSocket realtime.
Can I move my BuddyPress or PeepSo community to BuddyNext?
There is no built-in BuddyPress or PeepSo importer in BuddyNext today. If you are planning a migration, plan the move of members, groups and content carefully and test it on a staging copy of your site first.
Can I add courses, forums, events or a job board later?
Yes. Learnomy (courses), Jetonomy (forums), Eventonomy (events), WB Listora (directory) and WP Career Board (jobs) all plug into the same feed, profiles, spaces and notifications. Jetonomy works with free BuddyNext; the courses, events, directory and jobs bridges are part of BuddyNext Pro.
Start small, then grow
A good community is not built in an afternoon, but the software part can be. Install BuddyNext, WPMediaVerse and BuddyX, walk through the seven-step wizard, set your message and moderation rules, decide how private you want to be, and invite your first 50 members personally. When the community needs courses, events, a directory, jobs or paid memberships, add them to the same site without moving anyone.
Start building a community you own.