
Recently, I discovered an interesting website for LearnDash memberships when I was looking for photography classes on the internet. The website offers a great mixture of videos to begin learning photography from the comfort of your own home.
Here’s the interesting part, however!
After browsing the site for a while I discovered that I could take advantage of the photography classes by signing up for a subscription that is available as a monthly or annual package that is subsidized. But that’s not all! I could gain access to all of the courses that are available on the site by becoming an active member.
My first thought was to look at the different types of courses available at the site. It was a delight to see that there were courses in web development and marketing subjects that I am interested in.
The thought of taking all the classes for a reasonable amount of $19.99per month had me feel a bit confused (*exaggeration*) and I’d decided to sign to join the program soon.
Why would you want to create an online membership site?
Customers do not mind paying every month to access massive amounts of information, instead of a one-time fee for data that is limited.
Additionally, in any scenario, the brain of the human-designed to limit losses. The membership model, with the option to cancel the membership when not satisfied, lets the user take advantage of this option.
Both of these factors together improve the chances of turning visitors into customers. Of course, from now to the present, it’s all about the content available on your e-learning website. As a webmaster that implies an increase in the number of users as well as the steady flow of money from registered users.
Create Groups to help your LearnDash Viewers
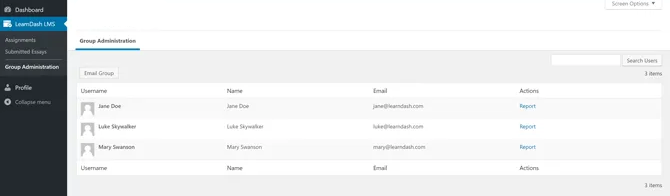
One of the benefits of LearnDash memberships is that you can sell as many courses within a bundle as you wish to. Instead of asking students to pay for each course related to a topic, you can group them into a single group. LearnDash categorizes their memberships as courses groups So pay attention to the term.
Also Read: Essential WordPress Plugins To Use On Your Website
Use these suggestions to set up a LearnDash membership group:
1. Prices your memberships or groups according to one-time or monthly payments.
Monthly subscriptions usually yield more profit, but the majority of students who are new to the field do not want to invest more money for something they’ve never done before. LearnDash will explain how you can charge your customers using PayPal, Stripe, or WooCommerce.
2. Make sure that each group has a set of restrictions.
You should ensure that they’re only accessible to members of the group. Click on ‘ Protect Group Content within WordPress using the LearnDash plug-in and then select the post types supported by LearnDash that must be exclusive.
3. Designate group leaders when you have a large group.
They can manage groups by introducing new courses to the group, handling issues with customer service, and more. It’s an excellent way to manage or outsource a LearnDash memberships level without feeling overwhelmed.
4. Decide if you would like to create sub-groups.
The sub-groups break up each membership level down into smaller pieces that are more manageable of a topic. For instance, if, for example, you are selling a membership group for guitar players who are beginning to learn it is possible to create one sub-group to practice fingerpicking as well as one for strumming patterns.
5. Create appealing layouts for courses that will attract potential customers.
You can offer your bundles and showcase what’s available to those who are thinking of signing up to the membership level. This will make it easier for people to upgrade, or for newcomers to join your group.
Numerous advantages offer numerous benefits that make LearnDash groups a necessity for many businesses and individuals. If you’d rather use simpler managing tools or the most effective sales tabs, establishing the right community for your clients will surely take your company to the next stage.
Go to the next section to find out more about how to create the membership level you want to have.
You can create multiple membership levels
It is by far the most vital element of the whole procedure. The creation of membership tiers will demonstrate the amount that your LearnDash customers will have to pay for access to the information. As a guideline, limit your choices at three to four levels. A lot of levels can make it difficult for the user to decide which usually leads to them choosing the least expensive choice.
Also Read: How To Use BuddyPress To Create Social Network On WordPress
Without further delay, we’ll go over how to create levels of membership.
- Locate the Memberships tab in Your WordPress dashboard. Select it, and then look at the ‘settings’ option. Select Create a Membership. This will allow you to create as many memberships as you’d like to assign courses to each level.
- It is also possible to create membership coupons that offer discounts to prospective customers. Paid Memberships Pro includes an instructional video and also makes videos to explain the benefits of each level of membership.
- Think about creating tabs for groups to allow members to join conversations that are exclusive to them. It is possible to create communities based on membership levels.
Connect Courses to Memberships
When you click on the Membership Creation tab, you’ll gain access to various actions. You can, for example, select which courses and other objects you can connect with at every level.
This option lets you decide the level of exclusivity you would like each level of membership to be. Therefore, it’s crucial to determine the benefits you’d like to provide to each member.
How do you link the classes to levels of membership?
- Click the checkbox on each item you’d like to add to your list. These include courses, rewards, tests and group discussions and communities, priority pages, and any other content you’ve designed to add to the LearnDash program. Most of the additions will bear the course’s label, however, you can include virtually every website to your membership.
- Choose which courses will require memberships and which courses will be offered for free. Certain companies choose to create free courses to introduce new customers to the program. This lets students test the courses before making a financial commitment. It is possible to separate the classes by membership level or give everyone access to every feature.
If you’ve completed the course, but you have to upgrade your membership level there’s no reason to be out of luck. There’s a trick that will make sure that every course is up to the speed you want it to be. Take these actions to ensure that your courses are unique:
- Locate it on the LearnDash software for managing learning within the WordPress panel.
- Find the course you wish to make exclusive, and then select ‘ Require Membership.’
- Determine the level of membership the viewer needs to be to access and view the content.
- Follow steps one to three for each level higher than the membership requirement from step 3. It’s crucial to add the membership requirements for each level by hand, or those who pay the highest sum of money will not enjoy the benefits offered by lower tiers.
Close Exclusive Courses and Link to the Pages
Once you’ve linked all the courses to members, it’s now time to end the loop. If you don’t do this step, members have access to any of the courses or features that you provide without acquiring the membership.
The best part is that it’s very simple to shut down the courses that are exclusive and link them to the appropriate websites.
Also Read: Free Google Analytics Plugins for WordPress
Here’s The Procedure:
- Go to the menu for courses within the LearnDash LMS menu.
- Look for an option called Course Access Settings Option Click on the Access Mode.
- Select the relevant items for the course. You have the option of choosing Open or Free and Buy Now Recurring, closed.
- In this case, select the Closed option, and then enter the URL of the course.
- To find the URL you need you must go to the Membership Settings tab of the LearnDash WordPress plugin Click Pages, then click on View Pages.
If someone clicks the Learn More button, you’ll get directed to the URL you specified. It is recommended to preview your course before launching your course78 or making it up on your website.
If they visit the URL but do not have the membership level required the item will appear in their shopping cart in which they’ll be able to buy the upgrade.
Summary
Making memberships available through the account of your LearnDash Account can make all the significant difference when working on WordPress.
It is possible to create multiple levels that allow your members to gain access to exclusive classes as well as rewards, group discussion, and prioritized coaching. It’s an excellent way to get new users to try low-level memberships before investing in premium memberships.
Make sure that the benefits are worth each membership level. It’s not necessary to go beyond the three- or four-level threshold in most firms. The excess of levels makes each level less appealing.
Interesting Reads:
WordPress Dating Themes
WooCommerce Social Media Plugins
Gamification Plugins For Your WordPress Site