
Quick Start - First-time setup
Free themeThis is the walkthrough every BuddyX site needs, regardless of what kind of site you're building. It's 8 required steps plus 1 optional step (the dark-mode toggle), about 45 minutes start to finish. When you're done, your site looks professional and is ready for real visitors.
After this, jump to Choose Your Path to pick what kind of site you're building (blog / portfolio / business / community).
Build pages faster: install the free Wbcom Essential plugin right after the theme. It adds Gutenberg blocks, Elementor widgets, and BuddyPress blocks that inherit your theme colors automatically. Paired with BuddyX's 27 built-in block patterns (ready-made hero, pricing, contact, and feature sections you drop into any page), you can assemble a full site in minutes instead of building every section by hand.
Before you start
You need:
- A WordPress site (WordPress 6.5 or newer, PHP 8.1 or newer)
- Admin access (you can reach
wp-admin) - About 45 minutes and a logo file ready (PNG or SVG, transparent background ideal)
Terms used here: "Customizer" = WordPress's live preview tool at Appearance → Customize. Every theme setting in BuddyX lives there. Changes don't go live until you click Publish.
Step 1 - Install + activate the theme (2 minutes)
Two install paths - pick whichever you prefer:
Option A: Install from WordPress.org (recommended for most)
- Go to Appearance → Themes → Add New
- Search for BuddyX
- Click Install on the BuddyX card, then Activate when the button changes
Option B: Upload a zip
- Download
buddyx.zipfrom wordpress.org/themes/buddyx or the GitHub release page - Go to Appearance → Themes → Add New → Upload Theme
- Choose
buddyx.zip→ Install Now → Activate
Your site front page should now show BuddyX's default look. Don't worry if it looks generic - that's fixed in the steps below.
Step 2 - Site identity: logo, title, tagline, favicon (5 minutes)
Go to Appearance → Customize → Site Identity.
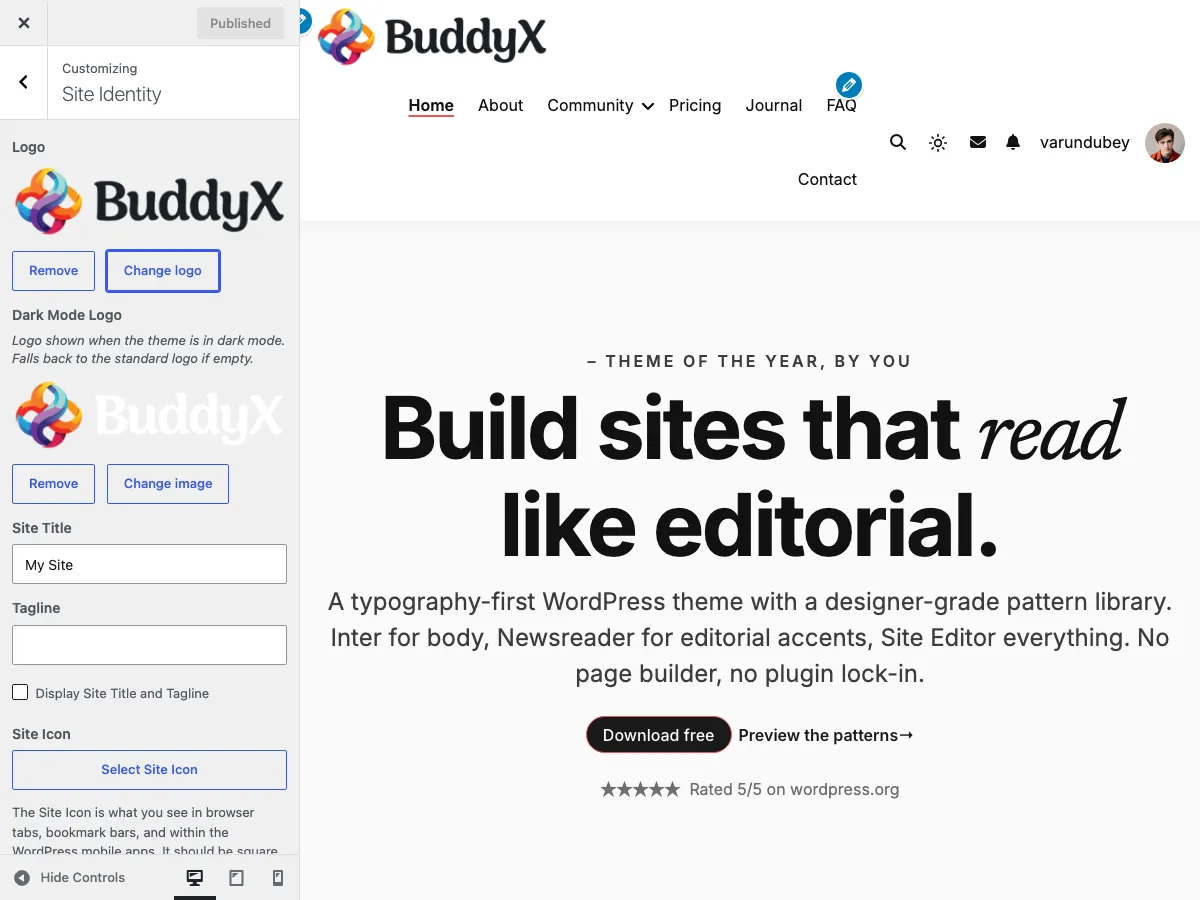
| Setting | What to set | Why |
|---|---|---|
| Logo | Upload your logo (PNG/SVG with transparent background) | Replaces the text site title in the header |
| Dark Mode Logo (BuddyX 5.1.0) | Optional alternate logo that shows when the site is in dark mode | Lets a dark-on-light logo flip to light-on-dark so it stays readable |
| Site title | Your site's name | Shows in the browser tab + search results, and as a fallback if you skip logo |
| Tagline | A short one-line description (optional) | Shows below the title on some layouts and in search-engine listings |
| Site icon (favicon) | Square image, 512×512 recommended | The tiny icon in browser tabs and bookmarks |
Click Publish at the top.
First-time tip: A simple horizontal logo (PNG, transparent background, around 200px wide) works for almost any layout. If you don't have one yet, leave it blank and your Site Title will display as text - that's perfectly fine for now.
Dark Mode Logo tip: only set this if your main logo doesn't read well on a dark background. If you skip it, BuddyX uses your standard logo in both modes - fine for most logos.
Step 3 - Colors: pick your brand color (5 minutes)
Go to Appearance → Customize → Site Skin.
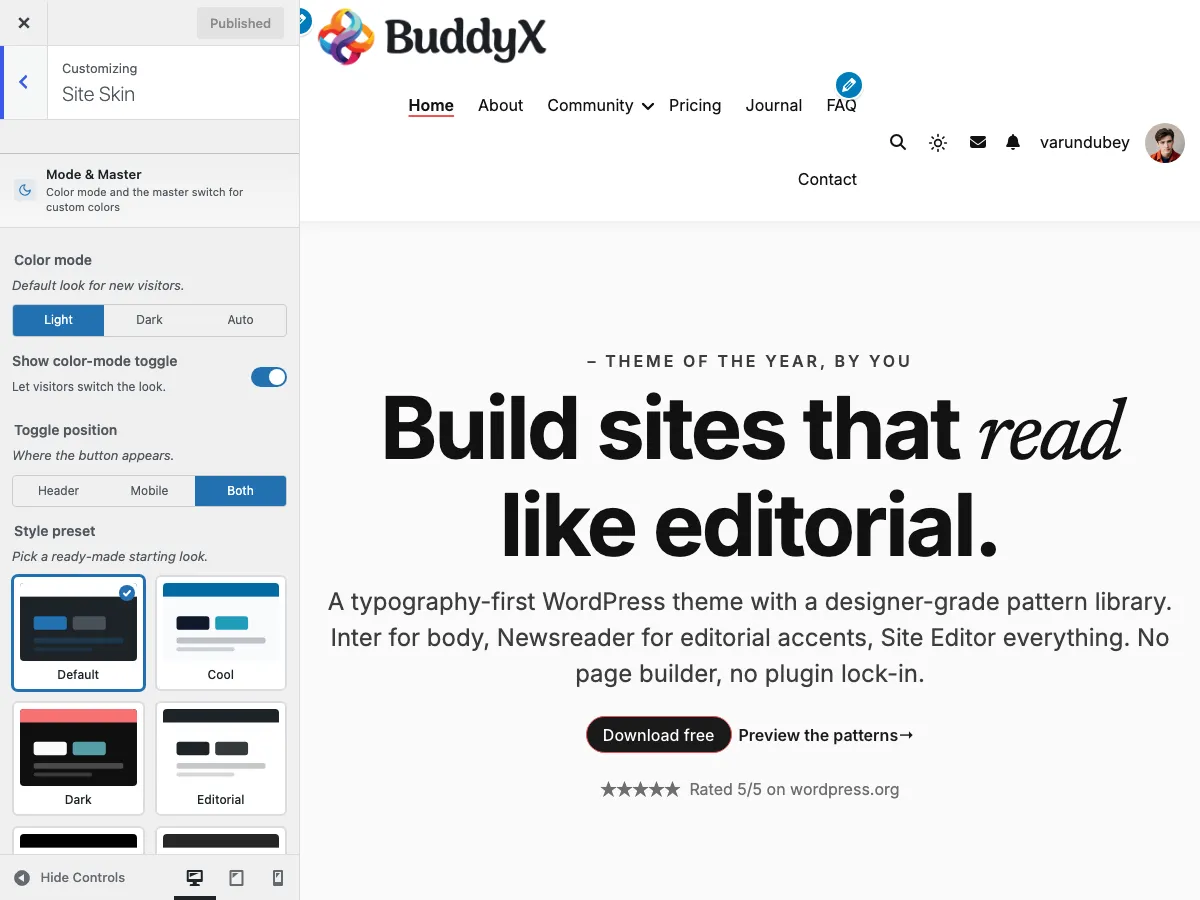
You have two paths - pick one:
Path A - Use a style preset (fastest)
- Find the Style preset picker (Default + 8 presets, 9 options total: Default, Cool, Dark, Editorial, Minimal, Monochrome, Pastel, Vibrant, Warm)
- Click a preset - the preview updates immediately
- Click Publish
That's it. Each preset is a complete palette designed to look good together. If you want to fine-tune later, any custom color you set below the preset always takes priority over the preset's defaults.
Path B - Set custom colors
- Scroll to Brand → Site Primary Color (the default is the BuddyX red
#ef5455) - Pick your brand color from the color picker
- (Optional) Adjust the Buttons subsection - by default buttons inherit the primary color
- (Optional) Adjust Body, Headings, Header, Footer background and text colors if needed
- Click Publish
Don't overthink it: most sites only need to set 1-3 colors. The default palette already has good contrast everywhere. Set your brand color and move on - you can always come back later.
For the full color reference, see skin-colors/color-scheme.md.
Step 4 - Fonts: pick a body font + heading font (5 minutes)
Go to Appearance → Customize → Typography.
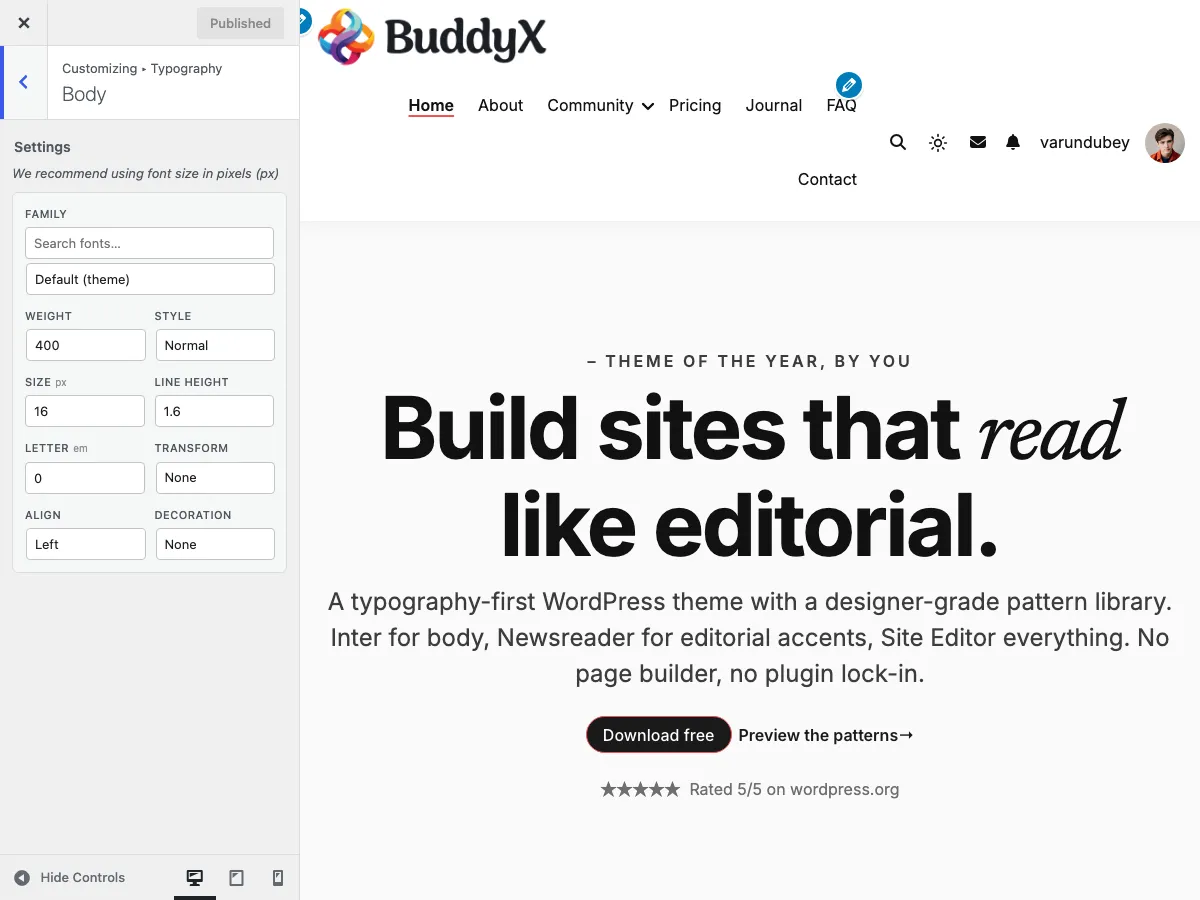
| Section | What to set | Recommended |
|---|---|---|
| Body Typography | Font family + base size | A readable sans-serif (Inter, Open Sans, Lato) at 16px |
| Headings → H1, H2, H3 | Font family (often the same family or a contrasting one) | Pair a serif for headings + sans-serif for body, OR one family for everything |
BuddyX includes the entire Google Fonts catalog (1000+ fonts). All free. All licensed for commercial use.
Click Publish.
Two-font rule of thumb: pick one heading font + one body font. More than two fonts on a page looks chaotic. If unsure, set everything to the same family - that always looks clean.
Performance tip: After picking fonts, go to Customize → Site Performance and turn on Load Google Fonts locally - Google Fonts will be cached on your server instead of pulled from Google's CDN. Faster page loads, better privacy.
Step 5 - Header + menu (8 minutes)
Step 5a - Build the menu (5 minutes)
WordPress menus live at Appearance → Menus (not Customize). One-time setup:
- Appearance → Menus → Create a New Menu
- Name it
Primary(or anything - it's just for your reference) - From the left panel, add pages: Home, About, Blog, Contact (or whatever pages you have)
- Drag items to reorder. Indent an item to make it a sub-item (dropdown)
- Under Menu Settings → Display location, check Primary (the location BuddyX uses for the main header menu - mobile inherits this menu automatically)
- Click Save Menu
Don't have these pages yet? That's fine - see Step 7 below. You can come back and add them to the menu after.
Step 5b - Header layout + features (3 minutes)
Go to Appearance → Customize → Site Header.
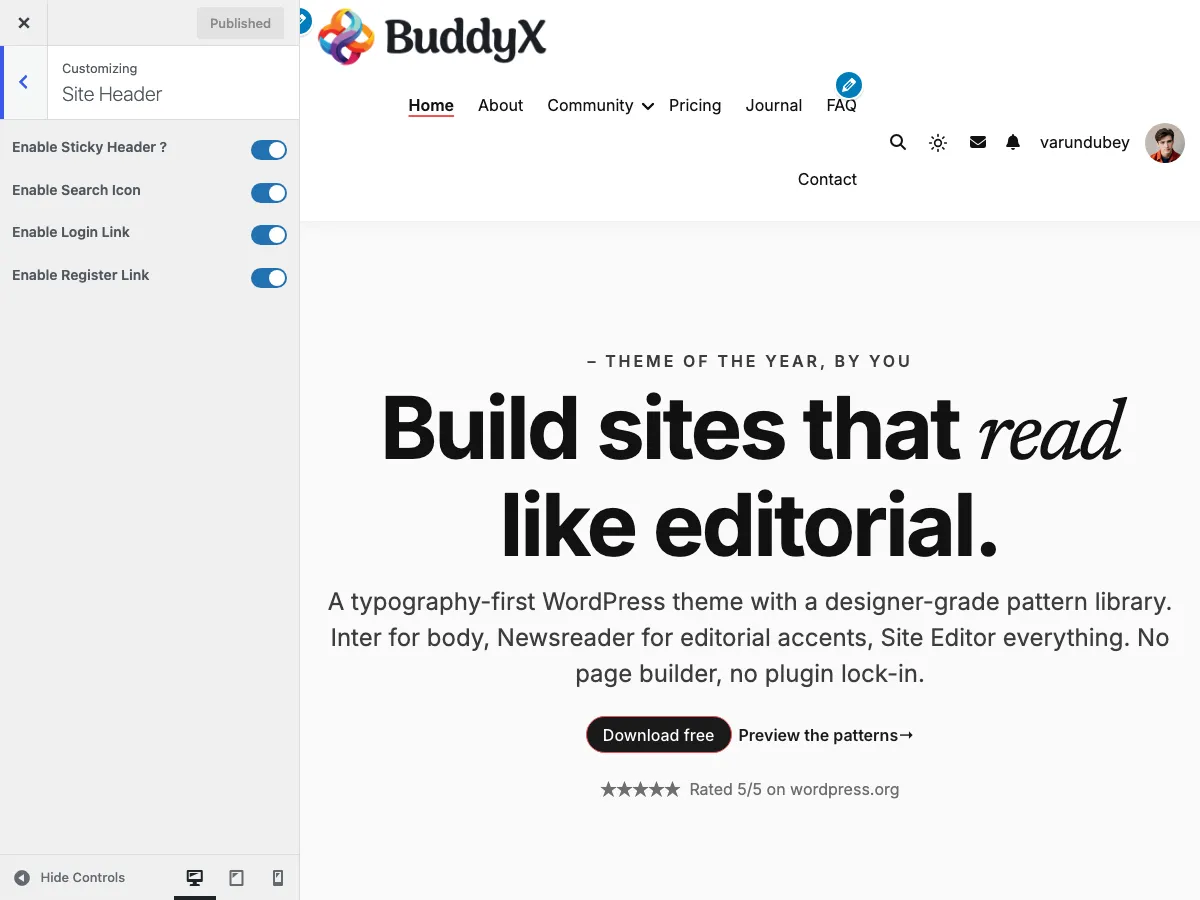
| Setting | What it does |
|---|---|
| Sticky header (on by default) | The header stays visible as visitors scroll. Recommended on. |
| Search icon (on by default) | Shows a search icon in the header so visitors can find content. |
| Sign-in / Register links (on by default) | Shows "Sign in" / "Register" links in the header. Useful for community sites; turn off for purely brochure sites. |
| Cart icon (conditional) | Shows only if WooCommerce/FluentCart/SureCart is active. Auto-hides on non-shop sites - that's why you won't see this toggle until you install one of those plugins. |
Click Publish.
Step 6 - Footer (5 minutes)
Step 6a - Footer widgets (3 minutes)
WordPress widgets live at Appearance → Widgets (not Customize).
- Go to Appearance → Widgets
- You'll see 4 footer widget areas: Footer 1, Footer 2, Footer 3, Footer 4
- Add what's relevant - common choices:
- Footer 1: a "Search" widget or "About" text block
- Footer 2: "Recent Posts" widget
- Footer 3: a "Navigation Menu" widget pointing to a "Useful Links" menu
- Footer 4: "Custom HTML" widget with your social-media icons or contact info
Leave any area empty and that column collapses. You're not required to fill all 4.
Step 6b - Copyright text (2 minutes)
- Appearance → Customize → Site Footer → Copyright
- Edit the copyright line. The default
© [year] [site name]is fine to start - Click Publish
Step 7 - Essential pages (10 minutes)
Every professional site needs at least these 4 pages. Create them now even if you don't have full content yet - you can fill them in later.
For each, go to Pages → Add New:
| Page | Title | Starting content |
|---|---|---|
| Home | Home |
A few sentences about what your site does. Add a hero image + a "Learn more" button (or block patterns - see below) |
| About | About |
Your story / company background. 2-4 paragraphs is plenty. Add a team photo if you have one |
| Contact | Contact |
Your email, phone, optional address. Or embed a contact form (use a plugin like WPForms or Contact Form 7) |
| Privacy Policy | Privacy Policy |
WordPress generates a draft for you at Settings → Privacy. Customize it for your site |
Use BuddyX block patterns to build pages faster: when editing a page, click the
+button → Patterns → BuddyX. You'll see ready-made sections (hero, pricing, contact, features grid). Drop one in, replace the placeholder text with your content. Saves an hour vs. building from scratch.
Don't forget: set the Privacy Policy page
- Settings → Privacy → Select a Privacy Policy page → Privacy Policy (the page you just created)
- Save
Step 8 - Set your homepage (3 minutes)
By default, WordPress shows your latest blog posts at the root URL. For most sites, you want a static landing page instead.
- Settings → Reading
- Under Your homepage displays, choose A static page
- Homepage: pick the Home page you created in Step 7
- Posts page: pick a page named Blog (create one first if you don't have one - empty page, just titled
Blog) - Save Changes
When a visitor lands at
yoursite.com/, they now see your Home page. The Blog page lists all your posts. Standard pro-site setup.Want a blog-style homepage instead? (Latest posts at the root URL.) Skip this step entirely and choose Your latest posts instead of A static page.
Step 9 - (Optional) Dark mode toggle (2 minutes)
BuddyX includes a built-in dark mode. Visitors can switch between light and dark.
Go to Appearance → Customize → Site Skin → Color Mode (Color Mode is the first subsection of Site Skin - see the screenshot in Step 3).
| Setting | Default | What it does |
|---|---|---|
| Default color mode | Light | What new visitors see (Light / Dark). |
| Show color-mode toggle | On (Show) | Adds a sun/moon button visitors can use to switch modes. |
| Toggle position | Both | Header (next to menu icons) / Mobile (mobile menu only) / Both. |
The toggle is on by default - visitors get to choose. If you want a one-look-only site, set Show color-mode toggle to Hide.
Click Publish.
The sun/moon icon then appears in your header. Visitors clicking it toggle Light ↔ Dark and the choice is remembered across page loads.
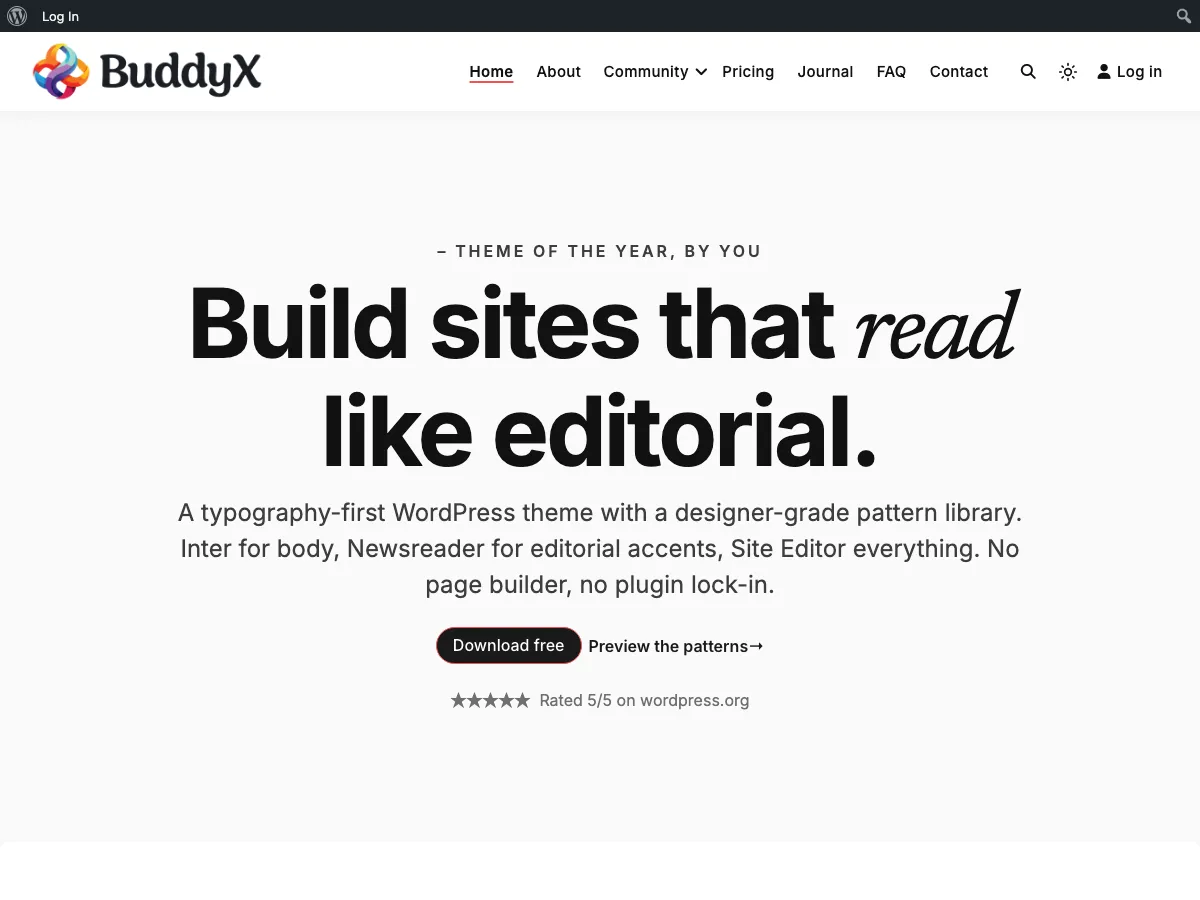
After click → dark mode applies and persists. No flash of light mode on subsequent page loads (FOUC-free first paint).
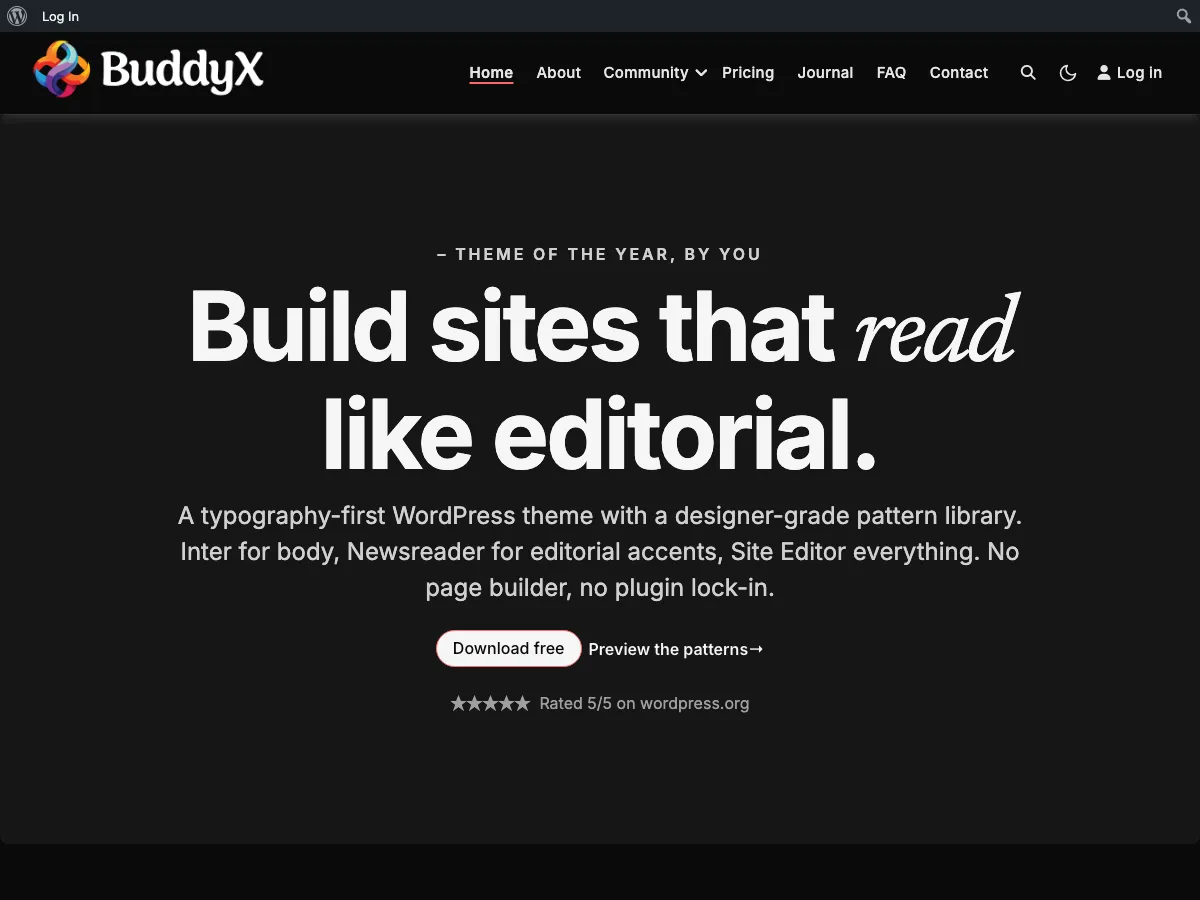
Dark mode is fully wired across every page: blog, BuddyPress community surfaces, WooCommerce (if active), comments, forms. No flash-of-wrong-color on page load. See skin-colors/dark-mode.md for the full reference.
You're done
Your site now has:
- A logo, title, tagline, and favicon
- A brand color (and a starting palette: Default + 8 presets, 9 options)
- A primary body font + heading font
- A working header + menu
- A footer with widgets and copyright
- Home, About, Contact, and Privacy Policy pages
- A static homepage with a separate Blog page
- Dark mode (if you enabled it)
Total time: ~45 minutes if you have a logo ready and don't get distracted picking fonts.
What's next?
Now that the basics are in place, pick what kind of site you're building. Each path has different next steps:
Common paths: personal/company blog, portfolio, business / brochure, community / social site.
Or browse focused recipes:
| Recipe | What you'll build |
|---|---|
| Match the demo design | Your site looks like the published BuddyX demo |
| Customize colors and fonts | A site that reflects your brand colors and typography |
Common questions
My logo is huge / tiny. How do I resize it? WordPress's default logo size works for most logos. If yours doesn't fit, resize the source image (use Canva, Photoshop, or a free tool like Squoosh.app) before uploading. The most common good logo size is around 200×60 pixels for horizontal logos or 60×60 for square ones.
Where do I add my social media links? BuddyX doesn't ship a dedicated social-icons setting. Use a footer widget (Step 6a) with a "Custom HTML" widget containing your social links, OR install a free plugin like "Social Icons Widget" - the icons then go into any widget area.
I don't see the "Style preset" picker in Step 3. You're probably on an older version. The style presets (Default + 8 presets, 9 options) shipped in BuddyX 5.1.0. Update to the latest version at Dashboard → Updates if available, or download fresh from wordpress.org.
Can I undo a change? Yes - every Customizer change is staged in the preview until you click Publish. If you regret a change after publishing, just go back to that setting and change it again. There's no "version history" for Customizer changes, but every setting is editable forever.
Do I have to use BuddyPress? No. BuddyX works perfectly as a regular blog / business / portfolio theme without BuddyPress. The community features only activate when the BuddyPress plugin is installed. See Choose Your Path for non-community paths.
Related
- Introduction to BuddyX - what BuddyX is + who it's for
- Choose Your Path - pick your site type after this Quick Start
- Installation Guide - detailed install + activation reference
- Glossary - plain-English definitions of every WordPress + BuddyX term
Stuck on a step? Post on the WordPress.org BuddyX support forum, open an issue at the BuddyX GitHub repo, or email support@wbcomdesigns.com. Friendly help is one click away.