
Header Presets
Pro featureBuddyX Pro ships five ready-made header presets so you can set your header's visual personality with a single click. A preset is a style choice - it decides how the header looks (solid bar, transparent overlay, frosted glass, and so on), while your menu arrangement and header icons stay exactly where you put them. Pick a preset first to set the overall feel, then fine-tune the individual controls underneath.
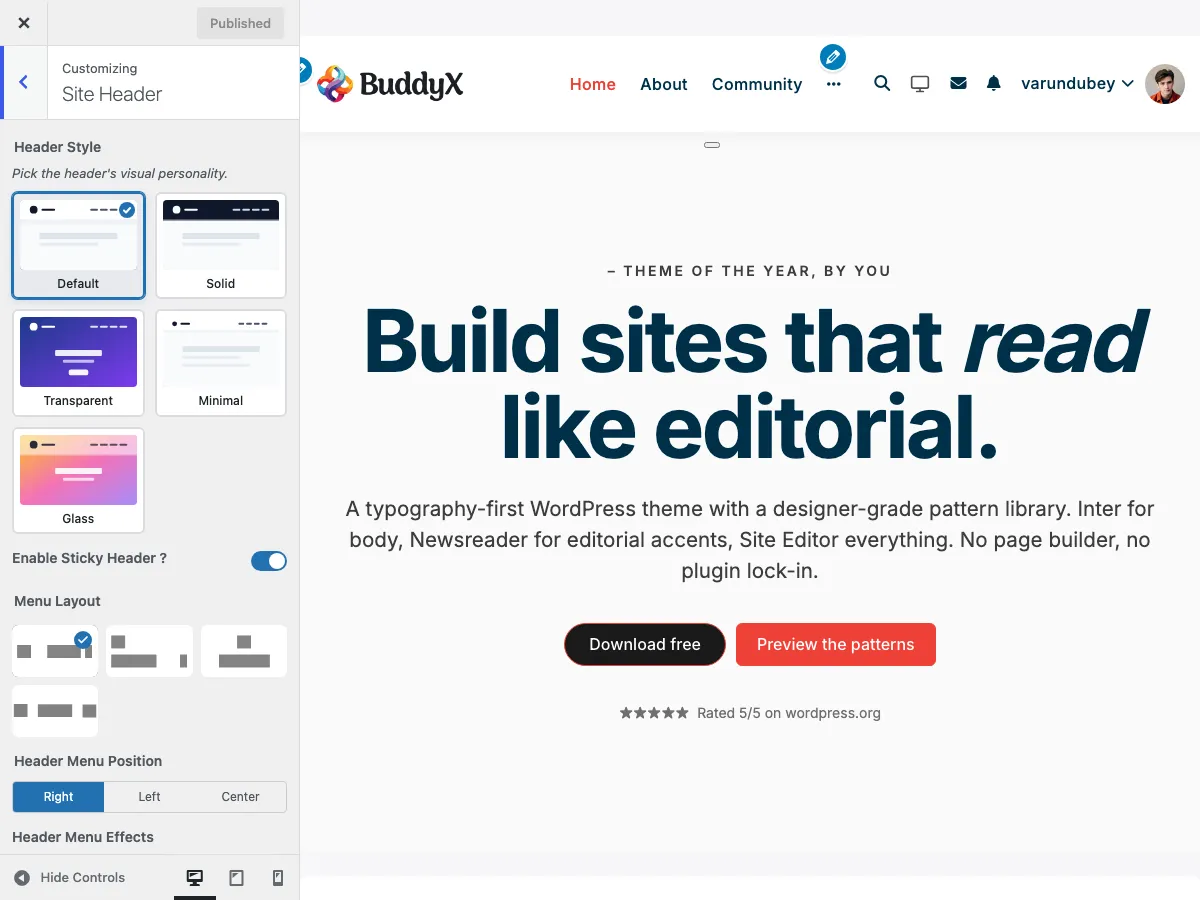 The Site Header section in the WordPress Customizer, where the Header Style presets live at the top.
Where Presets Fit
BuddyX Pro splits the header into two independent choices so they stop overlapping:
| Choice | Control | What it does |
|---|---|---|
| Header Style | Header presets (this page) | The header's visual personality - background, shadow, blur, height |
| Menu Layout | Header Layouts | Where the logo and menu sit inside the header |
You set them separately. A Glass style with a Logo Center, Menu Below layout is a perfectly valid combination, and so is any other pairing. The preset never moves your menu, and the layout never changes your background.
Applying a Preset
- Go to Appearance > Customize
- Navigate to Header > Site Header
- Find Header Style at the top of the section
- Click the preset card you want - the live preview updates so you can compare
- Click Publish
That is the whole flow. One click sets the header style site-wide, and the preview shows the result before you commit.
The Five Presets
Each card carries a short description in the Customizer so you can pick without guessing. Here is what each one does.
Default
The standard Pro header. Solid background with a soft shadow that appears on scroll. This is the baseline every existing site already uses, so choosing it (or leaving it) keeps your header rendering exactly as before.
Best for: most community, business, and membership sites that want the familiar BuddyX Pro look.
Solid
A flat colored bar with a 1px bottom border and no shadow. Cleaner and more grounded than Default, with a brand-color underline instead of a drop shadow.
Best for: sites that prefer a crisp, flat header without depth effects.
Transparent
The header sits over the hero or page cover with no background fill, letting the image or color behind it show through.
Best for: landing pages and any page that opens with a cover image. Pair this with a per-page override (below) so the transparent header applies only where you have a hero to sit over.
Minimal
A thin, compact bar with a 1px divider and no shadow. Trims the header height so more of the page shows above the fold.
Best for: editorial, blog, and magazine-style sites where the content should lead and the header should stay quiet.
Glass
A frosted-glass effect - a backdrop blur behind a semi-transparent fill. Content scrolling underneath is softly visible through the header.
Best for: modern, image-rich sites that want a contemporary, layered feel.
Preset Comparison
| Preset | Background | Shadow / Border | Height | Best For |
|---|---|---|---|---|
| Default | Solid | Soft shadow on scroll | Standard | General / community |
| Solid | Solid flat | 1px bottom border | Standard | Flat, crisp designs |
| Transparent | None (overlay) | None | Standard | Hero / cover pages |
| Minimal | Solid | 1px divider | Thin | Editorial / blogs |
| Glass | Semi-transparent + blur | None | Standard | Modern, image-rich |
Customizing After You Pick
A preset is a starting point, not a lock-in. Once a style is applied, every other Site Header control still works normally on top of it:
- Menu Layout - reposition the logo and menu. See Header Layouts.
- Header icons and elements - toggle search, cart, notifications, messages, login, and register. See Header Elements.
- Sticky Header - keep the header fixed on scroll. See Sticky Header.
- Colors and dark mode - the preset respects your theme colors and switches cleanly between light and dark, so a Glass or Solid header recolors automatically when a visitor flips the dark-mode toggle.
Change the preset any time - your menu, icons, and other header settings are untouched when you switch styles.
Overriding the Preset on a Single Page
The Header Style you choose in the Customizer is the site-wide default, but you can override it for one specific entry - handy when you want a Transparent header only on a landing page that has a hero image.
- Edit the page or post
- Open the Page Settings panel
- Go to the Header & Footer tab
- Set Header style to the preset you want for this entry (leave it on Default to inherit the site-wide choice)
- Update the page
The per-entry choice wins on that page only. Everywhere else keeps the Customizer setting.
Tip: Transparent headers look best over a full-width cover image. Set the page-level Header style to Transparent, add your hero, and leave the rest of the site on your standard preset.
Notes for Upgraders
If you are upgrading an existing BuddyX Pro site, the Default preset is already selected, so your header renders exactly as it did before. Presets are additive - nothing about your current header changes until you choose a different card.
Related Documentation
- Header Layouts - Position the logo and menu
- Header Elements & Icons - Configure header icons and buttons
- Sticky Header - Fixed header on scroll
- Mobile Header - Mobile-specific header behavior
- Topbar Settings - The bar above the header
Need a hand? Our team is happy to help - email us at support@wbcomdesigns.com.